Trazado de una tabla HTML mediante JavaScript y la Interface DOM
Introducción
Este artículo es un resumen de algunos métodos DOM nivel 1 poderosos y fundamentales así como una descripción de cómo utilizarlos utilizando Javascript. Aprenderás a crear, accesar, controlar, y remover elementos HTML dinámicamente. Los métodos DOM presentados aquí no son específicos de HTML; también aplican para XML. Las demostraciones aquí proporcionadas funcionarán en cualquier navegador moderno, incluyendo todas las versiones de Firefox e IE 5+.
Nota: Los métodos DOM presentados aquí forman parte del Modelo de Documento basado en Objetos (DOM: Document Object Model por sus siglas en inglés) de especificación nivel 1. DOM nivel 1 incluye métodos tanto para acceso genérico del documento (DOM 1 Core) así como métodos específicos para documentos HTML (DOM 1 HTML).
Ejemplo: Crear una tabla HTML dinámicamente (Ejemplo1.html)
Contenido HTML
<input type="button" value="Genera una tabla" onclick="genera_tabla()" />
JavaScript Content
function genera_tabla() {
  // Obtener la referencia del elemento body
  var body = document.getElementsByTagName("body")[0];

  // Crea un elemento <table> y un elemento <tbody>
  var tabla = document.createElement("table");
  var tblBody = document.createElement("tbody");

  // Crea las celdas
  for (var i = 0; i < 2; i++) {
    // Crea las hileras de la tabla
    var hilera = document.createElement("tr");

    for (var j = 0; j < 2; j++) {
      // Crea un elemento <td> y un nodo de texto, haz que el nodo de
      // texto sea el contenido de <td>, ubica el elemento <td> al final
      // de la hilera de la tabla
      var celda = document.createElement("td");
      var textoCelda = document.createTextNode(
        "celda en la hilera " + i + ", columna " + j,
      );
      celda.appendChild(textoCelda);
      hilera.appendChild(celda);
    }

    // agrega la hilera al final de la tabla (al final del elemento tblbody)
    tblBody.appendChild(hilera);
  }

  // posiciona el <tbody> debajo del elemento <table>
  tabla.appendChild(tblBody);
  // appends <table> into <body>
  body.appendChild(tabla);
  // modifica el atributo "border" de la tabla y lo fija a "2";
  tabla.setAttribute("border", "2");
}
Observa cuidadosamente el orden en el que se crearon los elementos en el nodo de texto:
- Primero se crea el elemento <table>.
- Posteriormente, creamos el elemento <tbody> , que es el hijo del elemento <table> .
- Después, utilizamos ciclos para crear los elementos <tr>, que son hijos del elemento <tbody>.
- Para cada elemento <tr>, utilizamos nuevamente ciclos para generar los elementos <td> que son hijos de los elementos <tr>.
- Para cada elemento <td>, creamos nodos de texto con el contenido de cada celda.
Una vez creados los elementos <table>, <tbody>, <tr>, y <td> así como los nodos de texto, adicionamos a cada hijo bajo su padre en el órden opuesto:
- Primero, anexamos cada nodo de texto a su elemento padre <td> :
celda.appendChild(textoCelda);
- Posteriormente, anexamos cada elemento <td> a su elemento padre <tr> :
hilera.appendChild(celda);
- Posteriomente, anexamos cada elemento <tr> a su elemento padre <tbody>:
tblBody.appendChild(hilera);
- Después, anexamos el elemento <tbody> a su elemento padre <table>:
tabla.appendChild(tblBody);
- Finalmente, anexamos el elemento <table> a su elemento padre <body>:
body.appendChild(tabla);
Recuérda esta técnica. Te será muy útil en la programación bajo el estándar W3C DOM. Primero, creas los elementos de arriba a abajo; posteriormente adicionas los hijos a los padres de abajo a arriba.
A continuación aparece el código HTML generado por el código JavaScript:
...
<table border="2">
    <tbody>
        <tr><td>celda en la hilera 0, columna 0</td><td>celda en la hilera 0, columna 1</td></tr>
        <tr><td>celda en la hilera 1, columna 0</td><td>celda en la hilera 1, columna 1</td></tr>
    </tbody>
</table>
...
Aquí está el árbol de objetos DOM generado por el código del elemento <TABLE> :
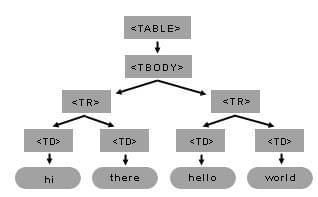
Tú puedes construir esta tabla y sus elementos internos utilizando sólo algunos de los varios métodos del DOM. Recuerda tener en mente el modelo de la estructura que planeas crear; esto hará mucho más fácil la escritura del código necesario.
En el árbol del elemento <table> de la Figura 1, el elemento <table> tiene solamente un hijo mientras que <tbody> tiene dos. A su vez, cada hijo de <tbody> tiene dos hijos. Finalmente, cada elemento <td> tiene sólo uno, el nodo de texto.
Ejemplo: Configuración del color de fondo de un párrafo
getElementsByTagName(tagNameValue) es un método disponible en cualquier elemento DOM o el elemento raíz del documento. Cuando se le llama, devolverá una matriz con todos los descendientes de elementos que coincidan con el nombre de la etiqueta. El primer elemento de la lista se encuentra en la posición [0] de la matriz.
HTML Content
<body>
  <input
    type="button"
    value="Set paragraph background color"
    onclick="set_background()" />
  <p>hi</p>
  <p>hello</p>
</body>
JavaScript Content
function set_background() {
  // get a list of all the body elements (there will only be one),
  // and then select the zeroth (or first) such element
  myBody = document.getElementsByTagName("body")[0];

  // now, get all the p elements that are descendants of the body
  myBodyElements = myBody.getElementsByTagName("p");

  // get the second item of the list of p elements
  myP = myBodyElements[1];
  myP.style.background = "rgb(255,0,0)";
}
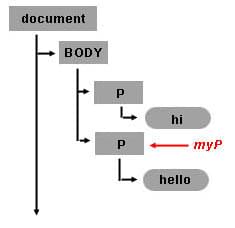
En este ejemplo, establecemos la variable myP en el objeto DOM para el segundo elemento p dentro del body:
- Primero, obtendremos una lista de todos los elementos body mediante
Como en cualquier documento HTML sólo hay un elemento body válido, esta lista tendrá sólo un elemento, que recuperamos seleccionando el primer elemento de esa lista usandojs
myBody = document.getElementsByTagName("body")[0];[0]. - Luego, obtenemos todos los elementos p que son descendientes del body mediante
myBodyElements = myBody.getElementsByTagName("p"); - Finalmente, obtenemos el segundo item de la lista de elementos p mediante
myP = myBodyElements[1];
Una vez que haya obtenido el objeto DOM para un elemento HTML, puede establecer sus propiedades. Por ejemplo, si desea establecer la propiedad estilo de color de fondo, agregue:
myP.style.background = "rgb(255,0,0)";
// setting inline STYLE attribute
Creating TextNodes with document.createTextNode("..")
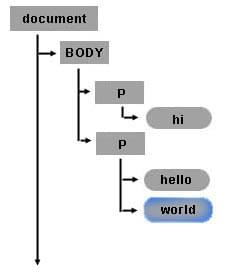
Use the document object to invoke the createTextNode method and create your text node. You just need to pass the text content. The return value is an object that represents the text node.
myTextNode = document.createTextNode("world");
This means that you have created a node of the type TEXT_NODE (a piece of text) whose text data is "world", and myTextNode is your reference to this node object. To insert this text into your HTML page, you need to make this text node a child of some other node element.
Inserting Elements with appendChild(..)
So, by calling myP.appendChild([node_element]), you are making the element a new child of the second <p> element.
myP.appendChild(myTextNode);
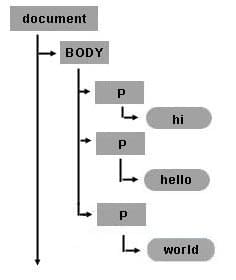
After testing this sample, note that the words hello and world are together: helloworld. So visually, when you see the HTML page it seems like the two text nodes hello and world are a single node, but remember that in the document model, there are two nodes. The second node is a new node of type TEXT_NODE, and it is the second child of the second <p> tag. The following figure shows the recently created Text Node object inside the document tree.
Nota: createTextNode and appendChild is a simple way to include white space between the words hello and world. Another important note is that the appendChild method will append the child after the last child, just like the word world has been added after the word hello. So if you want to append a Text Node between hello and world you will need to use insertBefore instead of appendChild.
Creating New Elements with the document object and the createElement(..) method
You can create new HTML elements or any other element you want with createElement. For example, if you want to create a new <p> element as a child of the <body> element, you can use the myBody in the previous example and append a new element node. To create a node simply call document.createElement("tagname"). For example:
myNewPTAGnode = document.createElement("p");
myBody.appendChild(myNewPTAGnode);
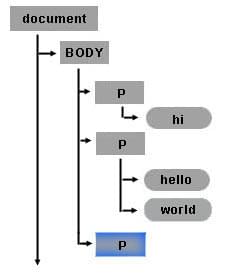
Removing nodes with the removeChild(..) method
Nodes can be removed. The following code removes text node myTextNode (containing the word "world") from the second <p> element, myP.
myP.removeChild(myTextNode);
Text node myTextNode (containing the word "world") still exists. The following code attaches myTextNode to the recently created <p> element, myNewPTAGnode.
myNewPTAGnode.appendChild(myTextNode);
The final state for the modified object tree looks like this:
Creating a table dynamically (back to Sample1.html)
For the rest of this article we will continue working with sample1.html. The following figure shows the table object tree structure for the table created in the sample.
Reviewing the HTML Table structure
Creating element nodes and inserting them into the document tree
The basic steps to create the table in sample1.html are:
- Get the body object (first item of the document object).
- Create all the elements.
- Finally, append each child according to the table structure (as in the above figure). The following source code is a commented version for the sample1.html.
Nota: At the end of the start function there is a new line of code. The table's border property was set using another DOM method, setAttribute. setAttribute has two arguments: the attribute name and the attribute value. You can set any attribute of any element using the setAttribute method.
<head>
<title>Sample code - Traversing an HTML Table with JavaScript and DOM Interfaces</title>
<script>
    function start() {
        // get the reference for the body
        var mybody = document.getElementsByTagName("body")[0];

        // creates <table> and <tbody> elements
        mytable     = document.createElement("table");
        mytablebody = document.createElement("tbody");

        // creating all cells
        for(var j = 0; j < 2; j++) {
            // creates a <tr> element
            mycurrent_row = document.createElement("tr");

            for(var i = 0; i < 2; i++) {
                // creates a <td> element
                mycurrent_cell = document.createElement("td");
                // creates a Text Node
                currenttext = document.createTextNode("cell is row " + j + ", column " + i);
                // appends the Text Node we created into the cell <td>
                mycurrent_cell.appendChild(currenttext);
                // appends the cell <td> into the row <tr>
                mycurrent_row.appendChild(mycurrent_cell);
            }
            // appends the row <tr> into <tbody>
            mytablebody.appendChild(mycurrent_row);
        }

        // appends <tbody> into <table>
        mytable.appendChild(mytablebody);
        // appends <table> into <body>
        mybody.appendChild(mytable);
        // sets the border attribute of mytable to 2;
        mytable.setAttribute("border","2");
    }
</script>
</head>
<body onload="start()">
</body>
</html>
Manipulating the table with DOM and CSS
Getting a text node from the table
This example introduces two new DOM attributes. First it uses the childNodes attribute to get the list of child nodes of mycel. The childNodes list includes all child nodes, regardless of what their name or type is. Like getElementsByTagName(), it returns a list of nodes. The differences are that (a) getElementsByTagName() only returns elements of the specified tag name; and (b) getElementsByTagName() returns descendants at any level, not just immediate children. Once you have the returned list, use [x] method to retrieve the desired child item. This example stores in myceltext the text node of the second cell in the second row of the table. Then, to display the results in this example, it creates a new text node whose content is the data of myceltext and appends it as a child of the <body> element.
Nota: If your object is a text node, you can use the data attribute and retrieve the text content of the node.
mybody = document.getElementsByTagName("body")[0];
mytable = mybody.getElementsByTagName("table")[0];
mytablebody = mytable.getElementsByTagName("tbody")[0];
myrow = mytablebody.getElementsByTagName("tr")[1];
mycel = myrow.getElementsByTagName("td")[1];

// first item element of the childNodes list of mycel
myceltext = mycel.childNodes[0];

// content of currenttext is the data content of myceltext
currenttext = document.createTextNode(myceltext.data);
mybody.appendChild(currenttext);
Getting an attribute value
At the end of sample1 there is a call to setAttribute on the mytable object. This call was used to set the border property of the table. To retrieve the value of the attribute, use the getAttribute method:
mytable.getAttribute("border");
Hiding a column by changing style properties
Once you have the object in your JavaScript variable, you can set style properties directly. The following code is a modified version of sample1.html in which each cell of the second column is hidden and each cell of the first column is changed to have a red background. Note that the style property was set directly.
<html>
  <body onload="start()"></body>
  <script>
    function start() {
      var mybody = document.getElementsByTagName("body")[0];
      mytable = document.createElement("table");
      mytablebody = document.createElement("tbody");

      for (var j = 0; j < 2; j++) {
        mycurrent_row = document.createElement("tr");
        for (var i = 0; i < 2; i++) {
          mycurrent_cell = document.createElement("td");
          currenttext = document.createTextNode("cell is:" + i + j);
          mycurrent_cell.appendChild(currenttext);
          mycurrent_row.appendChild(mycurrent_cell);
          // set the cell background color
          // if the column is 0. If the column is 1 hide the cel
          if (i == 0) {
            mycurrent_cell.style.background = "rgb(255,0,0)";
          } else {
            mycurrent_cell.style.display = "none";
          }
        }
        mytablebody.appendChild(mycurrent_row);
      }
      mytable.appendChild(mytablebody);
      mybody.appendChild(mytable);
    }
  </script>
</html>