Django 튜토리얼 파트 9: 폼(form)으로 작업하기
이 튜토리얼에서 우리는 Django에서 HTML Form 작업 방법을 보여주고 특히 model Instance를 생성,수정,제거 하는 Form을 작성하는 가장 쉬운 방법을 보여줄 것이다. 이 예제의 일부분으로 우리는 도서관직원이 (admin 앱을 이용하기 보다) 우리가 만든 form을 이용하여 책 대여기간을 연장하거나 작가 정보를 생성,수정,제거할 수 있도록 LocalLibrary 웹사이트를 확장할 것이다.
| 사전학습: | 아래 파트를 포함하여 앞선 모든 튜토리얼 파트의 학습을 완료할것 Django 튜토리얼 파트 8: 사용자 인증과 이용권한 (en-US). |
|---|---|
| 학습목표: | 사용자로 부터 정보를 얻고 database를 수정하는 form을 작성하는 방법을 이해하기. 일반 클래스 기반 form 편집용 view가 단독 model로 동작하는 form을 작성할 때 얼마나 많이 단순화할 수 있는지 이해하기. |
개요
HTML 폼(Form) (en-US) 은 웹 페이지상에서 한개 이상의 필드나 위젯들의 묶음을 말하며, 사용자로부터 정보를 수집하여 서버에 제출하는데 사용된다. 다양한 종류의 데이타 입력을 지원하는 위젯들( 텍스트 박스, 체크 박스, 라디오 버튼, 날짜 선택기 등등)이 많이 존재하기 때문에, 폼은 사용자 입력을 수집하는데 유연한 장치라고 할 수 있다. 폼은 또한, 교차 사이트 요청 위조 방지(CSRF protection, cross-site request forgery protection)와 함께 POST요청으로 데이타를 보낼수 있도록 지원하므로, 데이타를 서버와 공유하는데 있어서 비교적 안전한 방법이다.
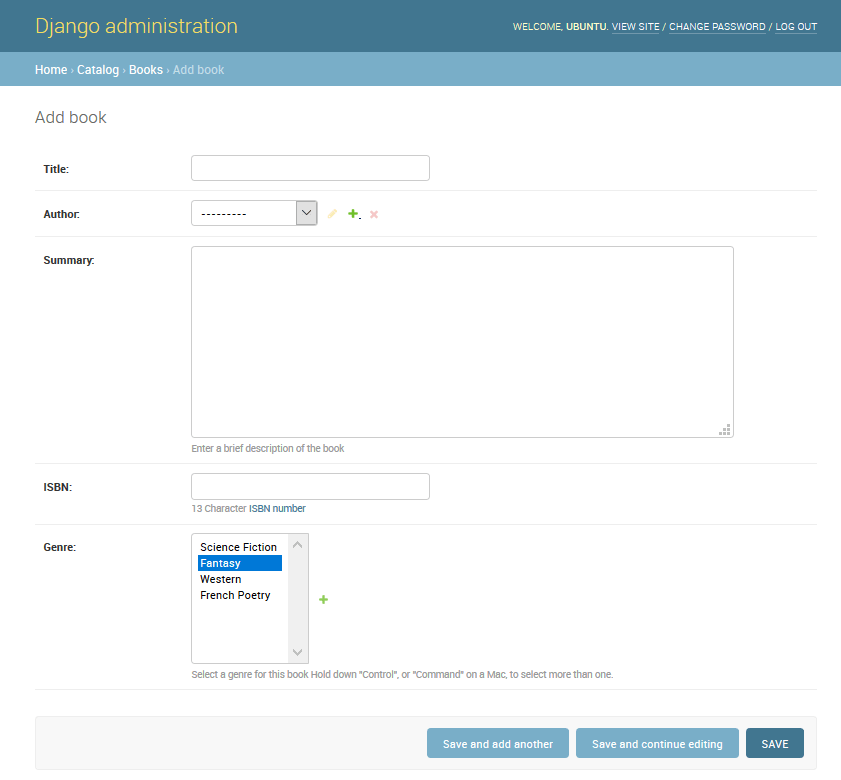
지금까지 이 튜토리얼에서 우리가 직접 폼을 생성한 적은 없지만, Django 관리 사이트에서 이미 경험해 보았다. 예를 들면, 아래 스크린 샷에서 Book 모델중 하나를 편집하는 폼을 보여주고 있는데, 몇개의 선택 목록과 텍스트 에디터를 볼 수 있다.
폼을 개발하는 것은 복잡한 작업이 될수도 있다! 개발자는 일단, 폼을 위한 HTML을 작성해야 하며, 서버로 입력된 (아마도 브라우저로도 입력된) 데이타의 유효성을 검증하고 적절하게 수정하도록 하고, 유효하지 않은 입력에 대해서 사용자가 알 수 있도록 폼을 에러 메시지와 함께 다시 표시해야하며,성공적으로 제출된 데이타를 적절히 처리하고, 마지막으로 성공했을 경우 사용자가 알수 있게 응답하도록 개발 해야 한다. Django 폼은 다음과 같은 기능의 프레임워크를 제공하여 이 모든 단계중 많은 부분을 덜어내 준다. 이 프레임워크는 폼과 그에 연관된 필드를 프로그램적으로 정의하여 객체를 만들고, 폼 HTML 코드를 작성하는 작업과 데이타 유효성 검증과 사용자 상호작용에 이 객체들을 사용한다.
이번 튜토리얼에서는, 폼을 생성하고 폼으로 작업하는 몇가지 방법을 보여줄 것이다. 특히, 모델을 처리하는 폼을 작성하는데 필요한 작업량을, generic 편집 폼 view를 이용하여 어떻게 획기적으로 줄일 수 있는지 보여줄 것이다. 그 과정에서, 도서관 사서들이 도서관 책 상태를 갱신할 수 있는 폼을 추가하고 책과 저자를 생성, 편집, 삭제할수 있는 페이지를 생성할 것이다. (즉, 위와 같이 책을 편집하는 폼의 기본적인 버전을 다시 개발하는 것이다).
HTML 폼(Form) 이란?
첫번째로 HTML 폼(Form)에 대한 간단한 개요이다. 어떤 "team"의 이름을 입력하는 단일 텍스트 필드와 관련 라벨을 가진 간단한 HTML 폼을 생각해보자:
![]()
폼은 HTML에서 적어도 한 개 이상의 type="submit"인 input 요소를 포함하는 <form>...</form> 태그 사이의 요소들의 집합으로 정의된다.
<form action="/team_name_url/" method="post">
  <label for="team_name">Enter name: </label>
  <input
    id="team_name"
    type="text"
    name="name_field"
    value="Default name for team." />
  <input type="submit" value="OK" />
</form>
위 코드에서는 팀 이름을 입력하기 위한 텍스트 필드를 단지 한개만 가지는데, 폼이 가질수 있는 입력 요소와 관련 라벨의 갯수에는 제한이 없다. 필드의 type 속성은 어떤 종류의 위젯이 표시될지 정의한다. 필드의 name과 id 가 JavaScript/CSS/HTML에 있는 필드를 확인하는데 사용되고 value는 필드가 처음 표시될 때의 초기값을 정의한다. 관련 팀 라벨은 label태그( 위 코드에서 "Enter name"을 확인)를 이용해 명시된다. 여기서 for필드는 관련된 input의 id값을 포함하고 있다.
submit 타입의 input 태그는 (기본적으로) 사용자가 누를수 있는 버튼으로 표시되는데, 버튼의 동작에 의해 폼의 다른 모든 input 요소의 데이터가 서버로 업로드된다 (위의 경우는 team_name만 업로드된다). 폼 속성으로는 데이터를 보내기 위해 사용되는 HTTP method와 서버상에서 데이타의 목적지를 ( action으로) 정의한다:
action: 폼이 제출(submit)될 때 처리가 필요한 데이타를 전달받는 곳의 자원/URL 주소. 설정이 안되면 (혹은 빈 문자열로 설정되면), 폼은 현재 페이지 URL로 다시 제출된다.method: 데이터를 보내는데 사용되는 HTTP 메소드: post 이거나 get 이다.POST메소드는 사이트간 요청 위조 공격에 좀 더 저항성이 좋게 만들 수 있기 때문에, 관련 데이터에 의해 서버 데이터베이스가 변경될 경우에는 항상 사용 되어야 한다.GET메소드는 사용자 데이터를 변경하지 않는 폼(예를 들면 , 탐색 폼)에서만 사용되어야 한다. URL을 북마크하길 원하거나 공유하기를 원하는 경우에 추천한다.
서버의 역할은 첫번째로 - 필드를 비워두거나 초기값으로 채워두도록 - 초기 폼 상태를 표시하는 것이다. 사용자가 제출 버튼을 누른후에, 서버는 웹 브라우저로부터 폼의 데이타를 념겨 받고, 데이타의 유효성 검증을 해야한다. 폼이 유효하지 않은 데이타를 담고 있다면, 서버는 폼을 다시 표기해야 하는데, 이번에는 사용자가 입력한 유효한 데이타는 그대로 표시하며, 유효하지 않은 필드만 경고 메시지와 함께 표기해야 한다. 일단 모든 필드의 데이타가 유효한 폼 데이타의 제출요청을 서버가 받게 되면, 서버는 적절한 동작(예를 들면, 데이타를 저장하거나, 검색결과를 반화하거나, 파일을 업로딩하는 등등의 작업)을 수행하고 사용자에게 알려주게된다.
당신이 상상할 수 있듯이, HTML을 작성하고, 입력된 데이타의 유효성을 검증하고, 필요시에 입력된 데이타를 검증 결과와 함게 다시 표시하며, 유효한 데이타에 대해 요구되는 동작을 수행하는 것은 "올바르게 하기"위해서는 꽤 많은 노력이 필요한 작업이다. Django는 일부 과중한 작업과 반복 코드를 줄여줌으로서, 이 작업을 훨씬 쉽게 만든다!
Django 폼 처리 과정
Django의 폼 처리 과정은 (모델에 대한 정보를 보여주는데 있어서) 우리가 앞선 튜토리얼에서 배웠던 것과 같은 기술을 사용한다. : 뷰는 요청을 받고, 모델로 부터 데이타를 읽는것을 포함한 요구되는 동작을 수행한다. 그런 다음, (보여줄 데이타를 포함한 context를 전달받은 템플릿으로 부터) HTML page를 생성하고 반환한다. 서버 또한 사용자가 입력한 데이타를 처리가능 해야 하며, 에러가 있으면 그 페이지를 다시 보여줄 필요가 있기 때문에 상황을 더욱 복잡하게 만든다.
아래에 Django가 어떻게 요청읕 처리하는지 보여주는 플로우 차트가 있다. 폼을 포함하는 페이지에 대한 요청 (초록색으로 표시함) 으로 시작하고 있다.
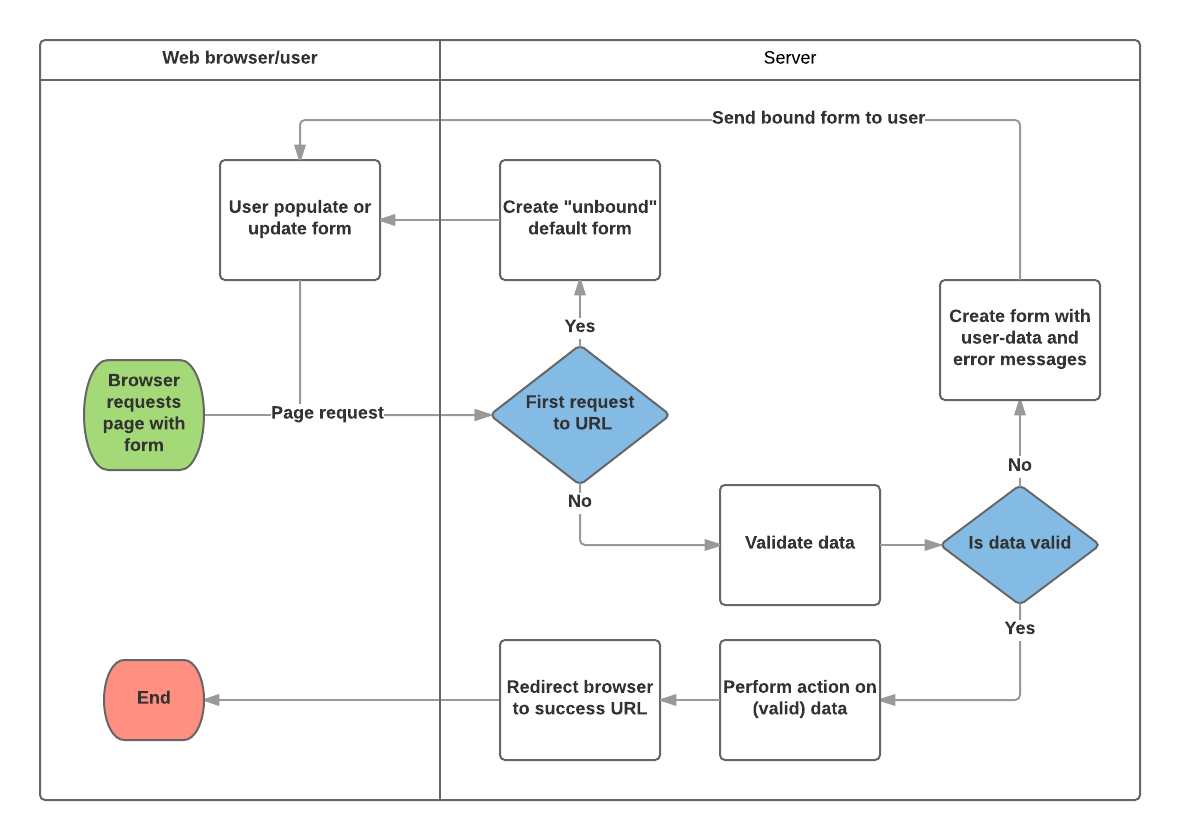
위의 다이어그램에 기반하여, Django 폼이 주요하게 다루는 것은 다음과 같다. :
- 사용자가 처음으로 폼을 요청할 때 기본 폼을 보여준다.
- 폼은 비어있는 필드가 있을 수 있다 (예를 들면, 새로운 책을 등록할 경우) 아니면 초기값으로 채워진 필드가 있을 수도 있다. ( 예를 들면, 기존의 책을 수정하거나, 흔히 사용하는 초기값이 있을경우)
- 이 시점의 폼은 (초기값이 있긴해도) 유저가 입력한 값에 연관되지 않았기에 unbound 상태라고 불린다.
- 제출 요청으로 부터 데이타를 수집하고 그것을 폼에 결합한다.
- 데이타를 폼에 결합(binding) 한다는 것은 사용자 입력 데이타와 유효성을 위반한 경우의 에러메시지가 폼을 재표시할 필요가 있을 때 준비되었다는 의미이다.
- 데이타를 다듬어서 유효성을 검증한다.
- 데이타를 다듬는다는 것은 사용자 입력을 정화(sanitisation) 하고 (예를 들면, 잠재적으로 악의적인 콘덴츠를 서버로 보낼수도 있는 유효하지 않은 문자를 제거하는 것) python에서 사용하는 타입의 데이타로 변환하는 것이다.
- 유효성검증은 입력된 값이 해당 필드에 적절한 값인지 검사한다. (예를 들면, 데이타가 허용된 범위에 있는 값인지, 너무 짧거나 길지 않은지 등등)
- 입력된 어떤 데이타가 유효하지 않다면, 폼을 다시 표시하는데 이번에는 초기값이 아니라 유저가 입력한 데이타와 문제가 있는 필드의 에러 메시지와 함께 표시한다.
- 입력된 모든 데이타가 유효하다면, 요청된 동작을 수행한다. (예를 들면, 데이타를 저장하거나, 이메일을 보내거나, 검색결과를 반환하거나, 파일을 업로딩하는 작업 등등)
- 일단 모든 작업이 완료되었다면, 사용자를 새로운 페이지로 보낸다.
Django는 위에 설명된 작업을 도와줄 수많은 도구와 접근법을 제공한다. 가장 기초적인 것은 Form 클래스 인데 form HTML의 생성과 데이터 정화와 유효성검증을 간단하게 만든다. 다음 단계에서는, 도서관 사서가 책의 대여갱신을 할수 있도록 해주는 페이지의 실제적인 예제를 이용해 폼이 어떻게 동작하는지 살펴보도록 한다.
참고: 참고사항: Form 이 어떻게 사용되는지 이해해두면 Django의 "고급 레벨" 폼 프레임워크 클래스를 논의하는데 도움이 된다.
책 대여갱신 form과 함수 view
다음으로 도서관직원이 대여기간을 갱신할수 있는 페이지를 추가할 것이다. 이 작업을 위해 사용자가 날짜 정보를 입력할 수 있는 form을 생성할 것이다. 그 필드는 현재날짜로 부터 3주의 기간 (일반적인 대여기간)으로 초기화될 것이다. 그리고 도서관직원이 과거날짜를 입력하거나 너무 긴 대여기간을 입력하지 않도록 유효성 체크기능을 추가할 것이다. 유효 날짜가 입력되면, 현재 record의 BookInstance.due_back 필드에 써넣을 것이다.
아래 예제는 함수기반 view와 Form 클래스를 이용할 것이다. 이어지는 내용에서 form 동작 방법과 현재진행중인 LocalLibray 프로젝트에서 변경할 내용을 설명한다.
Form 작성하기
Form 클래스는 Django form 관리 시스템의 핵심이다. Form 클래스는 form내 field들, field 배치, 디스플레이 widget, 라벨, 초기값, 유효한 값과 (유효성 체크이후에) 비유효 field에 관련된 에러메시지를 결정한다. Form 클래스는 또한 미리 정의된 포맷(테이블, 리스트 등등) 의 템플릿으로 그자신을 렌더링하는 method나 (세부 조정된 수동 렌더링을 가능케하는) 어떤 요소의 값이라도 얻는 method를 제공한다.
Form 선언하기
Form 을 선언하는 문법은 Model을 선언하는 것과 많이 닮았으며, 같은 필드타입을 사용한다. ( 또한 일부 매개변수도 유사하다) . 두가지 경우 모두 각 필드가 데이타에 맞는 (유효성 규칙에 맞춘) 타입인지 확인할 필요가 있고, 각 필드가 보여주고 문서화할 description을 가진다는 것에서 Form과 Model이 유사한 문법으로 구성된다는 점을 납득할 수 있다.
Form 데이타는 어플리케이션 디렉토리 안의 forms.py 파일에 저장되어야 한다. locallibrary/catalog/forms.py 파일을 생성하고 열어보자. Form을 생성하기 위해, Form클래스에서 파생된, forms라이브러리를 import 하고 폼 필드를 생성한다. 아래는 도서관 책 갱신 폼에 대한 아주 기본적인 폼 클래스이며 이를 생성한 파일에 추가하자.
from django import forms

class RenewBookForm(forms.Form):
    renewal_date = forms.DateField(help_text="Enter a date between now and 4 weeks (default 3).")
Form 필드
우리가 구현할 구체적인 내용은 다음과 같다. 대여갱신 날짜를 입력할 한 개의 DateField 를 가지는데, 이 필드는 "Renewal date:"라는 라벨로 초기값 없이 빈 칸으로 HTML에 표시되게 된다. 그리고 다음과 같은 도움문구가 추가 된다: "Enter a date between now and 4 weeks (default 3 weeks)." 따로 추가지정할 선택사항 없이, 이 필드는 Django의 input_formats: YYYY-MM-DD (2016-11-06), MM/DD/YYYY (02/26/2016), MM/DD/YY (10/25/16) 을 이용하여 날짜를 입력받는다. 그리고 Django의 기본 widget: DateInput 를 이용하여 표시될 것이다.
다음과 같이, 대응되는 모델 필드와 유사성 때문에, 여러분이 의미를 대체로 알만한 수많은 종류의 폼필드가 있다 : BooleanField, CharField, ChoiceField, TypedChoiceField, DateField, DateTimeField, DecimalField, DurationField, EmailField, FileField, FilePathField, FloatField, ImageField, IntegerField, GenericIPAddressField, MultipleChoiceField, TypedMultipleChoiceField, NullBooleanField, RegexField, SlugField, TimeField, URLField, UUIDField, ComboField, MultiValueField, SplitDateTimeField, ModelMultipleChoiceField, ModelChoiceField .
대부분의 필드에 공통적인 인자들은 아래와 같다. ( 이들은 적절한 기본값을 가지고 있다 ):
- required:
True로 설정되면, 필드를 빈칸으로 두거나None값을 줄 수 없게된다. 보통필드는 required는 True로 기본 설정되므로, 폼에서 빈 칸을 허용하기 위해서는required=False로 설정해야 한다. - label: HTML에서 필드를 렌더링할때 사용하는 레이블이다. label 이 지정되지 않으면, Django는 필드 이름에서 첫번째 문자를 대문자로, 밑줄을 공백으로 변형한 레이블을 새로 생성할 것이다. (예를 들면, renewaldate --> _Renewal date).
- label_suffix: 기본적으로, 콜론(:)이 레이블 다음에 표시된다. (예를 들면, Renewal date**:**). 이 인자는 다른 문자(들)를 포함한 접미사를 지정할 수 있도록 해준다.
- initial: 폼이 나타날 때 해당 필드의 초기 값.
- widget: 사용할 디스플레이 위젯.
- help_text (위의 예에서 봤듯이): 필드 사용법을 보여주는 추가적인 문구.
- error_messages: 해당 필드의 에러 메시지 목록. 필요하면 문구를 수정할 수 있다.
- validators: 해당 필드가 유효한 값을 가질 때 호출되는 함수의 목록.
- localize: 폼 데이타 입력의 현지화(localisation)를 허용함 (자세한 정보는 해당 링크 참조).
- disabled: 이 옵션이
True일때 해당 필드를 볼 수는 있지만 편집이 안됨. 기본 값은False.
유효성 체크
Django는 데이타의 유효성을 체크할 수 있는 수많은 지점을 제공한다. 어떤 필드의 유효성을 체크하는 가장 쉬운 방법은 해당 필드의 clean_<fieldname>() 메소드를 덮어쓰는 것이다. 예를 들면, 입력된 renewal_date 값이 현재로 부터 4 주이후 사이에 있는지는, clean_renewal_date() 를 아래와 같이 구현하여 유효성 체크를 수행할 수 있다.
forms.py 파일을 업데이트 하면 아래와 같은 모습이 된다:
import datetime

from django import forms
from django.core.exceptions import ValidationError
from django.utils.translation import ugettext_lazy as _

class RenewBookForm(forms.Form):
    renewal_date = forms.DateField(help_text="Enter a date between now and 4 weeks (default 3).")

    def clean_renewal_date(self):
        data = self.cleaned_data['renewal_date']

        # Check if a date is not in the past.
        if data < datetime.date.today():
            raise ValidationError(_('Invalid date - renewal in past'))

        # Check if a date is in the allowed range (+4 weeks from today).
        if data > datetime.date.today() + datetime.timedelta(weeks=4):
            raise ValidationError(_('Invalid date - renewal more than 4 weeks ahead'))

        # Remember to always return the cleaned data.
        return data
주목해야할 지점이 두개 있다. 첫 번째 지점은 self.cleaned_data['renewal_date'] 를 이용하여 데이타를 획득하고 이 데이타의 수정여부에 상관없이 함수가 끝나면 이 데이타를 반환한 다는 것이다. 이 단계는 기본 유효성 검사도구를 이용해 입력값을 "다듬고(cleaned)" 잠재적으로 안전하지 않을 수 있는 입력 값을 정화하며 , 해당 입력값에 맞는 표준 형식으로 변환해준다. ( 이 경우에는 Python datetime.datetime 객체 형식이다.).
두 번째 지점은 입력값이 지정한 범위를 벗어날 경우 ValidationError 에러를 발생시키고, 유효하지 않은 입력값일 때 폼에 보여주고자 하는 에러 문구를 지정하는 부분이다. 위의 예에서는, Django의 번역 함수들 중하나인 ugettext_lazy() (_() 로 import 됨)로 이 문구를 감싸고 있는데, 당신의 사이트를 나중에 번역하고자 한다면 좋은 예제가 된다.
참고: 참고사항: 폼과 필드 유효성 체크 (장고 문서임) 에 폼의 유효성 체크에 대한 수많은 다른메소드및 예제가 있다. 예를 들면, 서로 의존관계에 있는 여러개의 필드가 있을 경우, Form.clean() 함수를 덮어써서, ValidationError 를 다시 발생시킬수도 있다.
여기까지가 본 예제에서 필요한 폼에 대한 모든 내용이다!
URL Configuration 작성하기
뷰를 생성하기 전에, 책 대여갱신 페이지를 위해 URL 설정을 추가 하자. 아래 설정코드를 locallibrary/catalog/urls.py 아랫 부분에 복사하라.
urlpatterns += [
    path('book/<uuid:pk>/renew/', views.renew_book_librarian, name='renew-book-librarian'),
]
위 URL 설정코드는 /catalog/book/<bookinstance id>/renew/ 형식의 URL을 views.py 에 있는 renew_book_librarian() 라는 이름의 함수를 호출하고 BookInstance id를 pk라고 이름지은 매개변수로 전송한다. 위 패턴은 pk가 정확히 uuid의 형식일때만 일치한다.
참고: 주목할점: 추출된 URL 데이타 "pk" 는 당신 마음대로 이름을 정할 수 있다. 왜냐하면 view 함수에 대해서는 어떤 조작이라도 가능하기 때문이다. ( 특정 이름을 기대하는 매개변수를 가진 Generic detail view 클래스를 사용하지 않고 있다.) 하지만 pk는 "primary key"의 약자으로 합리적인 관례상 이름이다 !
View 작성하기
위의 Django 폼 처리 과정 에서 설명된대로, 위의 폼 뷰는 첫번째로 호출될 때는 기본 폼을 표시해야 한다. 그리고 나서 데이터가 유효하지 않은 경우 에러 메시지를 재 표시하고, 데이터가 유효한 경우에는 데이타를 처리하고 새로운 페이지를 표시해야 한다. 이런 서로 다른 동작을 수행하기 위해, 해당 뷰가 기본 폼을 표시하도록 현재 첫번째로 호출되고 있는지, 데이터 유효성을 체크하기 위해 연속되어 이어지는 호출인지 알 수 있어야 한다.
서버에 정보를 제출하는 POST리퀘스트를 사용하는 폼에 대해서, 가장 흔한 패턴은 뷰에서 POST 요청 타입 인지 판단 (if request.method == 'POST':) 하여 유효한 요청 여부를 확인하고 GET ( else 조건으로 ) 요청 타입인 경우 초기 폼 생성을 요청한다. GET요청으로 데이터를 제출하려고 한다면 첫 번째 뷰 호출인지 두 번째 이상의 뷰 호출인지 판단하는 전형적인 접근 방법은 폼 데이터를 읽어보는 (즉 폼에서 숨겨진 값을 읽는)것이다.
책 대여갱신 과정은 데이터베이스에 결과를 보내기 때문에, 관례상 POST요청 방법을 사용한다. 아래 코드는 이런 종류의 function 뷰에 대해 가장 기본적인 형식을 보여준다.
import datetime

from django.shortcuts import get_object_or_404
from django.http import HttpResponseRedirect
from django.urls import reverse

from catalog.forms import RenewBookForm

def renew_book_librarian(request, pk):
    book_instance = get_object_or_404(BookInstance, pk=pk)

    # POST 요청이면 폼 데이터를 처리한다
    if request.method == 'POST':

        # 폼 인스턴스를 생성하고 요청에 의한 데이타로 채운다 (binding):
        book_renewal_form = RenewBookForm(request.POST)

        # 폼이 유효한지 체크한다:
        if book_renewal_form.is_valid():
            # form.cleaned_data 데이타를 요청받은대로 처리한다(여기선 그냥 모델 due_back 필드에 써넣는다)
            book_instance.due_back = book_renewal_form.cleaned_data['renewal_date']
            book_instance.save()

            # 새로운 URL로 보낸다:
            return HttpResponseRedirect(reverse('all-borrowed') )

    # GET 요청 (혹은 다른 메소드)이면 기본 폼을 생성한다.
    else:
        proposed_renewal_date = datetime.date.today() + datetime.timedelta(weeks=3)
        book_renewal_form = RenewBookForm(initial={'renewal_date': proposed_renewal_date})

    context = {
        'form': book_renewal_form,
        'book_instance': book_instance,
    }

    return render(request, 'catalog/book_renew_librarian.html', context)
첫부분에서는 미리 작성된 폼 (RenewBookForm)을 import 하고 뷰 함수의 내부에서 쓰일 유용한 객체나 메소드를 import 한다:
get_object_or_404(): 해당 모델의 기본 키(primary key) 값에 연결되는 특정 객체를 반환하거나 해당 record가 없을경우Http404예외를 발생시킨다.HttpResponseRedirect: 특정 URL로의 재전송을 생성한다. (HTTP status code 302).reverse(): URL 설정(configuration) 의 이름과 전달인자들로 부터 URL을 만들어낸다. 템플릿에서 사용했던url태그에 해당하는 파이썬 형식의 동일 표현이다.datetime: 날짜와 시간을 다루는 파이썬 라이브러리 이다.
뷰 코드는 첫번째로 현재 BookInstance를 얻기위해 get_object_or_404()함수에 pk 전달인자를 사용한다( BookInstance가 없으면 뷰는 그 즉시 완료되며 페이지에는 "발견 하지 못함" 에러가 뜨게된다). POST요청이아니라면 ( else절로 처리되어) renewal_date필드에 대해 initial값을 넘겨주는 기본 폼을 생성한다. ( 기본 값은 아래 코드에서 볼드체로 표시된대로, 현재 날짜로 부터 3주후이다).
    book_instance = get_object_or_404(BookInstance, pk=pk)

    # GET 요청(혹은 다른 메소드)이면 기본 폼을 생성한다.
    else:
        proposed_renewal_date = datetime.date.today() + datetime.timedelta(weeks=3)
        book_renewal_form = RenewBookForm(initial={'renewal_date': proposed_renewal_date})

    context = {
        'form': book_renewal_form,
        'book_instance': book_instance,
    }

    return render(request, 'catalog/book_renew_librarian.html', context)
폼을 생성한이후, HTML 페이지를 생성하기 위해 render()를 호출하는데, 이 함수에서 템플릿과 폼을 포함하는 context를 특정한다. 이 경우에 context는 BookInstance 또한 포함하는데, BookInstance는 갱신하고자 하는 책의 정보를 템플릿에 제공하는데 사용한다.
하지만 POST요청이라면, form객체를 생성하고 POST요청에서의 데이터로 form을 채운다. 이 처리과정은 "binding"으로 불리며 폼의 유효성 체크를 할수 있도록 해준다. 여기에서 모든 필드에 관련된 유효성 체크 코드 - 날짜필드가 실제상황에서 유효한 값을 가지는지 체크하는 일반적인 코드와 날짜가 정해진 범위의 값을 가지는지 체크하는 폼의 특별한 함수인 clean_renewal_date() 를 포함하는 코드 - 를 실행하며 폼의 데이타가 유효한지 체크한다.
    book_instance = get_object_or_404(BookInstance, pk=pk)

    # POST 요청이면 폼 데이터를 처리한다
    if request.method == 'POST':

        # 폼 인스턴스를 생성하고 요청에 의한 데이타로 채운다 (binding):
        book_renewal_form = RenewBookForm(request.POST)

        # 폼이 유효한지 체크한다:
        if book_renewal_form.is_valid():
            # form.cleaned_data 데이타를 요청받은대로 처리한다(여기선 그냥 모델 due_back 필드에 써넣는다)
            book_inst.due_back = form.cleaned_data['renewal_date']
            book_inst.save()

            # 새로운 URL로 보낸다:
            return HttpResponseRedirect(reverse('all-borrowed') )

    context = {
        'form': book_renewal_form,
        'book_instance': book_instance,
    }

    return render(request, 'catalog/book_renew_librarian.html', context)
폼의 데이터가 유효하지 않다면 render()함수가 다시 호출된다. 하지만 이번에 context로 넘겨지는 폼의 값에는 에러메시지가 포함될 것이다.
폼의 데이터가 유효하다면, form.cleaned_data속성을 통해 데이타 사용을 시작할수 있다(즉, 다음과 같다. data = form.cleaned_data['renewal_date']). 여기에서는 단지 폼 데이터를 BookInstance객체에 관련된 due_back변수에 저장했다.
경고: 중요사항: 'request'객체를 통해 직접 폼 데이터를 가져올수는 있으나 ( 예를 들면 request.POST['renewal_date']나 GET 요청인경우 request.GET['renewal_date']처럼), 이 방식은 절대 추천하지 않는다. 위 코드에서 깔끔한 데이타(cleaned_data)란 것은 정제되고(sanitised), 유효성체크가되고, 파이썬에서 많이쓰는 타입의 데이타이다.
뷰에서 폼 처리의 마지막 단계는 , 대개는 "Success" 페이지라는 다른 페이지로 주소를 바꾸는 것이다. 여기서는 'all-borrowed'라는 뷰( 이 뷰는 Django 튜토리얼 파트 8: 사용자 인증과 사용권한 (en-US) 파트에서 "도전과제로" 생성했었다) 로 주소를 바꾸기 위해 HttpResponseRedirect와 reverse()를 사용한다. 당신이 이 페이지를 생성하지 않았다면 URL 주소가 '/'인 홈페이지로 주소를 변경하는 것을 고려해보자.
여기까지가 폼을 다루기 위해 필요한 모든 것이지만, 해당 폼 뷰의 사용권한을 도서관사서로 한정해야 하는 문제가 남아있다. BookInstance모델에 "can_renew"라는 새로운 사용권한을 추가해야 하겠지만, 작업을 간단하게 하기위해 그냥 기존의 사용권한can_mark_returned에 함수 데코레이터@permission_required를 사용하도록 하겠다.
그러므로 최종 뷰의 코드는 다음과 같다. 이 코드를 locallibrary/catalog/views.py 의 아랫부분에 복사해넣어라.
import datetime

from django.contrib.auth.decorators import permission_required
from django.shortcuts import get_object_or_404
from django.http import HttpResponseRedirect
from django.urls import reverse

from catalog.forms import RenewBookForm

@permission_required('catalog.can_mark_returned')
def renew_book_librarian(request, pk):
    """도서관 사서에 의해 특정 BookInstance를 갱신하는 뷰 함수."""
    book_instance = get_object_or_404(BookInstance, pk=pk)

    # POST 요청이면 폼 데이터를 처리한다
    if request.method == 'POST':

        # 폼 인스턴스를 생성하고 요청에 의한 데이타로 채운다 (binding):
        book_renewal_form = RenewBookForm(request.POST)

        # 폼이 유효한지 체크한다:
        if book_renewal_form.is_valid():
            # book_renewal_form.cleaned_data 데이타를 요청받은대로 처리한다(여기선 그냥 모델 due_back 필드에 써넣는다)
            book_instance.due_back = book_renewal_form.cleaned_data['renewal_date']
            book_instance.save()

            # 새로운 URL로 보낸다:
            return HttpResponseRedirect(reverse('all-borrowed') )

    # GET 요청(혹은 다른 메소드)이면 기본 폼을 생성한다.
    else:
        proposed_renewal_date = datetime.date.today() + datetime.timedelta(weeks=3)
        book_renewal_form = RenewBookForm(initial={'renewal_date': proposed_renewal_date})

    context = {
        'form': book_renewal_form,
        'book_instance': book_instance,
    }

    return render(request, 'catalog/book_renew_librarian.html', context)
Template 작성하기
뷰 에서 참조되는 템플릿 (/catalog/templates/catalog/book_renew_librarian.html)을 생성하고 아래 코드를 복사해넣어라 :
{% extends "base_generic.html" %}

{% block content %}
  <h1>Renew: {{ book_instance.book.title }}</h1>
  <p>Borrower: {{ book_instance.borrower }}</p>
  <p> if book_instance.is_overdue %} class="text-danger"{% endif %}>Due date: {{book_instance.due_back}}</p>

  <form action="" method="post">
    {% csrf_token %}
    {{ form.as_table }}
    <input type="submit" value="Submit">
  </form>
{% endblock %}
이 작업의 대부분은 앞선 튜토리얼에서 익숙해진 작업이다. 우리는 베이스 템플릿을 확장하고 콘텐츠 블럭을 재설정한다. {{bookinst}}(와 그에 따른 변수) 가 render() 함수 내의 컨텍스트 객체로 넘겨졌기 때문에 {{bookinst}}를 참조할수 있다. 이들을 이용해 책 제목, 대여자 그리고 이전 대여마감일의 목록을 열거한다.
폼 코드는 상대적으로 간단하다. 우선 form이 어디에 제출될 것인지(action)(POST인지 PUT인지) 명시하여 form 태그를 선언하고, 데이터를 제출하는 method 를 명시한다(이 경우에는 "HTTP POST") — 해당 페이지 위 쪽의 HTML Forms overview에서 보았듯이, action을 비워 놓았는데, 이렇게 하면 form 데이터가 현재 URL페이지로 다시 POST 된다(지금 우리가 하고자 하는 것입니다!). form 태그 안에는 submit input 태그 또한 만들어서 페이지 사용자가 눌러서 데이터를 제출(submit)할 수 있도록 한다. form 태그 안에정의된 또 다른 하나인 {% csrf_token %}는 Django의 cross-site 위조 방지의 방식 중 하나이다.
참고: Add the {% csrf_token %} to every Django template you create that uses POST to submit data. This will reduce the chance of forms being hijacked by malicious users.
마지막으로 템플릿에 context라는 dictionary형 데이터로 넘기는 {{form}} 변수가 남았다. 별로 놀랍지 않을 수 있지만, 아래처럼 하면 form의 모든 field의 필드, 위젯, 도움말을 함께 렌더링하는 기본 렌더링기능을 사용할 수 있다 — 렌더링된 결과는 다음과 같다.
<tr>
  <th><label for="id_renewal_date">Renewal date:</label></th>
  <td>
    <input
      id="id_renewal_date"
      name="renewal_date"
      type="text"
      value="2016-11-08"
      required />
    <br />
    <span class="helptext"
      >Enter date between now and 4 weeks (default 3 weeks).</span
    >
  </td>
</tr>
참고: 필드가 하나만 있기 때문에 분명하지는 않지만 기본적으로 모든 필드는 자체 테이블 행에 정의되어 있습니다. 템플릿 변수 {{ form.as_table }}을 참조하면이 동일한 렌더링이 제공됩니다.
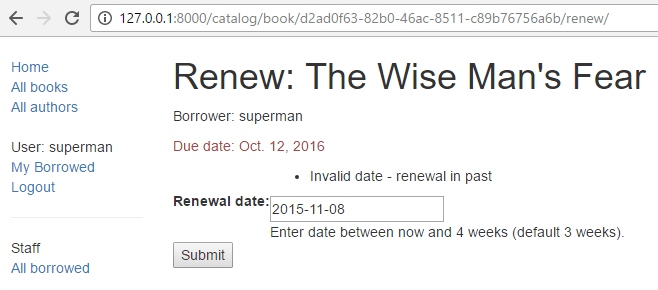
유효하지 않은 날짜를 입력하는 경우 페이지에서 렌더링 된 오류 목록 (아래 굵게 표시)을 얻게됩니다.
<tr>
  <th><label for="id_renewal_date">Renewal date:</label></th>
  <td>
    <ul class="errorlist">
      <li>Invalid date - renewal in past</li>
    </ul>
    <input
      id="id_renewal_date"
      name="renewal_date"
      type="text"
      value="2015-11-08"
      required />
    <br />
    <span class="helptext"
      >Enter date between now and 4 weeks (default 3 weeks).</span
    >
  </td>
</tr>
Form template variable을 사용하는 다른 방법
위와 같이 {{form.as_table}} 을 사용하면 각 필드가 테이블 행으로 렌더링됩니다. 또한 각 필드를 {{form.as_ul}} 을 사용하여 목록항목(list item)으로 렌더링하거나 {{form.as_p}}를 사용하여 단락(paragraph)으로 렌더링 할 수도 있습니다.
또한 dot notation을 사용하여 form 속성을 인덱싱하여 각 부분 렌더링을 완벽하게 제어 할 수도 있습니다. 예를 들어, renewal_date 필드에 대한 여러 개의 개별 항목에 접근 할 수 있습니다.
{{form.renewal_date}}:The whole field.{{form.renewal_date.errors}}: The list of errors.{{form.renewal_date.id_for_label}}: The id of the label.{{form.renewal_date.help_text}}: The field help text.
템플릿의 양식을 수동으로 렌더링하고 템플릿 필드를 동적으로 반복하는 방법에 대한 자세한 예제는, Working with forms > Rendering fields manually (Django docs)를 참고.
Page를 시험하기
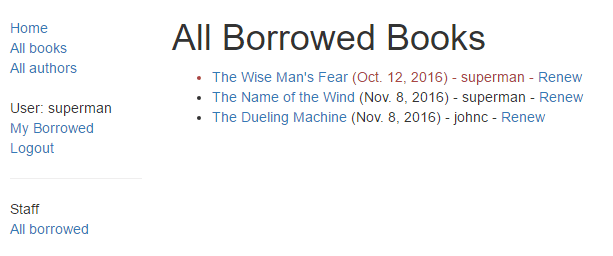
If you accepted the "challenge" in Django Tutorial Part 8: User authentication and permissions (en-US) you'll have a list of all books on loan in the library, which is only visible to library staff. We can add a link to our renew page next to each item using the template code below.
{% if perms.catalog.can_mark_returned %}-
  <a href="{% url 'renew-book-librarian' bookinst.id %}">Renew</a>
{% endif %}
참고: Remember that your test login will need to have the permission "catalog.can_mark_returned" in order to access the renew book page (perhaps use your superuser account).
You can alternatively manually construct a test URL like this — http://127.0.0.1:8000/catalog/book/<bookinstance_id>/renew/ (a valid bookinstance id can be obtained by navigating to a book detail page in your library, and copying the id field).
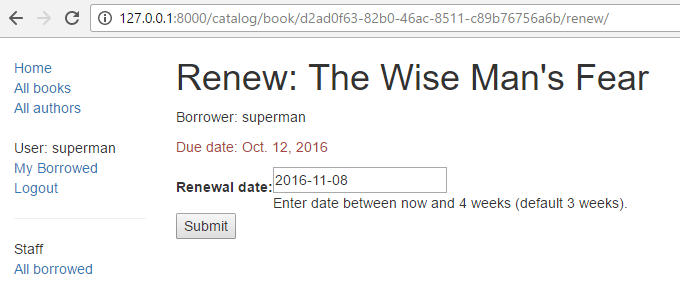
What does it look like?
If you are successful, the default form will look like this:
The form with an invalid value entered, will look like this:
The list of all books with renew links will look like this:
ModelForms
Creating a Form class using the approach described above is very flexible, allowing you to create whatever sort of form page you like and associate it with any model or models.
However if you just need a form to map the fields of a single model then your model will already define most of the information that you need in your form: fields, labels, help text, etc. Rather than recreating the model definitions in your form, it is easier to use the ModelForm helper class to create the form from your model. This ModelForm can then be used within your views in exactly the same way as an ordinary Form.
A basic ModelForm containing the same field as our original RenewBookForm is shown below. All you need to do to create the form is add class Meta with the associated model (BookInstance) and a list of the model fields to include in the form (you can include all fields using fields = '__all__', or you can use exclude (instead of fields) to specify the fields not to include from the model).
from django.forms import ModelForm
from .models import BookInstance

class RenewBookModelForm(ModelForm):
    class Meta:
        model = BookInstance
        fields = ['due_back',]
참고: This might not look like all that much simpler than just using a Form (and it isn't in this case, because we just have one field). However if you have a lot of fields, it can reduce the amount of code quite significantly!
The rest of the information comes from the model field definitions (e.g. labels, widgets, help text, error messages). If these aren't quite right, then we can override them in our class Meta, specifying a dictionary containing the field to change and its new value. For example, in this form we might want a label for our field of "Renewal date" (rather than the default based on the field name: Due date), and we also want our help text to be specific to this use case. The Meta below shows you how to override these fields, and you can similarly set widgets and error_messages if the defaults aren't sufficient.
class Meta:
    model = BookInstance
    fields = ['due_back',]
    labels = { 'due_back': _('Renewal date'), }
    help_texts = { 'due_back': _('Enter a date between now and 4 weeks (default 3).'), }
To add validation you can use the same approach as for a normal Form — you define a function named clean_field_name() and raise ValidationError exceptions for invalid values. The only difference with respect to our original form is that the model field is named due_back and not "renewal_date".
from django.forms import ModelForm
from .models import BookInstance

class RenewBookModelForm(ModelForm):
    def clean_due_back(self):
       data = self.cleaned_data['due_back']

       #Check date is not in past.
       if data < datetime.date.today():
           raise ValidationError(_('Invalid date - renewal in past'))

       #Check date is in range librarian allowed to change (+4 weeks)
       if data > datetime.date.today() + datetime.timedelta(weeks=4):
           raise ValidationError(_('Invalid date - renewal more than 4 weeks ahead'))

       # Remember to always return the cleaned data.
       return data

    class Meta:
        model = BookInstance
        fields = ['due_back',]
        labels = { 'due_back': _('Renewal date'), }
        help_texts = { 'due_back': _('Enter a date between now and 4 weeks (default 3).'), }
The class RenewBookModelForm below is now functionally equivalent to our original RenewBookForm. You could import and use it wherever you currently use RenewBookForm.
Generic editing views
The form handling algorithm we used in our function view example above represents an extremely common pattern in form editing views. Django abstracts much of this "boilerplate" for you, by creating generic editing views for creating, editing, and deleting views based on models. Not only do these handle the "view" behaviour, but they automatically create the form class (a ModelForm) for you from the model.
**참고:**In addition to the editing views described here, there is also a FormView class, which lies somewhere between our function view and the other generic views in terms of "flexibility" vs "coding effort". Using
FormViewyou still need to create yourForm, but you don't have to implement all of the standard form-handling pattern. Instead you just have to provide an implementation of the function that will be called once the submitted is known to be be valid.
In this section we're going to use generic editing views to create pages to add functionality to create, edit, and delete Author records from our library — effectively providing a basic reimplementation of parts of the Admin site (this could be useful if you need to offer admin functionality in a more flexible way that can be provided by the admin site).
Views
Open the views file (locallibrary/catalog/views.py) and append the following code block to the bottom of it:
from django.views.generic.edit import CreateView, UpdateView, DeleteView
from django.urls import reverse_lazy
from .models import Author

class AuthorCreate(CreateView):
    model = Author
    fields = '__all__'
    initial={'date_of_death':'05/01/2018',}

class AuthorUpdate(UpdateView):
    model = Author
    fields = ['first_name','last_name','date_of_birth','date_of_death']

class AuthorDelete(DeleteView):
    model = Author
    success_url = reverse_lazy('authors')
As you can see, to create the views you need to derive from CreateView, UpdateView, and DeleteView (respectively) and then define the associated model.
For the "create" and "update" cases you also need to specify the fields to display in the form (using in same syntax as for ModelForm). In this case we show both the syntax to display "all" fields, and how you can list them individually. You can also specify initial values for each of the fields using a dictionary of field_name/value pairs (here we arbitrarily set the date of death for demonstration purposes — you might want to remove that!). By default these views will redirect on success to a page displaying the newly created/edited model item, which in our case will be the author detail view we created in a previous tutorial. You can specify an alternative redirect location by explicitly declaring parameter success_url (as done for the AuthorDelete class).
The AuthorDelete class doesn't need to display any of the fields, so these don't need to be specified. You do however need to specify the success_url, because there is no obvious default value for Django to use. In this case we use the reverse_lazy() function to redirect to our author list after an author has been deleted — reverse_lazy() is a lazily executed version of reverse(), used here because we're providing a URL to a class-based view attribute.
Templates
The "create" and "update" views use the same template by default, which will be named after your model: model_name_form.html (you can change the suffix to something other than _form using the template_name_suffix field in your view, e.g. template_name_suffix = '_other_suffix')
Create the template file locallibrary/catalog/templates/catalog/author_form.html and copy in the text below.
{% extends "base_generic.html" %}

{% block content %}
  <form action="" method="post">
    {% csrf_token %}
    <table>
      {{ form.as_table }}
    </table>
    <input type="submit" value="Submit" />
  </form>
{% endblock %}
This is similar to our previous forms, and renders the fields using a table. Note also how again we declare the {% csrf_token %} to ensure that our forms are resistant to CSRF attacks.
The "delete" view expects to find a template named with the format model_name_confirm_delete.html (again, you can change the suffix using template_name_suffix in your view). Create the template file locallibrary/catalog/templates/catalog/author_confirm_delete.html and copy in the text below.
{% extends "base_generic.html" %}

{% block content %}
  <h1>Delete Author</h1>

  <p>Are you sure you want to delete the author: {{ author }}?</p>

  <form action="" method="POST">
    {% csrf_token %}
    <input type="submit" action="" value="Yes, delete." />
  </form>
{% endblock %}
URL configurations
Open your URL configuration file (locallibrary/catalog/urls.py) and add the following configuration to the bottom of the file:
urlpatterns += [
    path('author/create/', views.AuthorCreate.as_view(), name='author_create'),
    path('author/<int:pk>/update/', views.AuthorUpdate.as_view(), name='author_update'),
    path('author/<int:pk>/delete/', views.AuthorDelete.as_view(), name='author_delete'),
]
There is nothing particularly new here! You can see that the views are classes, and must hence be called via .as_view(), and you should be able to recognise the URL patterns in each case. We must use pk as the name for our captured primary key value, as this is the parameter name expected by the view classes.
The author create, update, and delete pages are now ready to test (we won't bother hooking them into the site sidebar in this case, although you can do so if you wish).
참고: Observant users will have noticed that we didn't do anything to prevent unauthorised users from accessing the pages! We leave that as an exercise for you (hint: you could use the PermissionRequiredMixin and either create a new permission or reuse our can_mark_returned permission).
Testing the page
First login to the site with an account that has whatever permissions you decided are needed to access the author editing pages.
Then navigate to the author create page: http://127.0.0.1:8000/catalog/author/create/, which should look like the screenshot below.
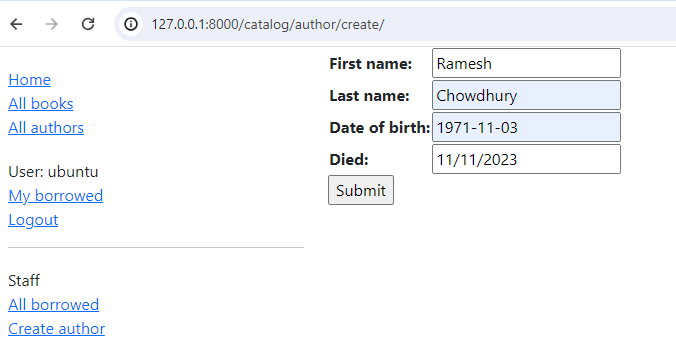
Enter values for the fields and then press Submit to save the author record. You should now be taken to a detail view for your new author, with a URL of something like http://127.0.0.1:8000/catalog/author/10.
You can test editing records by appending /update/ to the end of the detail view URL (e.g. http://127.0.0.1:8000/catalog/author/10/update/) — we don't show a screenshot, because it looks just like the "create" page!
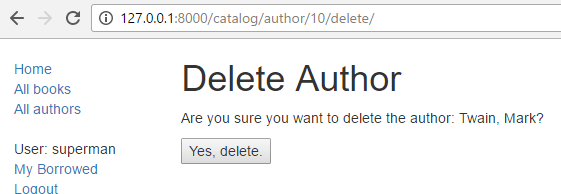
Last of all we can delete the page, by appending delete to the end of the author detail-view URL (e.g. http://127.0.0.1:8000/catalog/author/10/delete/). Django should display the delete page shown below. Press Yes, delete. to remove the record and be taken to the list of all authors.
Challenge yourself
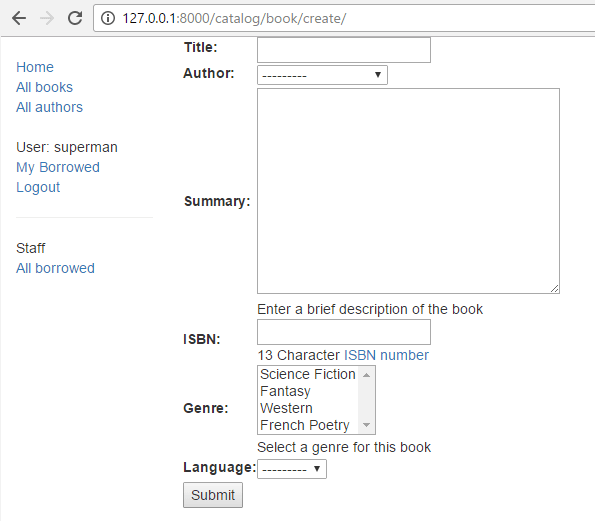
Create some forms to create, edit and delete Book records. You can use exactly the same structure as for Authors. If your book_form.html template is just a copy-renamed version of the author_form.html template, then the new "create book" page will look like the screenshot below:
Summary
Creating and handling forms can be a complicated process! Django makes it much easier by providing programmatic mechanisms to declare, render and validate forms. Furthermore, Django provides generic form editing views that can do almost all the work to define pages that can create, edit, and delete records associated with a single model instance.
There is a lot more that can be done with forms (check out our See also list below), but you should now understand how to add basic forms and form-handling code to your own websites.
See also
- Working with forms (Django docs)
- Writing your first Django app, part 4 > Writing a simple form (Django docs)
- The Forms API (Django docs)
- Form fields (Django docs)
- Form and field validation (Django docs)
- Form handling with class-based views (Django docs)
- Creating forms from models (Django docs)
- Generic editing views (Django docs)