Django Tutorial Part 2: Creating a skeleton website
This second article in our Django Tutorial shows how you can create a "skeleton" website project as a basis, which you can then populate with site-specific settings, paths, models, views, and templates.
| Prerequisites: | Set up a Django development environment. Review the Django Tutorial. |
|---|---|
| Objective: | To be able to use Django's tools to start your own new website projects. |
Overview
This article shows how you can create a "skeleton" website, which you can then populate with site-specific settings, paths, models, views, and templates (we discuss these in later articles).
To get started:
- Use the
django-admintool to generate a project folder, the basic file templates, and manage.py, which serves as your project management script. - Use manage.py to create one or more applications.
Note: A website may consist of one or more sections. For example, main site, blog, wiki, downloads area, etc. Django encourages you to develop these components as separate applications, which could then be re-used in different projects if desired.
- Register the new applications to include them in the project.
- Hook up the url/path mapper for each application.
For the Local Library website, the website and project folders are named locallibrary, and includes one application named catalog. The top-level folder structure will therefore be as follows:
locallibrary/         # Website folder
    manage.py         # Script to run Django tools for this project (created using django-admin)
    locallibrary/     # Website/project folder (created using django-admin)
    catalog/          # Application folder (created using manage.py)
The following sections discuss the process steps in detail, and show how you can test your changes. At the end of this article, we discuss other site-wide configuration you might also do at this stage.
Creating the project
To create the project:
- Open a command shell (or a terminal window), and make sure you are in your virtual environment.
- Navigate to the folder where you want to create your local library application (later on we'll move it to the "django_local_library" that you created as a local GitHub repository when setting up the development environment).
- Create the new project using the
django-admin startprojectcommand as shown, and then navigate into the project folder:Thebashdjango-admin startproject locallibrary cd locallibrarydjango-admintool creates a folder/file structure as follows:bashlocallibrary/ manage.py locallibrary/ __init__.py settings.py urls.py wsgi.py asgi.py
The locallibrary project sub-folder is the entry point for the website:
- __init__.py is an empty file that instructs Python to treat this directory as a Python package.
- settings.py contains all the website settings, including registering any applications we create, the location of our static files, database configuration details, etc.
- urls.py defines the site URL-to-view mappings. While this could contain all the URL mapping code, it is more common to delegate some of the mappings to particular applications, as you'll see later.
- wsgi.py is used to help your Django application communicate with the web server. You can treat this as boilerplate.
- asgi.py is a standard for Python asynchronous web apps and servers to communicate with each other. Asynchronous Server Gateway Interface (ASGI) is the asynchronous successor to Web Server Gateway Interface (WSGI). ASGI provides a standard for both asynchronous and synchronous Python apps, whereas WSGI provided a standard for synchronous apps only. ASGI is backward-compatible with WSGI and supports multiple servers and application frameworks.
The manage.py script is used to create applications, work with databases, and start the development web server.
Creating the catalog application
Next, run the following command to create the catalog application that will live inside our locallibrary project. Make sure to run this command from the same folder as your project's manage.py:
# Linux/macOS
python3 manage.py startapp catalog

# Windows
py manage.py startapp catalog
Note: The rest of the tutorial uses the Linux/macOS syntax.
If you're working on Windows, wherever you see a command starting with python3 you should instead use py (or py -3).
The tool creates a new folder and populates it with files for the different parts of the application (shown in the following example). Most of the files are named after their purpose (e.g. views should be stored in views.py, models in models.py, tests in tests.py, administration site configuration in admin.py, application registration in apps.py) and contain some minimal boilerplate code for working with the associated objects.
The updated project directory should now look like this:
locallibrary/
    manage.py
    locallibrary/
    catalog/
        admin.py
        apps.py
        models.py
        tests.py
        views.py
        __init__.py
        migrations/
In addition we now have:
- A migrations folder, used to store "migrations" — files that allow you to automatically update your database as you modify your models.
- __init__.py — an empty file created here so that Django/Python will recognize the folder as a Python Package and allow you to use its objects within other parts of the project.
Note: Have you noticed what is missing from the files list above? While there is a place for your views and models, there is nowhere for you to put your URL mappings, templates, and static files. We'll show you how to create them further along (these aren't needed in every website but they are needed in this example).
Registering the catalog application
Now that the application has been created, we have to register it with the project so that it will be included when any tools are run (like adding models to the database for example). Applications are registered by adding them to the INSTALLED_APPS list in the project settings.
Open the project settings file, django-locallibrary-tutorial/locallibrary/settings.py, and find the definition for the INSTALLED_APPS list. Then add a new line at the end of the list, as shown below:
INSTALLED_APPS = [
    'django.contrib.admin',
    'django.contrib.auth',
    'django.contrib.contenttypes',
    'django.contrib.sessions',
    'django.contrib.messages',
    'django.contrib.staticfiles',
    # Add our new application
    'catalog.apps.CatalogConfig', # This object was created for us in /catalog/apps.py
]
The new line specifies the application configuration object (CatalogConfig) that was generated for you in /django-locallibrary-tutorial/catalog/apps.py when you created the application.
Note: You'll notice that there are already a lot of other INSTALLED_APPS (and MIDDLEWARE, further down in the settings file). These enable support for the Django administration site and the functionality it uses (including sessions, authentication, etc.).
Specifying the database
This is also the point where you would normally specify the database to be used for the project. It makes sense to use the same database for development and production where possible, in order to avoid minor differences in behavior. You can find out about the different options in Databases (Django docs).
We'll use the default SQLite database for most of this example, because we don't expect to require a lot of concurrent access on a demonstration database, and it requires no additional work to set up! You can see how this database is configured in settings.py:
DATABASES = {
    'default': {
        'ENGINE': 'django.db.backends.sqlite3',
        'NAME': BASE_DIR / 'db.sqlite3',
    }
}
Later on in the Deploying Django to production we'll also show you how to configure a Postgres database, which might be more suitable for larger sites.
Other project settings
The settings.py file is also used for configuring a number of other settings, but at this point, you probably only want to change the TIME_ZONE — this should be made equal to a string from the standard List of tz database time zones (the TZ column in the table contains the values you want). Change your TIME_ZONE value to one of these strings appropriate for your time zone, for example:
TIME_ZONE = 'Europe/London'
There are two other settings you won't change now, but that you should be aware of:
SECRET_KEY. This is a secret key that is used as part of Django's website security strategy. If you're not protecting this code in development, you'll need to use a different code (perhaps read from an environment variable or file) when putting it into production.DEBUG. This enables debugging logs to be displayed on error, rather than HTTP status code responses. This should be set toFalsein production as debug information is useful for attackers, but for now we can keep it set toTrue.
Hooking up the URL mapper
The website is created with a URL mapper file (urls.py) in the project folder. While you can use this file to manage all your URL mappings, it is more usual to defer mappings to the associated application.
Open django-locallibrary-tutorial/locallibrary/urls.py and note the instructional text which explains some of the ways to use the URL mapper.
"""
URL configuration for locallibrary project.

The `urlpatterns` list routes URLs to views. For more information please see:
    https://docs.djangoproject.com/en/5.0/topics/http/urls/
Examples:
Function views
    1. Add an import:  from my_app import views
    2. Add a URL to urlpatterns:  path('', views.home, name='home')
Class-based views
    1. Add an import:  from other_app.views import Home
    2. Add a URL to urlpatterns:  path('', Home.as_view(), name='home')
Including another URLconf
    1. Import the include() function: from django.urls import include, path
    2. Add a URL to urlpatterns:  path('blog/', include('blog.urls'))
"""
from django.contrib import admin
from django.urls import path

urlpatterns = [
    path('admin/', admin.site.urls),
]
The URL mappings are managed through the urlpatterns variable, which is a Python list of path() functions. Each path() function either associates a URL pattern to a specific view, which will be displayed when the pattern is matched, or with another list of URL pattern testing code (in this second case, the pattern becomes the "base URL" for patterns defined in the target module). The urlpatterns list initially defines a single function that maps all URLs with the pattern admin/ to the module admin.site.urls, which contains the Administration application's own URL mapping definitions.
Note: The route in path() is a string defining a URL pattern to match. This string might include a named variable (in angle brackets), e.g. 'catalog/<id>/'. This pattern will match a URL like catalog/any_chars/ and pass any_chars to the view as a string with the parameter name id. We discuss path methods and route patterns further in later topics.
To add a new list item to the urlpatterns list, add the following lines to the bottom of the file. This new item includes a path() that forwards requests with the pattern catalog/ to the module catalog.urls (the file with the relative URL catalog/urls.py).
# Use include() to add paths from the catalog application
from django.urls import include

urlpatterns += [
    path('catalog/', include('catalog.urls')),
]
Note: Note that we included the import line (from django.urls import include) with the code that uses it (so it is easy to see what we've added), but it is common to include all your import lines at the top of a Python file.
Now let's redirect the root URL of our site (i.e. 127.0.0.1:8000) to the URL 127.0.0.1:8000/catalog/. This is the only app we'll be using in this project. To do this, we'll use a special view function, RedirectView, which takes the new relative URL to redirect to (/catalog/) as its first argument when the URL pattern specified in the path() function is matched (the root URL, in this case).
Add the following lines to the bottom of the file:
# Add URL maps to redirect the base URL to our application
from django.views.generic import RedirectView
urlpatterns += [
    path('', RedirectView.as_view(url='catalog/', permanent=True)),
]
Leave the first parameter of the path function empty to imply '/'. If you write the first parameter as '/' Django will give you the following warning when you start the development server:
System check identified some issues:

WARNINGS:
?: (urls.W002) Your URL pattern '/' has a route beginning with a '/'.
Remove this slash as it is unnecessary.
If this pattern is targeted in an include(), ensure the include() pattern has a trailing '/'.
Django does not serve static files like CSS, JavaScript, and images by default, but it can be useful for the development web server to do so while you're creating your site. As a final addition to this URL mapper, you can enable the serving of static files during development by appending the following lines.
Add the following final block to the bottom of the file now:
# Use static() to add URL mapping to serve static files during development (only)
from django.conf import settings
from django.conf.urls.static import static

urlpatterns += static(settings.STATIC_URL, document_root=settings.STATIC_ROOT)
Note: There are a number of ways to extend the urlpatterns list (previously, we just appended a new list item using the += operator to clearly separate the old and new code). We could have instead just included this new pattern-map in the original list definition:
urlpatterns = [
    path('admin/', admin.site.urls),
    path('catalog/', include('catalog.urls')),
    path('', RedirectView.as_view(url='catalog/')),
] + static(settings.STATIC_URL, document_root=settings.STATIC_ROOT)
As a final step, create a file inside your catalog folder called urls.py, and add the following text to define the (empty) imported urlpatterns. This is where we'll add our patterns as we build the application.
from django.urls import path
from . import views

urlpatterns = [

]
Testing the website framework
At this point we have a complete skeleton project. The website doesn't actually do anything yet, but it's worth running it to make sure that none of our changes have broken anything.
Before we do that, we should first run a database migration. This updates our database (to include any models in our installed applications) and removes some build warnings.
Running database migrations
Django uses an Object-Relational-Mapper (ORM) to map model definitions in the Django code to the data structure used by the underlying database. As we change our model definitions, Django tracks the changes and can create database migration scripts (in /django-locallibrary-tutorial/catalog/migrations/) to automatically migrate the underlying data structure in the database to match the model.
When we created the website, Django automatically added a number of models for use by the admin section of the site (which we'll look at later). Run the following commands to define tables for those models in the database (make sure you are in the directory that contains manage.py):
python3 manage.py makemigrations
python3 manage.py migrate
Warning: You'll need to run these commands every time your models change in a way that will affect the structure of the data that needs to be stored (including both addition and removal of whole models and individual fields).
The makemigrations command creates (but does not apply) the migrations for all applications installed in your project. You can specify the application name as well to just run a migration for a single app. This gives you a chance to check out the code for these migrations before they are applied. If you're a Django expert, you may choose to tweak them slightly!
The migrate command is what applies the migrations to your database. Django tracks which ones have been added to the current database.
Note: You should re-run migrations and re-test the site whenever you make significant changes. It doesn't take very long!
See Migrations (Django docs) for additional information about the lesser-used migration commands.
Running the website
During development, you can serve the website first using the development web server, and then viewing it on your local web browser.
Note: The development web server is not robust or performant enough for production use, but it is a very easy way to get your Django website up and running during development to give it a convenient quick test. By default it will serve the site to your local computer (http://127.0.0.1:8000/), but you can also specify other computers on your network to serve to. For more information see django-admin and manage.py: runserver (Django docs).
Run the development web server by calling the runserver command (in the same directory as manage.py):
python3 manage.py runserver
Once the server is running, you can view the site by navigating to http://127.0.0.1:8000/ in your local web browser. You should see a site error page that looks like this:
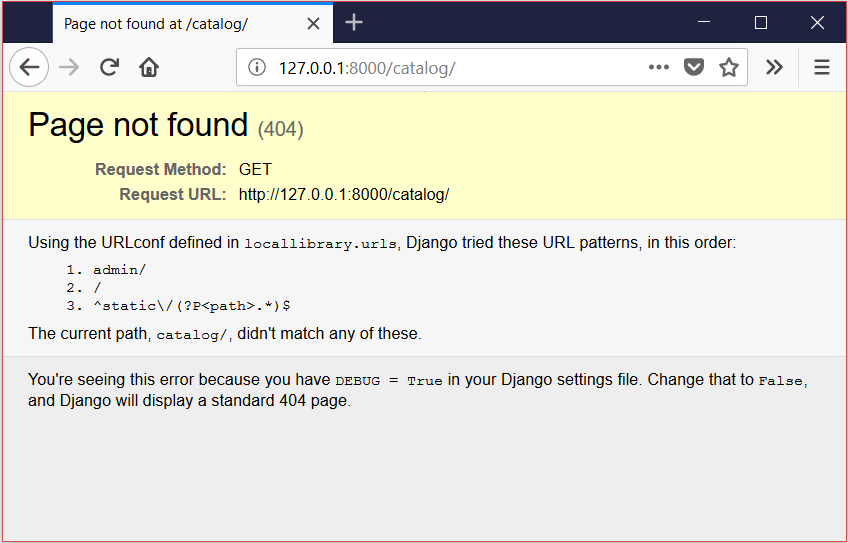
Don't worry! This error page is expected because we don't have any pages/urls defined in the catalog.urls module (which we're redirected to when we get a URL to the root of the site).
At this point, we know that Django is working!
Note: The example page demonstrates a great Django feature — automated debug logging. Whenever a page cannot be found, Django displays an error screen with useful information or any error raised by the code. In this case, we can see that the URL we've supplied doesn't match any of our URL patterns (as listed). Logging is turned off in production (which is when we put the site live on the Web), in which case a less informative but more user-friendly page will be served.
Don't forget to backup to GitHub
We've just done some significant work, so now is a good time to backup the project using GitHub.
First move the content of the top level locallibrary folder into the django_local_library folder that you created as a local GitHub repository when setting up the development environment. This will include manage.py, the locallibrary subfolder, the catalog subfolder, and anything else inside the top level folder.
Then add and commit the changes in the django_local_library folder and push them to GitHub. From the root of that folder, you can use a similar set of commands to those in the Modify and sync changes section of the Development environment topic:
# Get the current source from GitHub on the main branch
git checkout main
git pull origin main

# Create a branch and add/commit your newly created app skeleton
git checkout -b skeleton_website # Create and activate a new branch "skeleton_website"
git add -A # Add all changed files to the staging area
git commit -m "Create Skeleton framework for LocalLibrary" # Commit the changed files

# Push the branch to GitHub
git push origin skeleton_website
Then create and merge a PR from your GitHub repo.
After merging you can switch back to the main branch and pull your changes from GitHub:
git checkout main
git pull origin main
Note: If you don't delete the skeleton_website branch you can always switch back to it at some later point.
We won't necessarily mention this again in future, but you may find it useful to update GitHub with your changes at the end of each section in this tutorial.
Challenge yourself
The catalog/ directory contains files for the views, models, and other parts of the application. Open these files and inspect the boilerplate.
As you saw previously, a URL-mapping for the Admin site has already been added in the project's urls.py. Navigate to the admin area in your browser and see what happens (you can infer the correct URL from the mapping).
Summary
You have now created a complete skeleton website project, which you can go on to populate with URLs, models, views, and templates.
Now that the skeleton for the Local Library website is complete and running, it's time to start writing the code that makes this website do what it is supposed to do.
See also
- Writing your first Django app - part 1 (Django docs)
- Applications (Django Docs). Contains information on configuring applications.