Создание простой сцены с помощью Three.js
В 3D сцене любой игры, даже самой простой, есть стандартные сущности, такие как поверхности, расположенные в координатной системе, камера, для того, чтобы их видеть, света и материалы, для того, чтобы они лучше выглядели, анимации, чтобы их оживить и тд. Three.js, как и любая другая 3D библиотека, предоставляет встроенные функции, которые помогут вам в реализации 3D. В этой статье мы покажем вам основы использования Three, включая настройку среды, структуру необходимого HTML, фундаментальные объекты Three и как создать простейшую сцену.
Примечание: Мы выбрали Three, потому что это одна из самых популярных WebGL библиотек и она достаточно проста в освоении. Это не значит, что она самая лучшая, вы можете выбрать любую другую, например CopperLicht, GLGE, O3D и тд.
Настройка среды
Чтобы начать разработку с Three.js, нужно:
- Удостовериться, что вы используете современную версию браузера с поддержкой WebGL, например, Firefox или Chrome.
- Создать папку для экспериментов.
- Сохранить копию последней версии библиотеки Three.js в вашей папке.
- Открыть документацию Three.js в отдельной вкладке.
HTML структура
Здесь находится HTML структура, которую мы будем использовать:
<!doctype html>
<html>
  <head>
    <meta charset="utf-8" />
    <title>MDN Games: Three.js demo</title>
    <style>
      body {
        margin: 0;
        padding: 0;
      }
      canvas {
        width: 100%;
        height: 100%;
      }
    </style>
  </head>
  <body>
    <script src="three.min.js"></script>
    <script>
      var WIDTH = window.innerWidth;
      var HEIGHT = window.innerHeight;
      /* весь наш JavaScript-код будет после этого комментария */
    </script>
  </body>
</html>
Она содержит основную информацию: <title>, CSS, чтобы сделать ширину и высоту <canvas> элемента равным странице. В первом элементе <script> мы подключаем Three.js, во втором будем писать наш код, в котором уже создали 2 переменные для хранения width и height.
Прежде чем продолжить, скопируйте этот код в новый файл и сохраните в вашей рабочей директории под именем index.html.
Renderer
Renderer это инструмент для отрисовки сцены в браузере. Есть 2 вида таких инструментов: WebGL по умолчанию, другие - Canvas, SVG, CSS, и DOM. Они различаются по тому как все рендерится. Несмотря на различия в них, для пользователя все будет выглядеть одинаково. Поэтому, вы можете выбрать запасной вариант на случай, если браузер пользователя не поддерживает выбранную вами технологию.
var renderer = new THREE.WebGLRenderer({ antialias: true });
renderer.setSize(WIDTH, HEIGHT);
renderer.setClearColor(0xdddddd, 1);
document.body.appendChild(renderer.domElement);
Создаём новый WebGL renderer, устанавливаем размер так, чтобы он занимал все пространство страницы, прикрепляем DOM-элемент к странице. Вы могли заметить параметр antialias в первой строке — если он установлен в true, то границы объектов сглаживаются. Метод setClearColor() устанавливает цвет фона (мы установили в 0xDDDDDD, светло-серый, значение по умолчанию - чёрный).
Добавьте этот код в ваш элемент <script>.
Сцена
Сцена (scene) это место, где все происходит. Когда создаются новые объекты, они добавляются в сцену, чтобы их можно было увидеть. В three.js роль сцены выполняет объект Scene. Давайте создадим его, добавив следующих код:
var scene = new THREE.Scene();
Позже, мы будем использовать метод .add() для добавления объектов в сцену.
Камера
У нас есть сцена, теперь необходимо создать камеру. С помощью следующих строк мы добавим камеру, установим её позицию в координатной системе и направим её на нужную нам точку, где расположено то, что мы хотим видеть:
var camera = new THREE.PerspectiveCamera(70, WIDTH / HEIGHT);
camera.position.z = 50;
scene.add(camera);
Добавьте следующий код в программу.
Существует несколько типов камер: кубическая (Cube), ортографическая (Orthographic), но самая простая - перспективная (Perspective). Чтобы инициализировать её, нужно установить угол обзора и соотношение сторон: Первое нужно для указания того, как широко мы видим, последний для того, чтобы эти объекты имели правильные пропорции. Объясним поподробнее, что означают числа, что мы установили:
- Мы установили поле зрения в 70, с этим можно поэкспериментировать: чем больше число, тем больше угол обзора, тем шире мы видим. Представьте обычную камеру и камеру с эффектом fish eye, Которая позволяет увидеть больше. Значение по умолчанию 50.
- Соотношение сторон установлено в соотношение сторон окна браузера. Можно установить, например, в 16 ⁄ 9. Значение по умолчанию 1.
- Координата
z, равная 50, это дистанция от камеры до начала координат сцены вдоль осиz. Мы установили такое значение, чтобы увидеть объекты в сцене. Значенияxиyпо умолчанию равны 0.
Стоит поэкспериментировать с этими значениями, чтобы лучше разобраться в том, как они влияют на отрисовку сцены.
Примечание: значения позиции (например координата z) безразмерны, устанавливайте их так, чтобы вам было удобно с ними работать.
Отрисовка сцены
Всё уже готово, но мы пока что ничего не видим. Хотя мы настроили рендерер, нам всё равно нужно запустить рендеринг. Функция render() выполнит эту работу с небольшой помощью requestAnimationFrame(), которая заставляет сцену постоянно перерисовываться в каждом кадре:
function render() {
  requestAnimationFrame(render);
  renderer.render(scene, camera);
}
render();
На каждом новом кадре вызывается функция render(), а renderer рендерит scene и camera. Сразу после объявления функции мы в первый раз вызываем её, чтобы запустить цикл, после чего он будет использоваться бесконечно.
Ещё раз, добавьте этот новый код ниже ваших предыдущих дополнений. Попробуйте сохранить файл и открыть его в браузере. Теперь вы должны увидеть серое окно. Поздравляем!
Geometry
Now our scene is properly rendering, we can start adding 3D shapes. To speed up development, Three.js provides a bunch of predefined primitives, which you can use to create shapes instantly in a single line of code. There's cubes, spheres, cylinders, and more complicated shapes available. Detail like drawing required vertices and faces, for a given shape, is handled by the Three framework, so we can focus on higher level coding. Let's start, by defining the geometry for a cube shape, adding the following just above the render() function:
var boxGeometry = new THREE.BoxGeometry(10, 10, 10);
In this case, we define a simple cube that is 10 x 10 x 10 units. The geometry itself is not enough though, we also need a material that will be used for our shape.
Material
A material is what covers an object, the colors, or textures on its surface. In our case, we will choose a simple blue color to paint our box. There are a number of predefined materials which can be used: Basic, Phong, Lambert. Let's play with the last two later, but for now, the Basic one should be enough:
var basicMaterial = new THREE.MeshBasicMaterial({ color: 0x0095dd });
Add this line below the previously added.
Our material is now ready, what next?
Mesh
To apply the material to a geometry, a mesh is used. This takes on a shape, and adds the specified material to every face:
var cube = new THREE.Mesh(boxGeometry, basicMaterial);
Again, add this line below the one you previously added.
Добавление куба в сцену
Сейчас мы создали куб, используя 'geometry' и 'material'. Последнее, что мы должны сделать - добавить куб на сцену. Добавьте в код эту строку:
scene.add(cube);
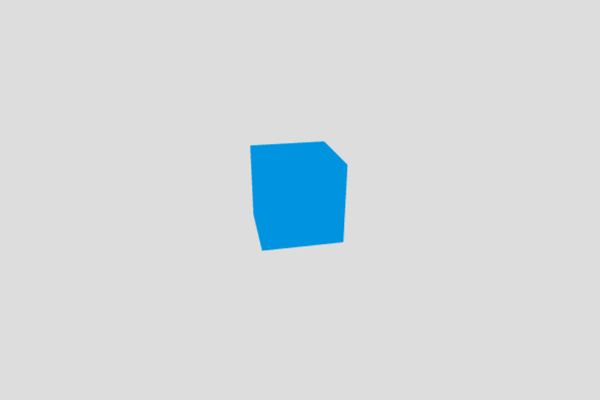
Если вы сохраните код и обновите вкладку браузера, вы увидите квадрат, а не куб, потому, что он стоит ровно напротив камеры и мы видим только одну сторону. У объектов есть полезное свойство - мы можем изменять их как хотим. Например, вы можете вращать его и масштабировать, сколько угодно. Что давайте немного повернём его, чтобы видеть больше сторон. Добавить в конец кода эту строку:
cube.rotation.set(0.4, 0.2, 0);
Поздравляю, вы создали объект в 3D-среде! This might have proven easier than you first thought? Here's how it should look:
Весь код который мы создали:
Вы также можете просмотреть на GitHub.
More shapes and materials
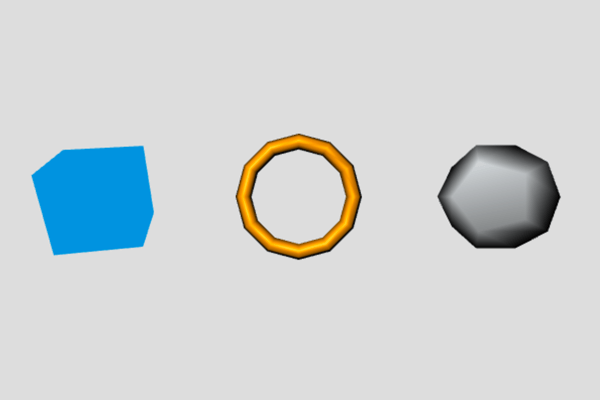
Now we will add more shapes to the scene, and explore other shapes, materials, lighting, and more. Let's move the cube to the left, to make space for some friends. Adding the following line just below the previous one:
cube.position.x = -25;
Now onto more shapes and materials. What might you input to add a torus, wrapped in the Phong material? Try adding the following lines, just below the lines defining the cube.
var torusGeometry = new THREE.TorusGeometry(7, 1, 6, 12);
var phongMaterial = new THREE.MeshPhongMaterial({ color: 0xff9500 });
var torus = new THREE.Mesh(torusGeometry, phongMaterial);
scene.add(torus);
These lines will add a torus geometry; the TorusGeometry() method's parameters define, and the parameters are radius, tube diameter, radial segment count, and tubular segment count. The Phong material should look more glossy than the box's simple Basic material, though right now our torus will just look black.
We can choose more fun predefined shapes. Let's play some more. Add the following lines, below those defining the torus:
var dodecahedronGeometry = new THREE.DodecahedronGeometry(7);
var lambertMaterial = new THREE.MeshLambertMaterial({ color: 0xeaeff2 });
var dodecahedron = new THREE.Mesh(dodecahedronGeometry, lambertMaterial);
dodecahedron.position.x = 25;
scene.add(dodecahedron);
This time, we are creating a dodecahedron, a shape containing twelve flat faces. The parameter, DodecahedronGeometry(), defines the size of the object. We're using a Lambert material, similar to Phong, but should be less glossy. Again it's black, for now. We're moving the object to the right, so it's not in the same position as the box, or torus.
As mentioned above, the new objects currently just look black. To have both, the Phong and Lambert materials properly visible, we need to introduce a source of light.
Lights
There are various types of light sources available in Three.js. The most basic is PointLight, which works like a flashlight, shining a spotlight in a defined direction. Add the following lines, below your shape definitions:
var light = new THREE.PointLight(0xffffff);
light.position.set(-10, 15, 50);
scene.add(light);
We define a white point of light, set its position a little away from the center of the scene, so it can light up some parts of the shapes, finally adding it to the scene. Now everything works as it should, all three shapes are visible. You should check the documentation for other types of lights, like Ambient, Directional, Hemisphere, or Spot. Experiment placing them on our scene, to see how they affect it.
This looks a little boring though. In a game, something is usually happening. We might see animations and such. So let's try breathing a little life into these shapes, by animating them!
Анимация
Мы можем использовать 'rotation', чтобы поменять положение куба. Также мы можем масштабировать фигуры или изменять их положение. Чтобы создать анимацию нужно внесённые изменения внести в цикл рендеринга, чтобы изменения происходили в каждом кадре.
Вращение
Вращать фигуры просто. Вы просто добавляете или отнимаете значение по оси вращения. Добавьте эту строку кода сразу после: requestAnimationFrame() invocation inside the render function:
cube.rotation.y += 0.01;
This rotates the cube on every frame, by a tiny bit, so the animation looks smooth.
Scaling
We can also scale an object. Applying a constant value, we would make it grow, or shrink just once. Let's make things more interesting. First, we implement a helper variable, called t, for counting elapsed time. Add it right before the render() function:
var t = 0;
Now let's increase the value by a given constant value, on each frame of the animation. Add the following lines, just below the requestAnimationFrame() invocation:
t += 0.01;
torus.scale.y = Math.abs(Math.sin(t));
We use Math.sin, ending up with quite an interesting result. This scales the torus, repeating the process, as sin is a periodic function. We're wrapping the scale value in Math.abs, to pass the absolute values, greater or equal to 0. As sin is between -1 and 1, negative values might render out torus in unexpected way. In this case it looks black half the time.
Now, onto movement.
Moving
Aside from rotation, and scaling, we can additionally move objects around the scene. Add the following, again just below our requestAnimationFrame() invocation:
dodecahedron.position.y = -7 * Math.sin(t * 2);
This will move the dodecahedron up and down, by applying the sin() value to the y axis on each frame, and a little adjustment to make it look cooler. Try changing these values, to see how it affects the animations.
Conclusion
Here's the final code:
You can also see it on GitHub and fork the repository, if you want to play with it locally. Now you understand the basics of Three.js, you can jump back to the parent page, 3D on the Web (en-US).
You could also try learning raw WebGL, to gain a better understanding of what's going on underneath. See our WebGL documentation.