开始编写我们的 Svelte 待办事项列表应用程序
现在我们对 Svelte 运作机制有初步的了解后,就能开始构建我们的示例应用程序:一个待办事项列表。此篇文章中,会先确认应用程序所需的功能,接着会建立 Todos.svelte 组件并编写一些静态标记(markup)语言和样式,待一切准备就绪后,就能开始开发待办事项列表应用程序的相关特性,我们将在后续文章实现它们。
我们想要让用户能够浏览、新增和删除任务,也能标记它们为完成状态。这将是我们在本系列教程中要开发的基本功能,此外,在开发过程中我们将会学到一些更进阶的概念。
| 前提: |
推荐你至少需熟悉基本的 HTML、CSS 与 JavaScript 等程序语言且具备终端/命令行环境基本知识。 你需要安装了 node 和 npm 的终端来编译和构建你的应用程序。 |
|---|---|
| 目标: | 学习如何建立一个 Svelte 组件并于另一个组件内渲染它,通过属性(prop)传递数据并保存它的状态。 |
与我们一起编写代码
Git
使用以下命令克隆 Github 仓库(假如本地还没有代码):
git clone https://github.com/opensas/mdn-svelte-tutorial.git
接着取得当前应用程序状态,执行:
cd mdn-svelte-tutorial/02-starting-our-todo-app
或像这样直接下载文件夹内容:
npx degit opensas/mdn-svelte-tutorial/02-starting-our-todo-app
记得执行 npm install && npm run dev 以开发模式来运行你的应用程序。
REPL
为了使用 REPL 和我们一起编写程序代码,点击如下链接:
https://svelte.dev/repl/b7b831ea3a354d3789cefbc31e2ca495?version=3.23.2
待办列表应用程序特性
这是我们预计完成待办列表应用程序的样子:
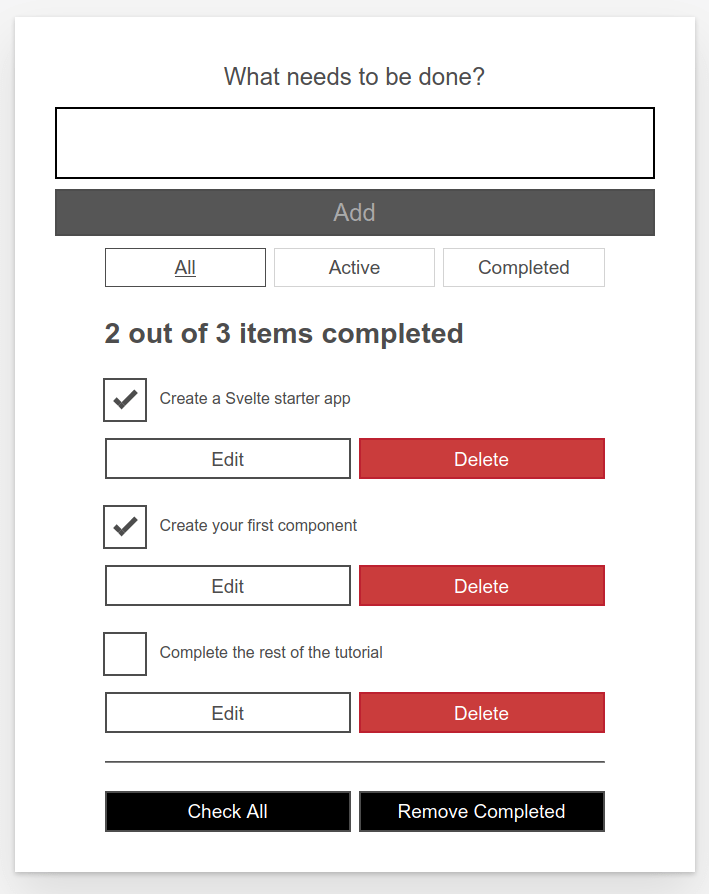
使用这个用户界面,我们的用户将能够做到以下事情:
- 浏览他们的任务。
- 标记任务为已完成或待办理,而不是删除它们。
- 删除任务。
- 新增任务。
- 通过状态过滤任务:全部、正在进行或已完成任务。
- 编辑任务。
- 标记全部任务为正在进行或已完成状态。
- 删除全部已完成任务。
建立我们第一个组件
建立 Todos.svelte 组件——这个组件包含我们的待办任务列表。
- 建立新文件夹——
src/components。备注: 你可以把组件放在
src文件夹当中的任何地方,但放在components文件夹是比较常见的做法,也让你可以更容易地找到它们。 - 建立
src/components/Todos.svelte文件并包含以下内容:html<h1>Svelte To-Do list</h1> - 改变
public/index.html中的title元素内容为 Svelte To-do list:html<title>Svelte To-Do list</title> - 打开
src/App.svelte并替换为以下内容:html<script> import Todos from "./components/Todos.svelte"; </script> <Todos /> - 在开发模式中,如果定义属性没有存在于组件中,Svelte 将会在浏览器控制台发出警告;在此例中,当我们于
src/main.js实例化App组件时,由于我们已经明确定义出name属性,但并没有实际在App中使用到,所以控制台现在应该会给你一个警告信息,如“<App> was created with unknown prop 'name'”。为了排除这个问题,请从src/main.js中移除name属性;main.js现在应该类似于这样:jsimport App from "./App.svelte"; const app = new App({ target: document.body, }); export default app;
假如你现在检查你的测试服务器 URL,应该会看到 Todos.svelte 组件已经渲染成如下画面:

加上静态标记语言
我们将会从应用程序的静态标记语言表示开始,所以你将会看到它的外观。复制并粘贴下面内容至 Todos.svelte 组件文件以取代现有内容:
<!-- Todos.svelte -->
<div class="todoapp stack-large">
  <!-- 新待办 -->
  <form>
    <h2 class="label-wrapper">
      <label for="todo-0" class="label__lg"> What needs to be done? </label>
    </h2>
    <input type="text" id="todo-0" autocomplete="off" class="input input__lg" />
    <button type="submit" disabled="" class="btn btn__primary btn__lg">
      Add
    </button>
  </form>

  <!-- 过滤器 -->
  <div class="filters btn-group stack-exception">
    <button class="btn toggle-btn" aria-pressed="true">
      <span class="visually-hidden">Show</span>
      <span>All</span>
      <span class="visually-hidden">tasks</span>
    </button>
    <button class="btn toggle-btn" aria-pressed="false">
      <span class="visually-hidden">Show</span>
      <span>Active</span>
      <span class="visually-hidden">tasks</span>
    </button>
    <button class="btn toggle-btn" aria-pressed="false">
      <span class="visually-hidden">Show</span>
      <span>Completed</span>
      <span class="visually-hidden">tasks</span>
    </button>
  </div>

  <!-- 待办状态 -->
  <h2 id="list-heading">2 out of 3 items completed</h2>

  <!-- 待办 -->
  <ul role="list" class="todo-list stack-large" aria-labelledby="list-heading">
    <!-- 待办—1(编辑模式)-->
    <li class="todo">
      <div class="stack-small">
        <form class="stack-small">
          <div class="form-group">
            <label for="todo-1" class="todo-label">
              New name for 'Create a Svelte starter app'
            </label>
            <input
              type="text"
              id="todo-1"
              autocomplete="off"
              class="todo-text" />
          </div>
          <div class="btn-group">
            <button class="btn todo-cancel" type="button">
              Cancel
              <span class="visually-hidden">renaming Create a Svelte starter app</span>
            </button>
            <button class="btn btn__primary todo-edit" type="submit">
              Save
              <span class="visually-hidden">new name for Create a Svelte starter app</span>
            </button>
          </div>
        </form>
      </div>
    </li>

    <!-- 待办—2 -->
    <li class="todo">
      <div class="stack-small">
        <div class="c-cb">
          <input type="checkbox" id="todo-2" checked />
          <label for="todo-2" class="todo-label">
            Create your first component
          </label>
        </div>
        <div class="btn-group">
          <button type="button" class="btn">
            Edit
            <span class="visually-hidden">Create your first component</span>
          </button>
          <button type="button" class="btn btn__danger">
            Delete
            <span class="visually-hidden">Create your first component</span>
          </button>
        </div>
      </div>
    </li>

    <!-- 待办—3 -->
    <li class="todo">
      <div class="stack-small">
        <div class="c-cb">
          <input type="checkbox" id="todo-3" />
          <label for="todo-3" class="todo-label">
            Complete the rest of the tutorial
          </label>
        </div>
        <div class="btn-group">
          <button type="button" class="btn">
            Edit
            <span class="visually-hidden">Complete the rest of the tutorial</span>
          </button>
          <button type="button" class="btn btn__danger">
            Delete
            <span class="visually-hidden">Complete the rest of the tutorial</span>
          </button>
        </div>
      </div>
    </li>
  </ul>

  <hr />

  <!-- 更多操作 -->
  <div class="btn-group">
    <button type="button" class="btn btn__primary">Check all</button>
    <button type="button" class="btn btn__primary">Remove completed</button>
  </div>
</div>
再次确认已经渲染出来的画面,你应该会看到如下样子:
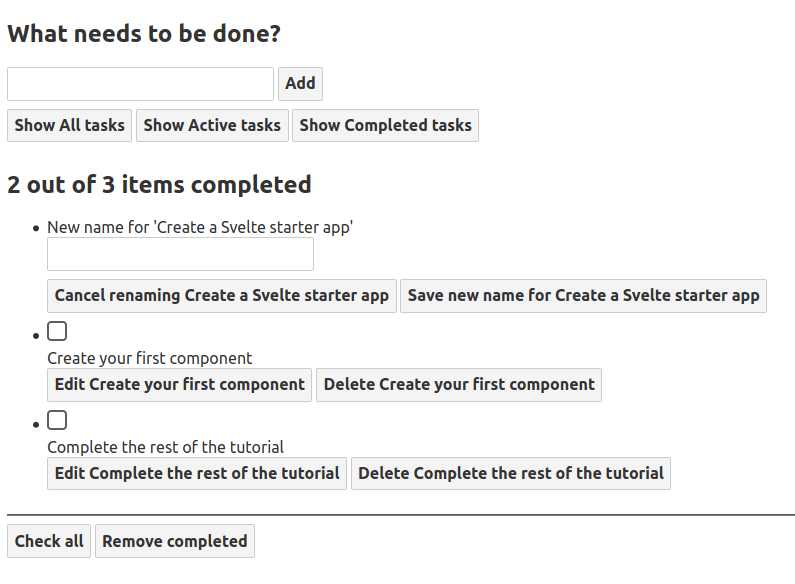
上面 HTML 标记语言的样式并不是那么好看,而且也没有实际功能。尽管如此,让我们来看看这些标记,看看它们如何与我们想要的特性关联起来:
- 一个标签和一个输入框用来输入新任务。
- 三个按钮用来依据状态来过滤任务。
- 一个标签用来显示任务总数及已完成任务数量。
- 一个无序列表,其中包含每一个任务项目。
- 编辑任务时,列表条目会有输入框和两个按钮用来取消或保存变更。
- 任务处于非编辑状态时,有一个复选框用于设置已完成状态,还有两个按钮用于编辑或删除任务。
- 最后有两个按钮,分别用于选中/取消选中所有任务和删除已完成任务。
随后的文章我们会逐一将这些特性完善,以及实现更多其他特性。
待办列表的无障碍特性
你可能有注意到一些特殊的属性。例如:
<button class="btn toggle-btn" aria-pressed="true">
  <span class="visually-hidden">Show</span>
  <span>All</span>
  <span class="visually-hidden">tasks</span>
</button>
在这里,aria-pressed 告诉无障碍技术(如屏幕阅读器)按钮可以是两种状态之一:pressed 或 unpressed。可以想象类似于开关状态。设定数值为 true 时,意谓着按钮默认是被按下的。
visually-hidden 类别现在还没有效果,因为我们还没引入任何 CSS。不过,一旦我们设置了样式,任何带有该类的元素都将对视力正常的用户隐藏起来,但屏幕阅读器用户仍然可以使用,这是因为视力正常的用户并不需要这些文字;这些文字是为了向屏幕阅读器用户提供更多有关按钮作用的信息,因为屏幕阅读器用户没有额外的视觉上下文来帮助他们。
再往下看一点,你可以找到如下 <ul> 元素:
<ul
  role="list"
  className="todo-list stack-large"
  aria-labelledby="list-heading"></ul>
role 属性则帮助无障碍技术去解释元素具有什么种类的语义数值——或它的目的。默认情况下,<ul> 会被视为列表,但在加上样式之后会破坏原有性质。明确定义规则为“list”将能复原 <ul> 元素本身意义。如果你想要想进一步了解为什么有必要这样做,可以去参考 Scott O'Hara 的“修复列表”(2019)文章。
aria-labelledby 属性则告诉辅助技术,我们把具有 id 属性值为 list-heading 的 <h2> 元素作为描述下面列表用途的标签。这种关联为列表提供了更多的上下文信息,可以帮助屏幕阅读器用户更好地理解列表的目的。
这似乎是讨论 Svelte 如何处理无障碍的好时机;让我们继续看下去。
Svelte 无障碍性支持
Svelte 特别重视无障碍性。目的是鼓励开发人员尽可能“默认”编写更具有无障碍性的代码。作为编译程序,Svelte 能静态地分析我们的 HTML 模板,而当组件被编译后,就能提出一些无障碍警告。
无障碍性(缩写为 a11y)并不总是容易做到,但 Svelte 会在编写不具无障碍性的标记时发出警告,从而帮助你。
举例来说,假如我们新增 <img> 元素至我们的 todos.svelte 组件,但没有对应的 alt 属性:
<h1>Svelte To-Do list</h1>

<img height="32" width="88" src="https://www.w3.org/WAI/wcag2A" />
编译器将会报出下列警告:
(!) Plugin svelte: A11y: <img> element should have an alt attribute
src/components/Todos.svelte
1: <h1>Svelte To-Do list</h1>
2:
3: <img height="32" width="88" src="https://www.w3.org/WAI/wcag2A">
   ^
created public/build/bundle.js in 220ms

[2020-07-15 04:07:43] waiting for changes...
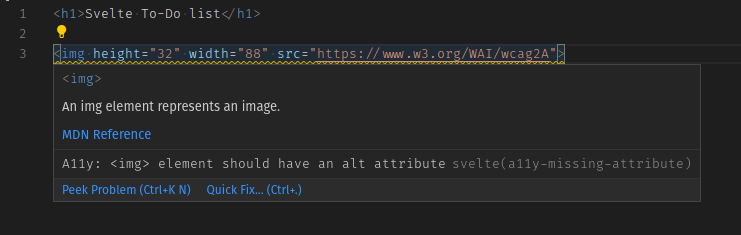
此外,在我们调用编译器之前,编辑器也会显示这个警告:
你可以像这样使用以 svelte-ignore 开头的注释,来告诉 Svelte 去忽略下一个标记语言区块的警告:
<!-- svelte-ignore a11y-missing-attribute -->
<img height="32" width="88" src="https://www.w3.org/WAI/wcag2A" />
备注: 通过 VSCode 你可以点击 Quick fix... 链接或按 Ctrl + . 来自动地加上这个忽略注释。
假如你想要全局地关闭这个警告,可以像这样在你的 rollup.config.js 文件中调整 Svelte 插件配置并补上这个 onwarn 处理器:
plugins: [
  svelte({
    dev: !production,
    css: (css) => {
      css.write("public/build/bundle.css");
    },
    // 警告通常直接传递给 Rollup。你可以
    // 选择在这里处理它们,例如压制
    // 带有特定代码的警告
    onwarn: (warning, handler) => {
      // 例如,我不在乎屏幕阅读器 -> 请 不 要 这 样 做!!!
      if (warning.code === "a11y-missing-attribute") return;

      // 让 Rollup 正常处理所有其他警告
      handler(warning);
    },
  }),

  // …
];
在设计上,这些警告是在编译器本身中实现的,而不是可以选择性加入项目的插件。这样做的目的是在默认情况下检查标记中的无障碍问题,并让你选择不使用特定的警告。
备注: 只有在有充分理由的情况下,例如在构建快速原型时,才应禁用这些警告。做一名优秀的网络公民,让尽可能多的用户都能访问你的网页,这一点非常重要。
Svelte 通过 eslint-plugin-jsx-a11y 来检查无障碍性规则,它是提供在 JSX 元素方面的许多无障碍性规则静态检查的一个 ESLint 插件。Svelte 的目标是在其编译器中实现所有这些功能,其中大部分功能已经移植到 Svelte 中。你可以在 GitHub 中看到尚未实现的无障碍检查。点击规则的链接可以查阅它们各自的含义。
为标记语言加上样式
让我们来将待办列表变得好看些。将 public/global.css 文件替换为如下内容:
/* 重置样式 */
*,
*::before,
*::after {
  box-sizing: border-box;
}
*:focus {
  outline: 3px dashed #228bec;
  outline-offset: 0;
}
html {
  font: 62.5% / 1.15 sans-serif;
}
h1,
h2 {
  margin-bottom: 0;
}
ul {
  list-style: none;
  padding: 0;
}
button {
  border: none;
  margin: 0;
  padding: 0;
  width: auto;
  overflow: visible;
  background: transparent;
  color: inherit;
  font: inherit;
  line-height: normal;
  -webkit-font-smoothing: inherit;
  -moz-osx-font-smoothing: inherit;
  -webkit-appearance: none;
}
button::-moz-focus-inner {
  border: 0;
}
button,
input,
optgroup,
select,
textarea {
  font-family: inherit;
  font-size: 100%;
  line-height: 1.15;
  margin: 0;
}
button,
input {
  overflow: visible;
}
input[type="text"] {
  border-radius: 0;
}
body {
  width: 100%;
  max-width: 68rem;
  margin: 0 auto;
  font:
    1.6rem/1.25 Arial,
    sans-serif;
  background-color: #f5f5f5;
  color: #4d4d4d;
}
@media screen and (min-width: 620px) {
  body {
    font-size: 1.9rem;
    line-height: 1.31579;
  }
}
/* 重置样式结尾 */

/* 全局样式 */
.form-group > input[type="text"] {
  display: inline-block;
  margin-top: 0.4rem;
}
.btn {
  padding: 0.8rem 1rem 0.7rem;
  border: 0.2rem solid #4d4d4d;
  cursor: pointer;
  text-transform: capitalize;
}
.btn.toggle-btn {
  border-width: 1px;
  border-color: #d3d3d3;
}
.btn.toggle-btn[aria-pressed="true"] {
  text-decoration: underline;
  border-color: #4d4d4d;
}
.btn__danger {
  color: #fff;
  background-color: #ca3c3c;
  border-color: #bd2130;
}
.btn__filter {
  border-color: lightgrey;
}
.btn__primary {
  color: #fff;
  background-color: #000;
}
.btn__primary:disabled {
  color: darkgrey;
  background-color: #565656;
}
.btn-group {
  display: flex;
  justify-content: space-between;
}
.btn-group > * {
  flex: 1 1 49%;
}
.btn-group > * + * {
  margin-left: 0.8rem;
}
.label-wrapper {
  margin: 0;
  flex: 0 0 100%;
  text-align: center;
}
.visually-hidden {
  position: absolute !important;
  height: 1px;
  width: 1px;
  overflow: hidden;
  clip: rect(1px 1px 1px 1px);
  clip: rect(1px, 1px, 1px, 1px);
  white-space: nowrap;
}
[class*="stack"] > * {
  margin-top: 0;
  margin-bottom: 0;
}
.stack-small > * + * {
  margin-top: 1.25rem;
}
.stack-large > * + * {
  margin-top: 2.5rem;
}
@media screen and (min-width: 550px) {
  .stack-small > * + * {
    margin-top: 1.4rem;
  }
  .stack-large > * + * {
    margin-top: 2.8rem;
  }
}
.stack-exception {
  margin-top: 1.2rem;
}
/* 全局样式结尾 */

.todoapp {
  background: #fff;
  margin: 2rem 0 4rem 0;
  padding: 1rem;
  position: relative;
  box-shadow:
    0 2px 4px 0 rgb(0 0 0 / 20%),
    0 2.5rem 5rem 0 rgb(0 0 0 / 10%);
}
@media screen and (min-width: 550px) {
  .todoapp {
    padding: 4rem;
  }
}
.todoapp > * {
  max-width: 50rem;
  margin-left: auto;
  margin-right: auto;
}
.todoapp > form {
  max-width: 100%;
}
.todoapp > h1 {
  display: block;
  max-width: 100%;
  text-align: center;
  margin: 0;
  margin-bottom: 1rem;
}
.label__lg {
  line-height: 1.01567;
  font-weight: 300;
  padding: 0.8rem;
  margin-bottom: 1rem;
  text-align: center;
}
.input__lg {
  padding: 2rem;
  border: 2px solid #000;
}
.input__lg:focus {
  border-color: #4d4d4d;
  box-shadow: inset 0 0 0 2px;
}
[class*="__lg"] {
  display: inline-block;
  width: 100%;
  font-size: 1.9rem;
}
[class*="__lg"]:not(:last-child) {
  margin-bottom: 1rem;
}
@media screen and (min-width: 620px) {
  [class*="__lg"] {
    font-size: 2.4rem;
  }
}
.filters {
  width: 100%;
  margin: unset auto;
}
/* 待办条目样式 */
.todo {
  display: flex;
  flex-direction: row;
  flex-wrap: wrap;
}
.todo > * {
  flex: 0 0 100%;
}
.todo-text {
  width: 100%;
  min-height: 4.4rem;
  padding: 0.4rem 0.8rem;
  border: 2px solid #565656;
}
.todo-text:focus {
  box-shadow: inset 0 0 0 2px;
}
/* 复选框样式 */
.c-cb {
  box-sizing: border-box;
  font-family: Arial, sans-serif;
  -webkit-font-smoothing: antialiased;
  font-weight: 400;
  font-size: 1.6rem;
  line-height: 1.25;
  display: block;
  position: relative;
  min-height: 44px;
  padding-left: 40px;
  clear: left;
}
.c-cb > label::before,
.c-cb > input[type="checkbox"] {
  box-sizing: border-box;
  top: -2px;
  left: -2px;
  width: 44px;
  height: 44px;
}
.c-cb > input[type="checkbox"] {
  -webkit-font-smoothing: antialiased;
  cursor: pointer;
  position: absolute;
  z-index: 1;
  margin: 0;
  opacity: 0;
}
.c-cb > label {
  font-size: inherit;
  font-family: inherit;
  line-height: inherit;
  display: inline-block;
  margin-bottom: 0;
  padding: 8px 15px 5px;
  cursor: pointer;
  touch-action: manipulation;
}
.c-cb > label::before {
  content: "";
  position: absolute;
  border: 2px solid currentColor;
  background: transparent;
}
.c-cb > input[type="checkbox"]:focus + label::before {
  border-width: 4px;
  outline: 3px dashed #228bec;
}
.c-cb > label::after {
  box-sizing: content-box;
  content: "";
  position: absolute;
  top: 11px;
  left: 9px;
  width: 18px;
  height: 7px;
  transform: rotate(-45deg);
  border: solid;
  border-width: 0 0 5px 5px;
  border-top-color: transparent;
  opacity: 0;
  background: transparent;
}
.c-cb > input[type="checkbox"]:checked + label::after {
  opacity: 1;
}
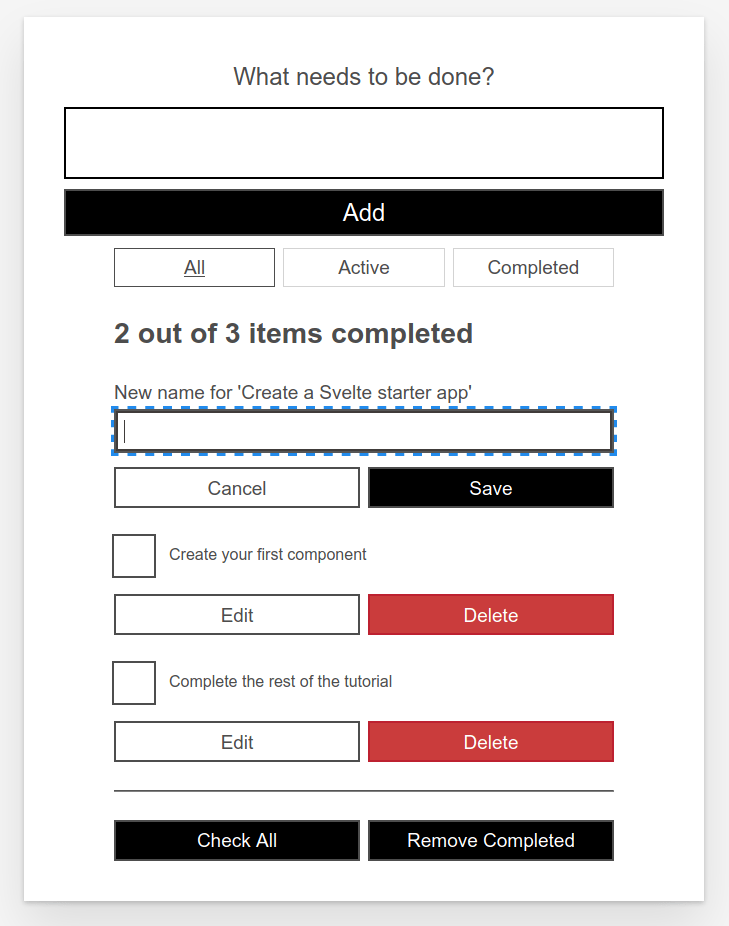
当我们为标记语言加上样式后,现在看起来好多了:
到目前为止的代码
Git
若想要看到本文结束后程序代码所呈现的最终结果,请获取我们仓库的复制:
cd mdn-svelte-tutorial/03-adding-dynamic-behavior
或直接下载文件夹内容:
npx degit opensas/mdn-svelte-tutorial/03-adding-dynamic-behavior
记得执行 npm install && npm run dev 以开发模式来运行你的应用程序。
REPL
若要在 REPL 查看当前程序代码状态,请点击如下链接:
https://svelte.dev/repl/c862d964d48d473ca63ab91709a0a5a0?version=3.23.2