Express Tutorial Part 3: Using a Database (with Mongoose)
This article briefly introduces databases, and how to use them with Node/Express apps. It then goes on to show how we can use Mongoose to provide database access for the LocalLibrary website. It explains how object schema and models are declared, the main field types, and basic validation. It also briefly shows a few of the main ways in which you can access model data.
| Prerequisites: | Express Tutorial Part 2: Creating a skeleton website |
|---|---|
| Objective: | To be able to design and create your own models using Mongoose. |
Overview
Library staff will use the Local Library website to store information about books and borrowers, while library members will use it to browse and search for books, find out whether there are any copies available, and then reserve or borrow them. In order to store and retrieve information efficiently, we will store it in a database.
Express apps can use many different databases, and there are several approaches you can use for performing Create, Read, Update and Delete (CRUD) operations. This tutorial provides a brief overview of some of the available options and then goes on to show in detail the particular mechanisms selected.
What databases can I use?
Express apps can use any database supported by Node (Express itself doesn't define any specific additional behavior/requirements for database management). There are many popular options, including PostgreSQL, MySQL, Redis, SQLite, and MongoDB.
When choosing a database, you should consider things like time-to-productivity/learning curve, performance, ease of replication/backup, cost, community support, etc. While there is no single "best" database, almost any of the popular solutions should be more than acceptable for a small-to-medium-sized site like our Local Library.
For more information on the options see Database integration (Express docs).
What is the best way to interact with a database?
There are two common approaches for interacting with a database:
- Using the databases' native query language, such as SQL.
- Using an Object Relational Mapper ("ORM"). An ORM represents the website's data as JavaScript objects, which are then mapped to the underlying database. Some ORMs are tied to a specific database, while others provide a database-agnostic backend.
The very best performance can be gained by using SQL, or whatever query language is supported by the database. ODM's are often slower because they use translation code to map between objects and the database format, which may not use the most efficient database queries (this is particularly true if the ODM supports different database backends, and must make greater compromises in terms of what database features are supported).
The benefit of using an ORM is that programmers can continue to think in terms of JavaScript objects rather than database semantics — this is particularly true if you need to work with different databases (on either the same or different websites). They also provide an obvious place to perform data validation.
Note: Using ODM/ORMs often results in lower costs for development and maintenance! Unless you're very familiar with the native query language or performance is paramount, you should strongly consider using an ODM.
What ORM/ODM should I use?
There are many ODM/ORM solutions available on the npm package manager site (check out the odm and orm tags for a subset!).
A few solutions that were popular at the time of writing are:
- Mongoose: Mongoose is a MongoDB object modeling tool designed to work in an asynchronous environment.
- Waterline: An ORM extracted from the Express-based Sails web framework. It provides a uniform API for accessing numerous different databases, including Redis, MySQL, LDAP, MongoDB, and Postgres.
- Bookshelf: Features both promise-based and traditional callback interfaces, providing transaction support, eager/nested-eager relation loading, polymorphic associations, and support for one-to-one, one-to-many, and many-to-many relations. Works with PostgreSQL, MySQL, and SQLite3.
- Objection: Makes it as easy as possible to use the full power of SQL and the underlying database engine (supports SQLite3, Postgres, and MySQL).
- Sequelize is a promise-based ORM for Node.js and io.js. It supports the dialects PostgreSQL, MySQL, MariaDB, SQLite, and MSSQL and features solid transaction support, relations, read replication and more.
- Node ORM2 is an Object Relationship Manager for NodeJS. It supports MySQL, SQLite, and Progress, helping to work with the database using an object-oriented approach.
- GraphQL: Primarily a query language for restful APIs, GraphQL is very popular, and has features available for reading data from databases.
As a general rule, you should consider both the features provided and the "community activity" (downloads, contributions, bug reports, quality of documentation, etc.) when selecting a solution. At the time of writing Mongoose is by far the most popular ODM, and is a reasonable choice if you're using MongoDB for your database.
Using Mongoose and MongoDB for the LocalLibrary
For the Local Library example (and the rest of this topic) we're going to use the Mongoose ODM to access our library data. Mongoose acts as a front end to MongoDB, an open source NoSQL database that uses a document-oriented data model. A "collection" of "documents" in a MongoDB database is analogous to a "table" of "rows" in a relational database.
This ODM and database combination is extremely popular in the Node community, partially because the document storage and query system looks very much like JSON, and is hence familiar to JavaScript developers.
Note: You don't need to know MongoDB in order to use Mongoose, although parts of the Mongoose documentation are easier to use and understand if you are already familiar with MongoDB.
The rest of this tutorial shows how to define and access the Mongoose schema and models for the LocalLibrary website example.
Designing the LocalLibrary models
Before you jump in and start coding the models, it's worth taking a few minutes to think about what data we need to store and the relationships between the different objects.
We know that we need to store information about books (title, summary, author, genre, ISBN) and that we might have multiple copies available (with globally unique ids, availability statuses, etc.). We might need to store more information about the author than just their name, and there might be multiple authors with the same or similar names. We want to be able to sort information based on the book title, author, genre, and category.
When designing your models it makes sense to have separate models for every "object" (a group of related information). In this case some obvious candidates for these models are books, book instances, and authors.
You might also want to use models to represent selection-list options (e.g. like a drop-down list of choices), rather than hard-coding the choices into the website itself — this is recommended when all the options aren't known up front or may change. A good example is a genre (e.g. fantasy, science fiction, etc.).
Once we've decided on our models and fields, we need to think about the relationships between them.
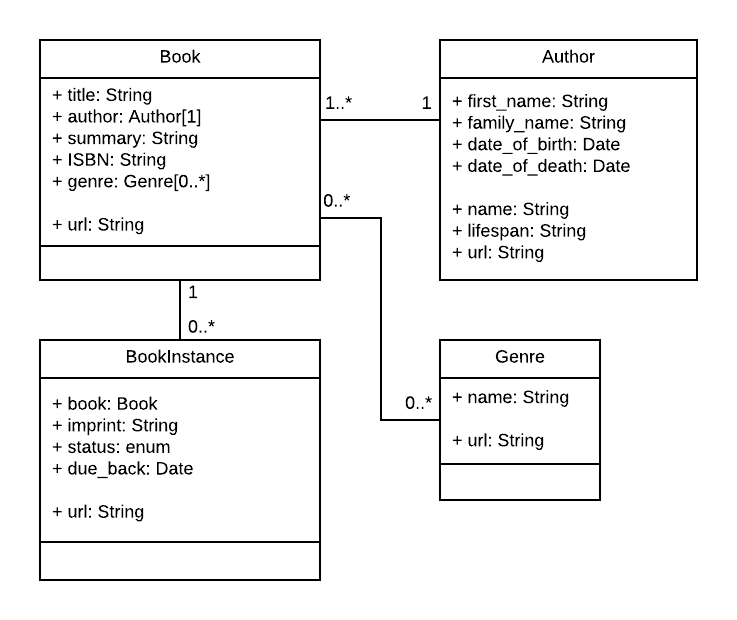
With that in mind, the UML association diagram below shows the models we'll define in this case (as boxes). As discussed above, we've created models for the book (the generic details of the book), book instance (status of specific physical copies of the book available in the system), and author. We have also decided to have a model for the genre so that values can be created dynamically. We've decided not to have a model for the BookInstance:status — we will hard code the acceptable values because we don't expect these to change. Within each of the boxes, you can see the model name, the field names and types, and also the methods and their return types.
The diagram also shows the relationships between the models, including their multiplicities. The multiplicities are the numbers on the diagram showing the numbers (maximum and minimum) of each model that may be present in the relationship. For example, the connecting line between the boxes shows that Book and a Genre are related. The numbers close to the Book model show that a Genre must have zero or more Books (as many as you like), while the numbers on the other end of the line next to the Genre show that a book can have zero or more associated Genres.
Note: As discussed in our Mongoose primer below it is often better to have the field that defines the relationship between the documents/models in just one model (you can still find the reverse relationship by searching for the associated _id in the other model). Below we have chosen to define the relationship between Book/Genre and Book/Author in the Book schema, and the relationship between the Book/BookInstance in the BookInstance Schema. This choice was somewhat arbitrary — we could equally well have had the field in the other schema.
Note: The next section provides a basic primer explaining how models are defined and used. As you read it, consider how we will construct each of the models in the diagram above.
Database APIs are asynchronous
Database methods to create, find, update, or delete records are asynchronous. What this means is that the methods return immediately, and the code to handle the success or failure of the method runs at a later time when the operation completes. Other code can execute while the server is waiting for the database operation to complete, so the server can remain responsive to other requests.
JavaScript has a number of mechanisms for supporting asynchronous behavior. Historically JavaScript relied heavily on passing callback functions to asynchronous methods to handle the success and error cases. In modern JavaScript callbacks have largely been replaced by Promises. Promises are objects that are (immediately) returned by an asynchronous method that represent its future state. When the operation completes, the promise object is "settled", and resolves an object that represents the result of the operation or an error.
There are two main ways you can use promises to run code when a promise is settled, and we highly recommend that you read How to use promises for a high level overview of both approaches.
In this tutorial, we'll primarily be using await to wait on promise completion within an async function, because this leads to more readable and understandable asynchronous code.
The way this approach works is that you use the async function keyword to mark a function as asynchronous, and then inside that function apply await to any method that returns a promise.
When the asynchronous function is executed its operation is paused at the first await method until the promise settles.
From the perspective of the surrounding code the asynchronous function then returns and the code after it is able to run.
Later when the promise settles, the await method inside the asynchronous function returns with the result, or an error is thrown if the promise was rejected.
The code in the asynchronous function then executes until either another await is encountered, at which point it will pause again, or until all the code in the function has been run.
You can see how this works in the example below.
myFunction() is an asynchronous function that is called within a try...catch block.
When myFunction() is run, code execution is paused at methodThatReturnsPromise() until the promise resolves, at which point the code continues to aFunctionThatReturnsPromise() and waits again.
The code in the catch block runs if an error is thrown in the asynchronous function, and this will happen if the promise returned by either of the methods is rejected.
async function myFunction {
  // ...
  await someObject.methodThatReturnsPromise();
  // ...
  await aFunctionThatReturnsPromise();
  // ...
}

try {
  // ...
  myFunction();
  // ...
} catch (e) {
 // error handling code
}
The asynchronous methods above are run in sequence.
If the methods don't depend on each other then you can run them in parallel and finish the whole operation more quickly.
This is done using the Promise.all() method, which takes an iterable of promises as input and returns a single Promise.
This returned promise fulfills when all of the input's promises fulfill, with an array of the fulfillment values.
It rejects when any of the input's promises rejects, with this first rejection reason.
The code below shows how this works.
First, we have two functions that return promises.
We await on both of them to complete using the promise returned by Promise.all().
Once they both complete await returns and the results array is populated,
the function then continues to the next await, and waits until the promise returned by anotherFunctionThatReturnsPromise() is settled.
You would call the myFunction() in a try...catch block to catch any errors.
async function myFunction {
  // ...
  const [resultFunction1, resultFunction2] = await Promise.all([
     functionThatReturnsPromise1(),
     functionThatReturnsPromise2()
  ]);
  // ...
  await anotherFunctionThatReturnsPromise(resultFunction1);
}
Promises with await/async allow both flexible and "comprehensible" control over asynchronous execution!
Mongoose primer
This section provides an overview of how to connect Mongoose to a MongoDB database, how to define a schema and a model, and how to make basic queries.
Note: This primer is heavily influenced by the Mongoose quick start on npm and the official documentation.
Installing Mongoose and MongoDB
Mongoose is installed in your project (package.json) like any other dependency — using npm. To install it, use the following command inside your project folder:
npm install mongoose
Installing Mongoose adds all its dependencies, including the MongoDB database driver, but it does not install MongoDB itself. If you want to install a MongoDB server then you can download installers from here for various operating systems and install it locally. You can also use cloud-based MongoDB instances.
Note: For this tutorial, we'll be using the MongoDB Atlas cloud-based database as a service free tier to provide the database. This is suitable for development and makes sense for the tutorial because it makes "installation" operating system independent (database-as-a-service is also one approach you might use for your production database).
Connecting to MongoDB
Mongoose requires a connection to a MongoDB database.
You can require() and connect to a locally hosted database with mongoose.connect() as shown below (for the tutorial we'll instead connect to an internet-hosted database).
// Import the mongoose module
const mongoose = require("mongoose");

// Set `strictQuery: false` to globally opt into filtering by properties that aren't in the schema
// Included because it removes preparatory warnings for Mongoose 7.
// See: https://mongoosejs.com/docs/migrating_to_6.html#strictquery-is-removed-and-replaced-by-strict
mongoose.set("strictQuery", false);

// Define the database URL to connect to.
const mongoDB = "mongodb://127.0.0.1/my_database";

// Wait for database to connect, logging an error if there is a problem
main().catch((err) => console.log(err));
async function main() {
  await mongoose.connect(mongoDB);
}
Note: As discussed in the Database APIs are asynchronous section, here we await on the promise returned by the connect() method within an async function.
We use the promise catch() handler to handle any errors when trying to connect, but we might also have called main() within a try...catch block.
You can get the default Connection object with mongoose.connection.
If you need to create additional connections you can use mongoose.createConnection().
This takes the same form of database URI (with host, database, port, options, etc.) as connect() and returns a Connection object).
Note that createConnection() returns immediately; if you need to wait on the connection to be established you can call it with asPromise() to return a promise (mongoose.createConnection(mongoDB).asPromise()).
Defining and creating models
Models are defined using the Schema interface. The Schema allows you to define the fields stored in each document along with their validation requirements and default values. In addition, you can define static and instance helper methods to make it easier to work with your data types, and also virtual properties that you can use like any other field, but which aren't actually stored in the database (we'll discuss a bit further below).
Schemas are then "compiled" into models using the mongoose.model() method. Once you have a model you can use it to find, create, update, and delete objects of the given type.
Note: Each model maps to a collection of documents in the MongoDB database. The documents will contain the fields/schema types defined in the model Schema.
Defining schemas
The code fragment below shows how you might define a simple schema. First you require() mongoose, then use the Schema constructor to create a new schema instance, defining the various fields inside it in the constructor's object parameter.
// Require Mongoose
const mongoose = require("mongoose");

// Define a schema
const Schema = mongoose.Schema;

const SomeModelSchema = new Schema({
  a_string: String,
  a_date: Date,
});
In the case above we just have two fields, a string and a date. In the next sections, we will show some of the other field types, validation, and other methods.
Creating a model
Models are created from schemas using the mongoose.model() method:
// Define schema
const Schema = mongoose.Schema;

const SomeModelSchema = new Schema({
  a_string: String,
  a_date: Date,
});

// Compile model from schema
const SomeModel = mongoose.model("SomeModel", SomeModelSchema);
The first argument is the singular name of the collection that will be created for your model (Mongoose will create the database collection for the model SomeModel above), and the second argument is the schema you want to use in creating the model.
Note: Once you've defined your model classes you can use them to create, update, or delete records, and run queries to get all records or particular subsets of records. We'll show you how to do this in the Using models section, and when we create our views.
Schema types (fields)
A schema can have an arbitrary number of fields — each one represents a field in the documents stored in MongoDB. An example schema showing many of the common field types and how they are declared is shown below.
const schema = new Schema({
  name: String,
  binary: Buffer,
  living: Boolean,
  updated: { type: Date, default: Date.now() },
  age: { type: Number, min: 18, max: 65, required: true },
  mixed: Schema.Types.Mixed,
  _someId: Schema.Types.ObjectId,
  array: [],
  ofString: [String], // You can also have an array of each of the other types too.
  nested: { stuff: { type: String, lowercase: true, trim: true } },
});
Most of the SchemaTypes (the descriptors after "type:" or after field names) are self-explanatory. The exceptions are:
ObjectId: Represents specific instances of a model in the database. For example, a book might use this to represent its author object. This will actually contain the unique ID (_id) for the specified object. We can use thepopulate()method to pull in the associated information when needed.Mixed: An arbitrary schema type.[]: An array of items. You can perform JavaScript array operations on these models (push, pop, unshift, etc.). The examples above show an array of objects without a specified type and an array ofStringobjects, but you can have an array of any type of object.
The code also shows both ways of declaring a field:
- Field name and type as a key-value pair (i.e. as done with fields
name,binaryandliving). - Field name followed by an object defining the
type, and any other options for the field. Options include things like:- default values.
- built-in validators (e.g. max/min values) and custom validation functions.
- Whether the field is required
- Whether
Stringfields should automatically be set to lowercase, uppercase, or trimmed (e.g.{ type: String, lowercase: true, trim: true })
For more information about options see SchemaTypes (Mongoose docs).
Validation
Mongoose provides built-in and custom validators, and synchronous and asynchronous validators. It allows you to specify both the acceptable range of values and the error message for validation failure in all cases.
The built-in validators include:
- All SchemaTypes have the built-in required validator. This is used to specify whether the field must be supplied in order to save a document.
- Numbers have min and max validators.
- Strings have:
The example below (slightly modified from the Mongoose documents) shows how you can specify some of the validator types and error messages:
const breakfastSchema = new Schema({
  eggs: {
    type: Number,
    min: [6, "Too few eggs"],
    max: 12,
    required: [true, "Why no eggs?"],
  },
  drink: {
    type: String,
    enum: ["Coffee", "Tea", "Water"],
  },
});
For complete information on field validation see Validation (Mongoose docs).
Virtual properties
Virtual properties are document properties that you can get and set but that do not get persisted to MongoDB. The getters are useful for formatting or combining fields, while setters are useful for de-composing a single value into multiple values for storage. The example in the documentation constructs (and deconstructs) a full name virtual property from a first and last name field, which is easier and cleaner than constructing a full name every time one is used in a template.
Note: We will use a virtual property in the library to define a unique URL for each model record using a path and the record's _id value.
For more information see Virtuals (Mongoose documentation).
Methods and query helpers
A schema can also have instance methods, static methods, and query helpers. The instance and static methods are similar, but with the obvious difference that an instance method is associated with a particular record and has access to the current object. Query helpers allow you to extend mongoose's chainable query builder API (for example, allowing you to add a query "byName" in addition to the find(), findOne() and findById() methods).
Using models
Once you've created a schema you can use it to create models. The model represents a collection of documents in the database that you can search, while the model's instances represent individual documents that you can save and retrieve.
We provide a brief overview below. For more information see: Models (Mongoose docs).
Note: Creation, update, deletion and querying of records are asynchronous operations that return a promise.
The examples below show just the use of the relevant methods and await (i.e. the essential code for using the methods).
The surrounding async function and try...catch block to catch errors are omitted for clarity.
For more information on using await/async see Database APIs are asynchronous above.
Creating and modifying documents
To create a record you can define an instance of the model and then call save() on it.
The examples below assume SomeModel is a model (with a single field name) that we have created from our schema.
// Create an instance of model SomeModel
const awesome_instance = new SomeModel({ name: "awesome" });

// Save the new model instance asynchronously
await awesome_instance.save();
You can also use create() to define the model instance at the same time as you save it.
Below we create just one, but you can create multiple instances by passing in an array of objects.
await SomeModel.create({ name: "also_awesome" });
Every model has an associated connection (this will be the default connection when you use mongoose.model()). You create a new connection and call .model() on it to create the documents on a different database.
You can access the fields in this new record using the dot syntax, and change the values. You have to call save() or update() to store modified values back to the database.
// Access model field values using dot notation
console.log(awesome_instance.name); //should log 'also_awesome'

// Change record by modifying the fields, then calling save().
awesome_instance.name = "New cool name";
await awesome_instance.save();
Searching for records
You can search for records using query methods, specifying the query conditions as a JSON document. The code fragment below shows how you might find all athletes in a database that play tennis, returning just the fields for athlete name and age. Here we just specify one matching field (sport) but you can add more criteria, specify regular expression criteria, or remove the conditions altogether to return all athletes.
const Athlete = mongoose.model("Athlete", yourSchema);

// find all athletes who play tennis, returning the 'name' and 'age' fields
const tennisPlayers = await Athlete.find(
  { sport: "Tennis" },
  "name age",
).exec();
Note: It is important to remember that not finding any results is not an error for a search — but it may be a fail-case in the context of your application. If your application expects a search to find a value you can check the number of entries returned in the result.
Query APIs, such as find(), return a variable of type Query.
You can use a query object to build up a query in parts before executing it with the exec() method.
exec() executes the query and returns a promise that you can await on for the result.
// find all athletes that play tennis
const query = Athlete.find({ sport: "Tennis" });

// selecting the 'name' and 'age' fields
query.select("name age");

// limit our results to 5 items
query.limit(5);

// sort by age
query.sort({ age: -1 });

// execute the query at a later time
query.exec();
Above we've defined the query conditions in the find() method. We can also do this using a where() function, and we can chain all the parts of our query together using the dot operator (.) rather than adding them separately.
The code fragment below is the same as our query above, with an additional condition for the age.
Athlete.find()
  .where("sport")
  .equals("Tennis")
  .where("age")
  .gt(17)
  .lt(50) // Additional where query
  .limit(5)
  .sort({ age: -1 })
  .select("name age")
  .exec();
The find() method gets all matching records, but often you just want to get one match. The following methods query for a single record:
findById(): Finds the document with the specifiedid(every document has a uniqueid).findOne(): Finds a single document that matches the specified criteria.findByIdAndDelete(),findByIdAndUpdate(),findOneAndRemove(),findOneAndUpdate(): Finds a single document byidor criteria and either updates or removes it. These are useful convenience functions for updating and removing records.
Note: There is also a countDocuments() method that you can use to get the number of items that match conditions. This is useful if you want to perform a count without actually fetching the records.
There is a lot more you can do with queries. For more information see: Queries (Mongoose docs).
Working with related documents — population
You can create references from one document/model instance to another using the ObjectId schema field, or from one document to many using an array of ObjectIds. The field stores the id of the related model. If you need the actual content of the associated document, you can use the populate() method in a query to replace the id with the actual data.
For example, the following schema defines authors and stories.
Each author can have multiple stories, which we represent as an array of ObjectId.
Each story can have a single author.
The ref property tells the schema which model can be assigned to this field.
const mongoose = require("mongoose");

const Schema = mongoose.Schema;

const authorSchema = new Schema({
  name: String,
  stories: [{ type: Schema.Types.ObjectId, ref: "Story" }],
});

const storySchema = new Schema({
  author: { type: Schema.Types.ObjectId, ref: "Author" },
  title: String,
});

const Story = mongoose.model("Story", storySchema);
const Author = mongoose.model("Author", authorSchema);
We can save our references to the related document by assigning the _id value.
Below we create an author, then a story, and assign the author id to our story's author field.
const bob = new Author({ name: "Bob Smith" });

await bob.save();

// Bob now exists, so lets create a story
const story = new Story({
  title: "Bob goes sledding",
  author: bob._id, // assign the _id from our author Bob. This ID is created by default!
});

await story.save();
Note: One great benefit of this style of programming is that we don't have to complicate the main path of our code with error checking.
If any of the save() operations fail, the promise will reject and an error will be thrown.
Our error handling code deals with that separately (usually in a catch() block), so the intent of our code is very clear.
Our story document now has an author referenced by the author document's ID. In order to get the author information in the story results we use populate(), as shown below.
Story.findOne({ title: "Bob goes sledding" })
  .populate("author") // Replace the author id with actual author information in results
  .exec();
Note: Astute readers will have noted that we added an author to our story, but we didn't do anything to add our story to our author's stories array. How then can we get all stories by a particular author? One way would be to add our story to the stories array, but this would result in us having two places where the information relating authors and stories needs to be maintained.
A better way is to get the _id of our author, then use find() to search for this in the author field across all stories.
Story.find({ author: bob._id }).exec();
This is almost everything you need to know about working with related items for this tutorial. For more detailed information see Population (Mongoose docs).
One schema/model per file
While you can create schemas and models using any file structure you like, we highly recommend defining each model schema in its own module (file), then exporting the method to create the model. This is shown below:
// File: ./models/somemodel.js

// Require Mongoose
const mongoose = require("mongoose");

// Define a schema
const Schema = mongoose.Schema;

const SomeModelSchema = new Schema({
  a_string: String,
  a_date: Date,
});

// Export function to create "SomeModel" model class
module.exports = mongoose.model("SomeModel", SomeModelSchema);
You can then require and use the model immediately in other files. Below we show how you might use it to get all instances of the model.
// Create a SomeModel model just by requiring the module
const SomeModel = require("../models/somemodel");

// Use the SomeModel object (model) to find all SomeModel records
const modelInstances = await SomeModel.find().exec();
Setting up the MongoDB database
Now that we understand something of what Mongoose can do and how we want to design our models, it's time to start work on the LocalLibrary website. The very first thing we want to do is set up a MongoDB database that we can use to store our library data.
For this tutorial, we're going to use the MongoDB Atlas cloud-hosted sandbox database. This database tier is not considered suitable for production websites because it has no redundancy, but it is great for development and prototyping. We're using it here because it is free and easy to set up, and because MongoDB Atlas is a popular database as a service vendor that you might reasonably choose for your production database (other popular choices at the time of writing include Compose, ScaleGrid and ObjectRocket).
Note: If you prefer, you can set up a MongoDB database locally by downloading and installing the appropriate binaries for your system. The rest of the instructions in this article would be similar, except for the database URL you would specify when connecting. In the Express Tutorial Part 7: Deploying to Production tutorial we host both the application and database on Railway, but we could equally well have used a database on MongoDB Atlas.
You will first need to create an account with MongoDB Atlas (this is free, and just requires that you enter basic contact details and acknowledge their terms of service).
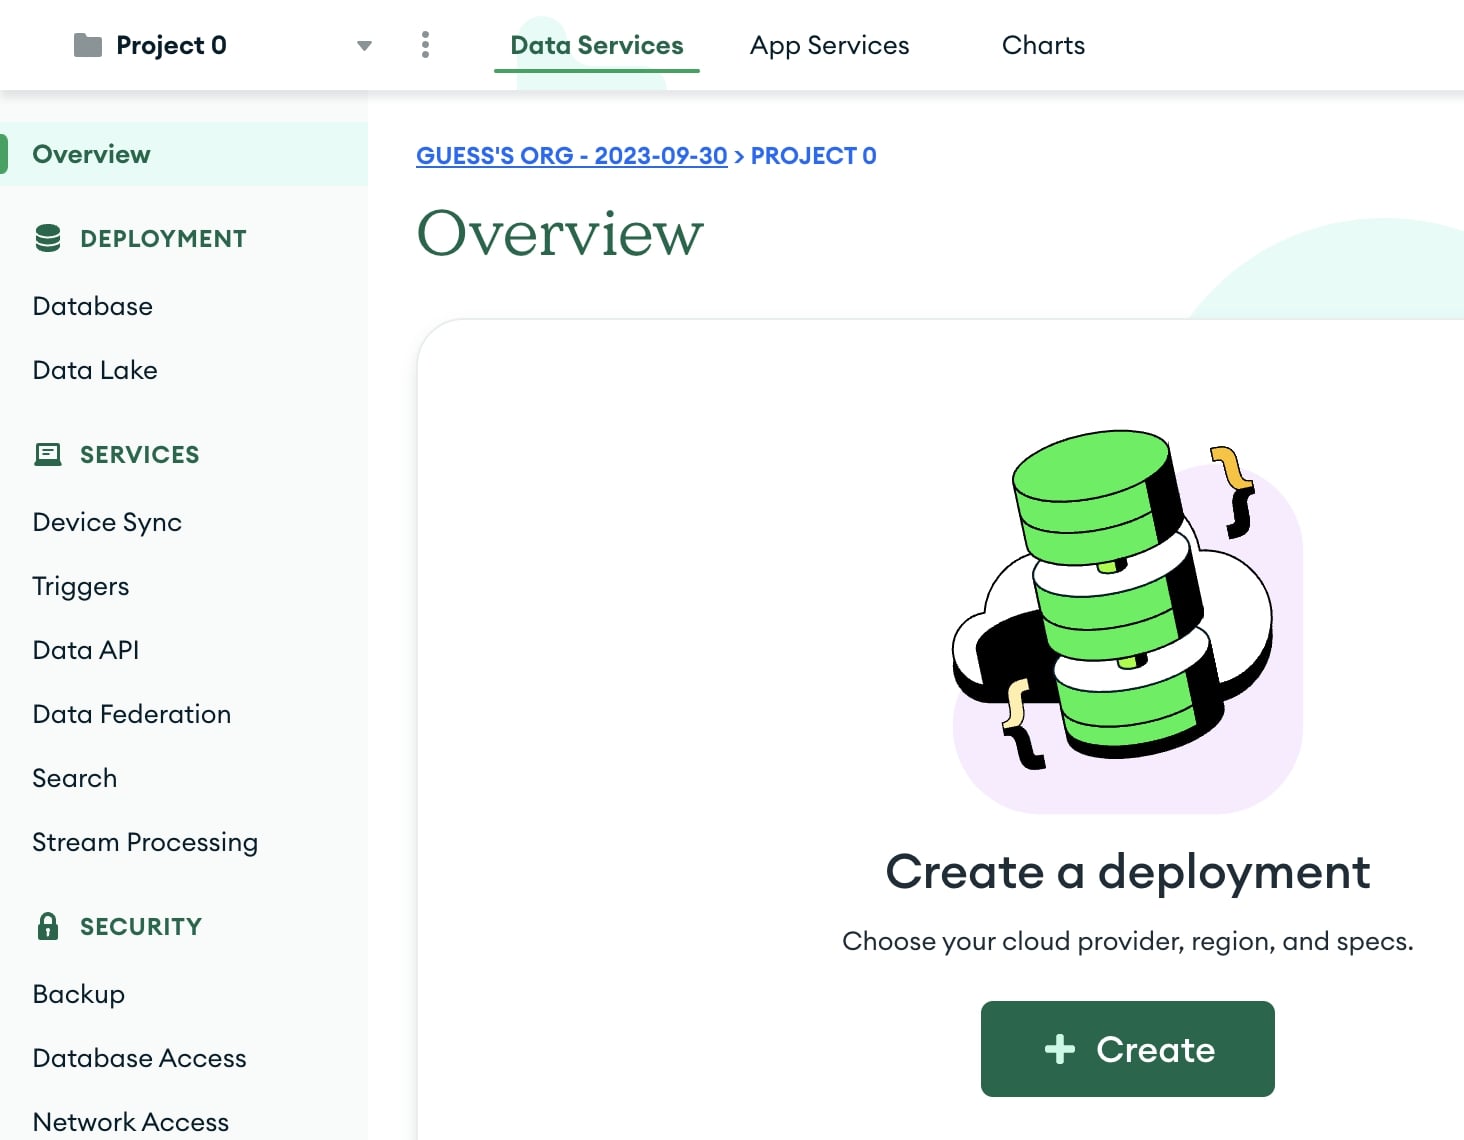
After logging in, you'll be taken to the home screen:
-
Click the + Create button in the Overview section.
-
This will open the Deploy your database screen. Click on the M0 FREE option template.

-
Scroll down the page to see the different options you can choose.
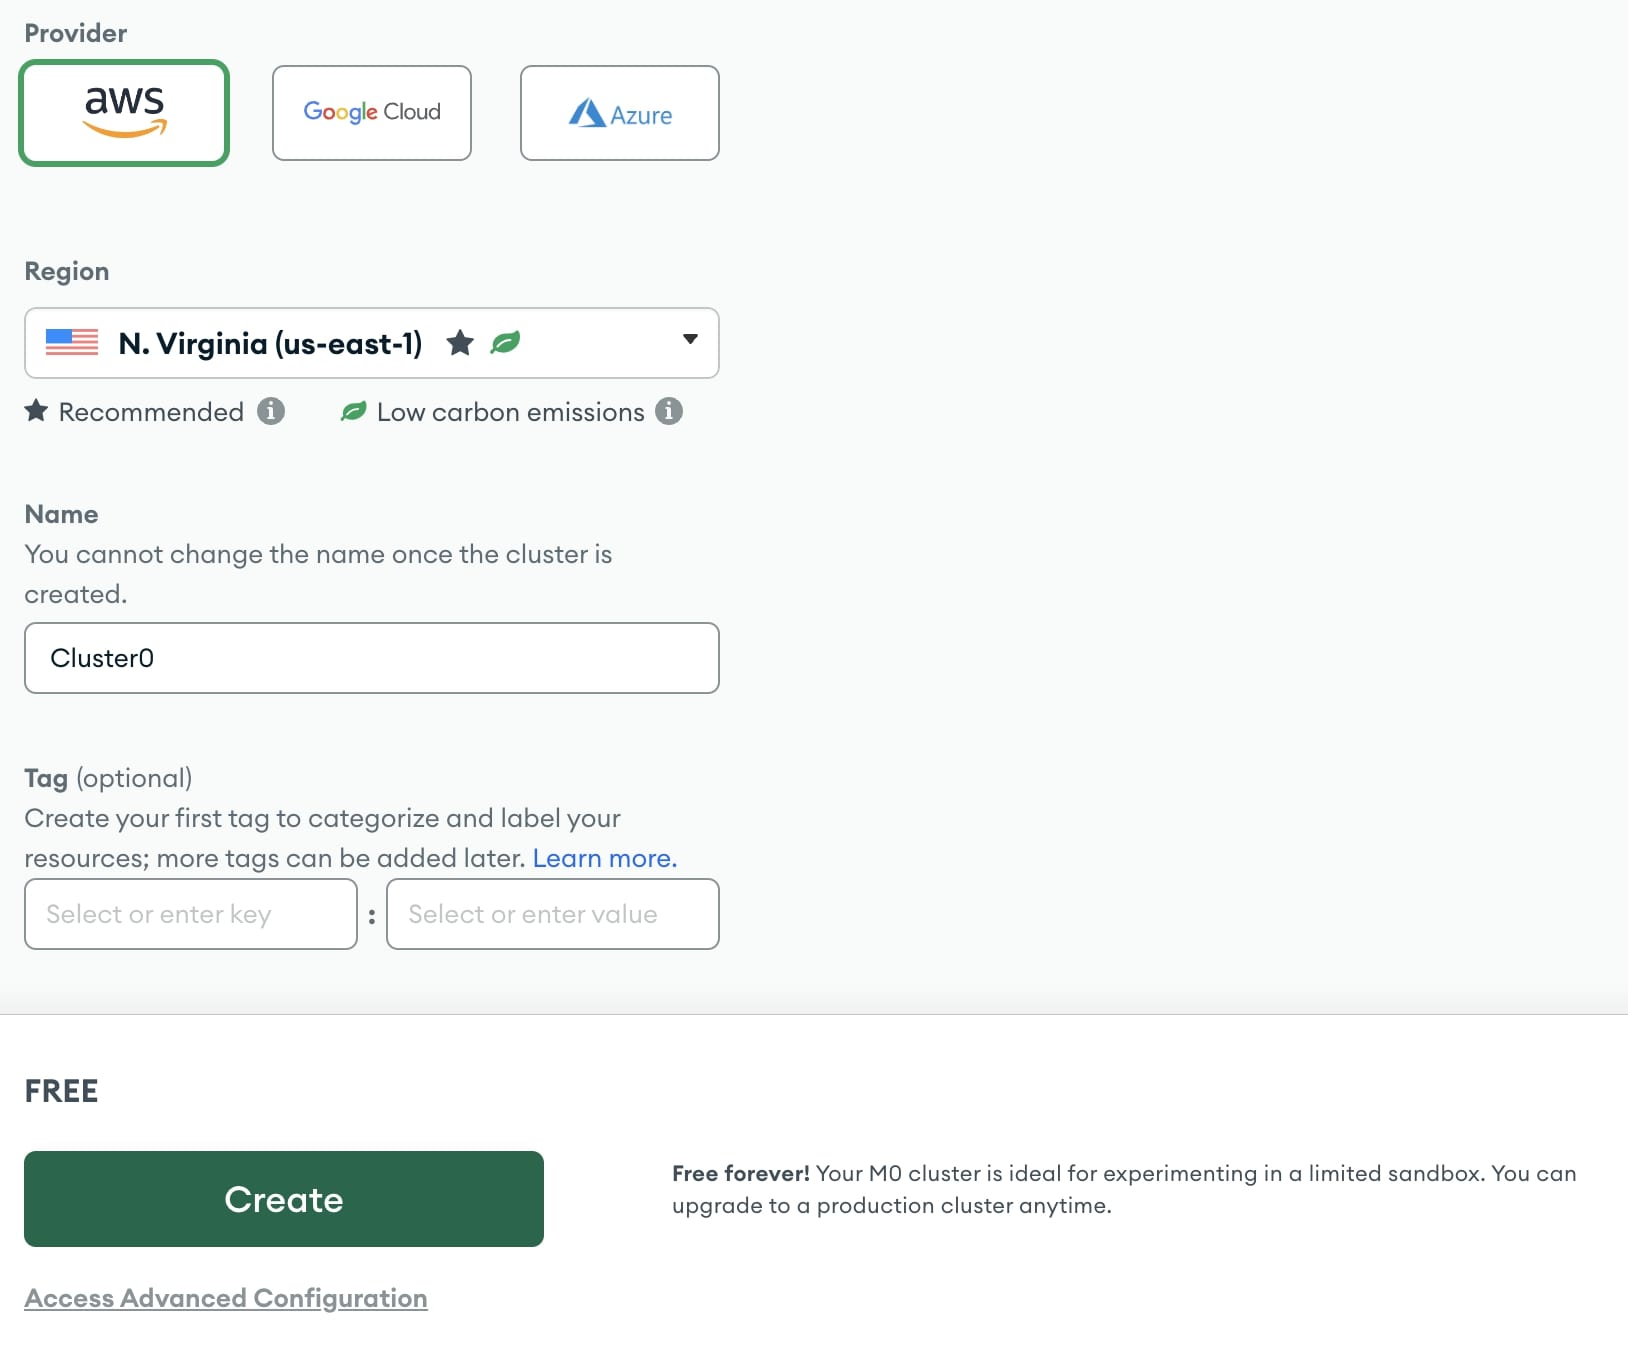
- Select any provider and region from the Provider and Region sections. Different regions offer different providers.
- You can change the name of your Cluster under Cluster Name. We are naming it
Cluster0for this tutorial. - Tags are optional. We will not use them here.
- Click the Create button (creation of the cluster will take some minutes).
-
This will open the Security Quickstart section.
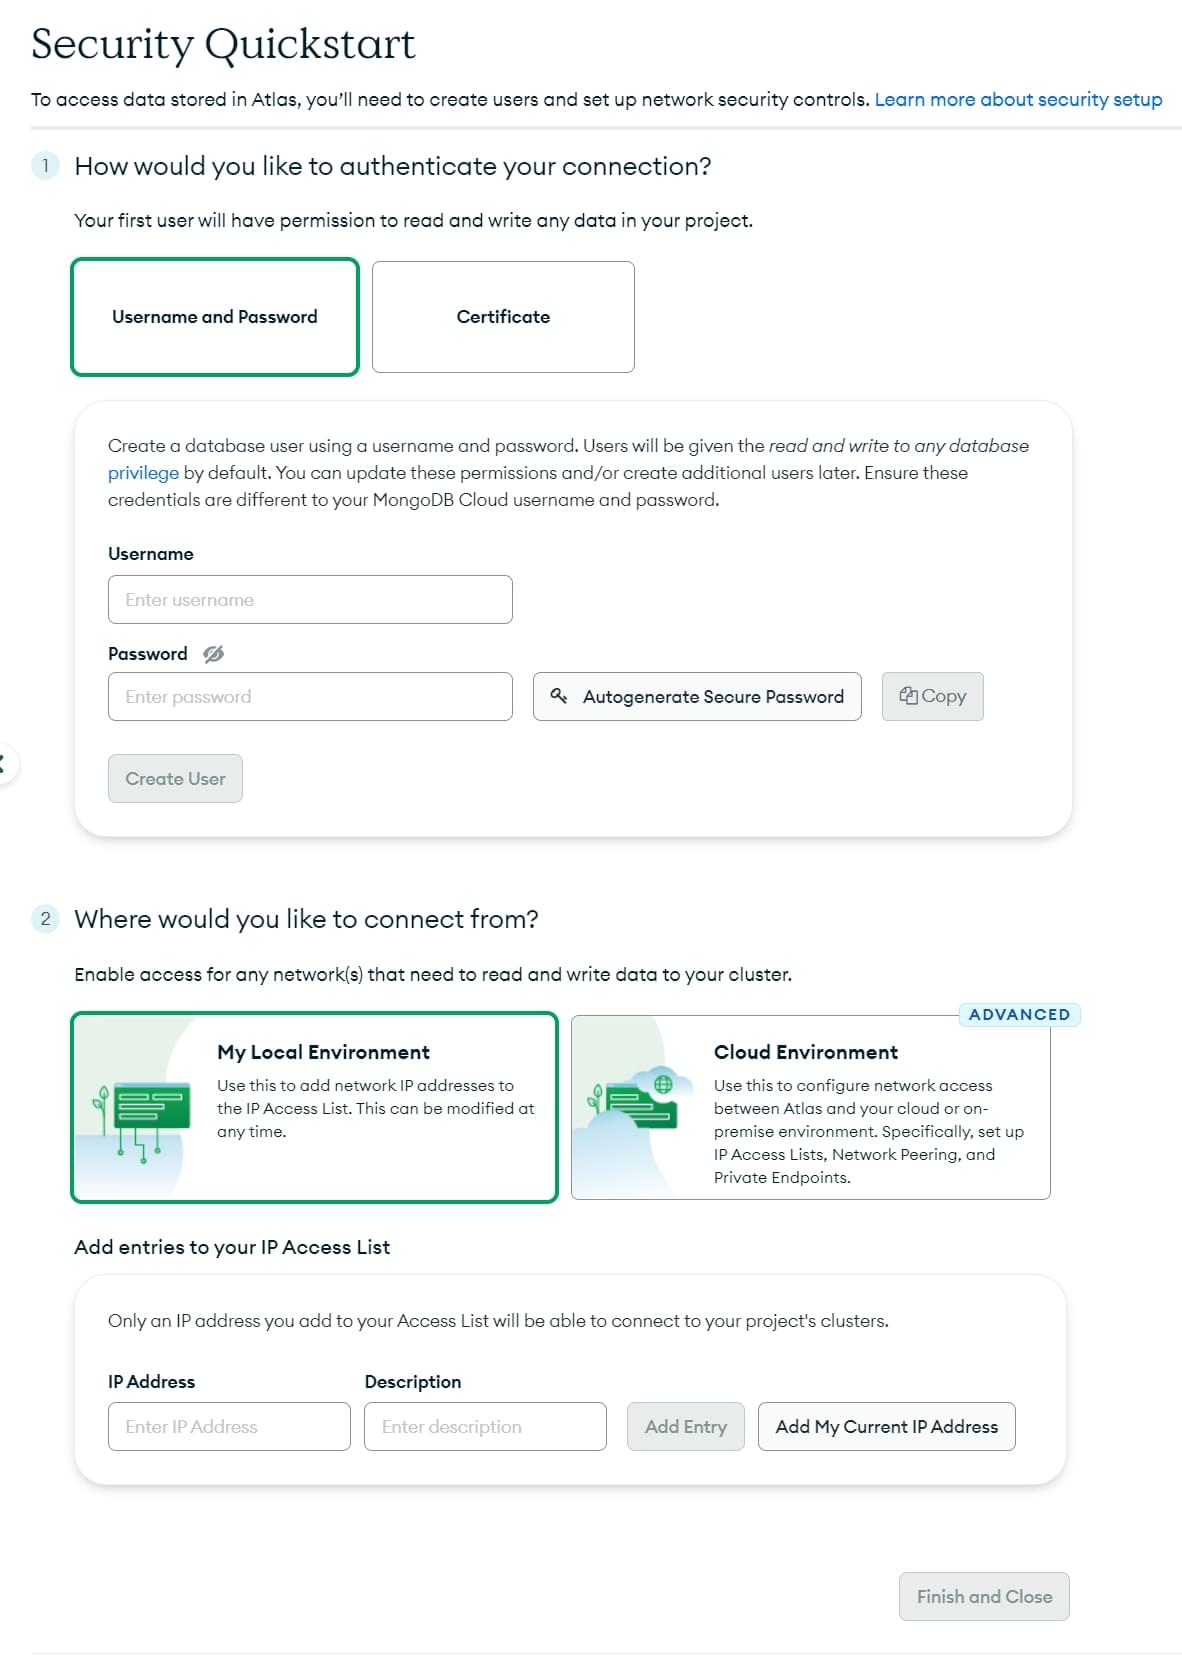
- Enter a username and password. Remember to copy and store the credentials safely as we will need them later on. Click the Create User button.
Note: Avoid using special characters in your MongoDB user password as mongoose may not parse the connection string properly.
- Enter
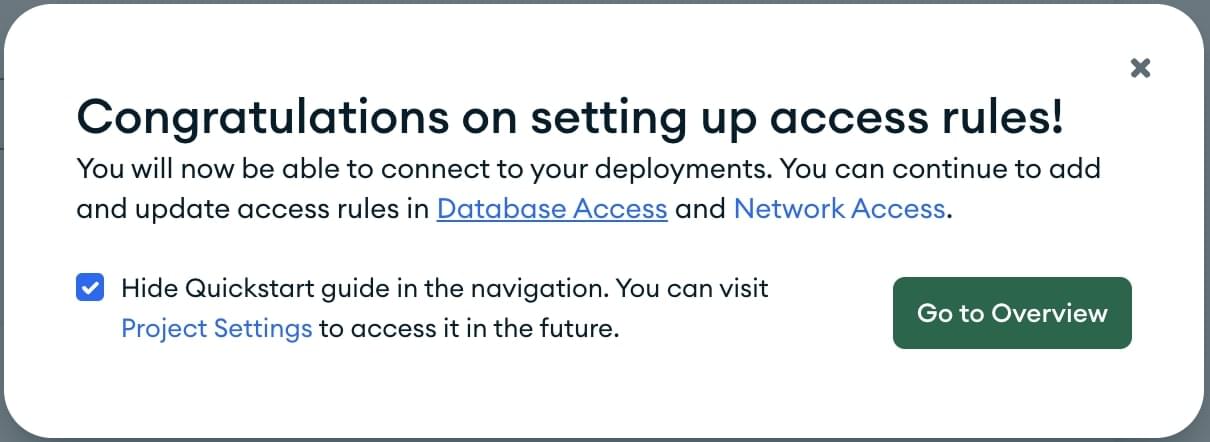
0.0.0.0/0in the IP Address field. This tells MongoDB that we want to allow access from anywhere. Click the Add Entry button.Note: It is a best practice to limit the IP addresses that can connect to your database and other resources. Here we allow a connection from anywhere because we don't know where the request will come from after deployment.
- Click the Finish and Close button.
- Enter a username and password. Remember to copy and store the credentials safely as we will need them later on. Click the Create User button.
-
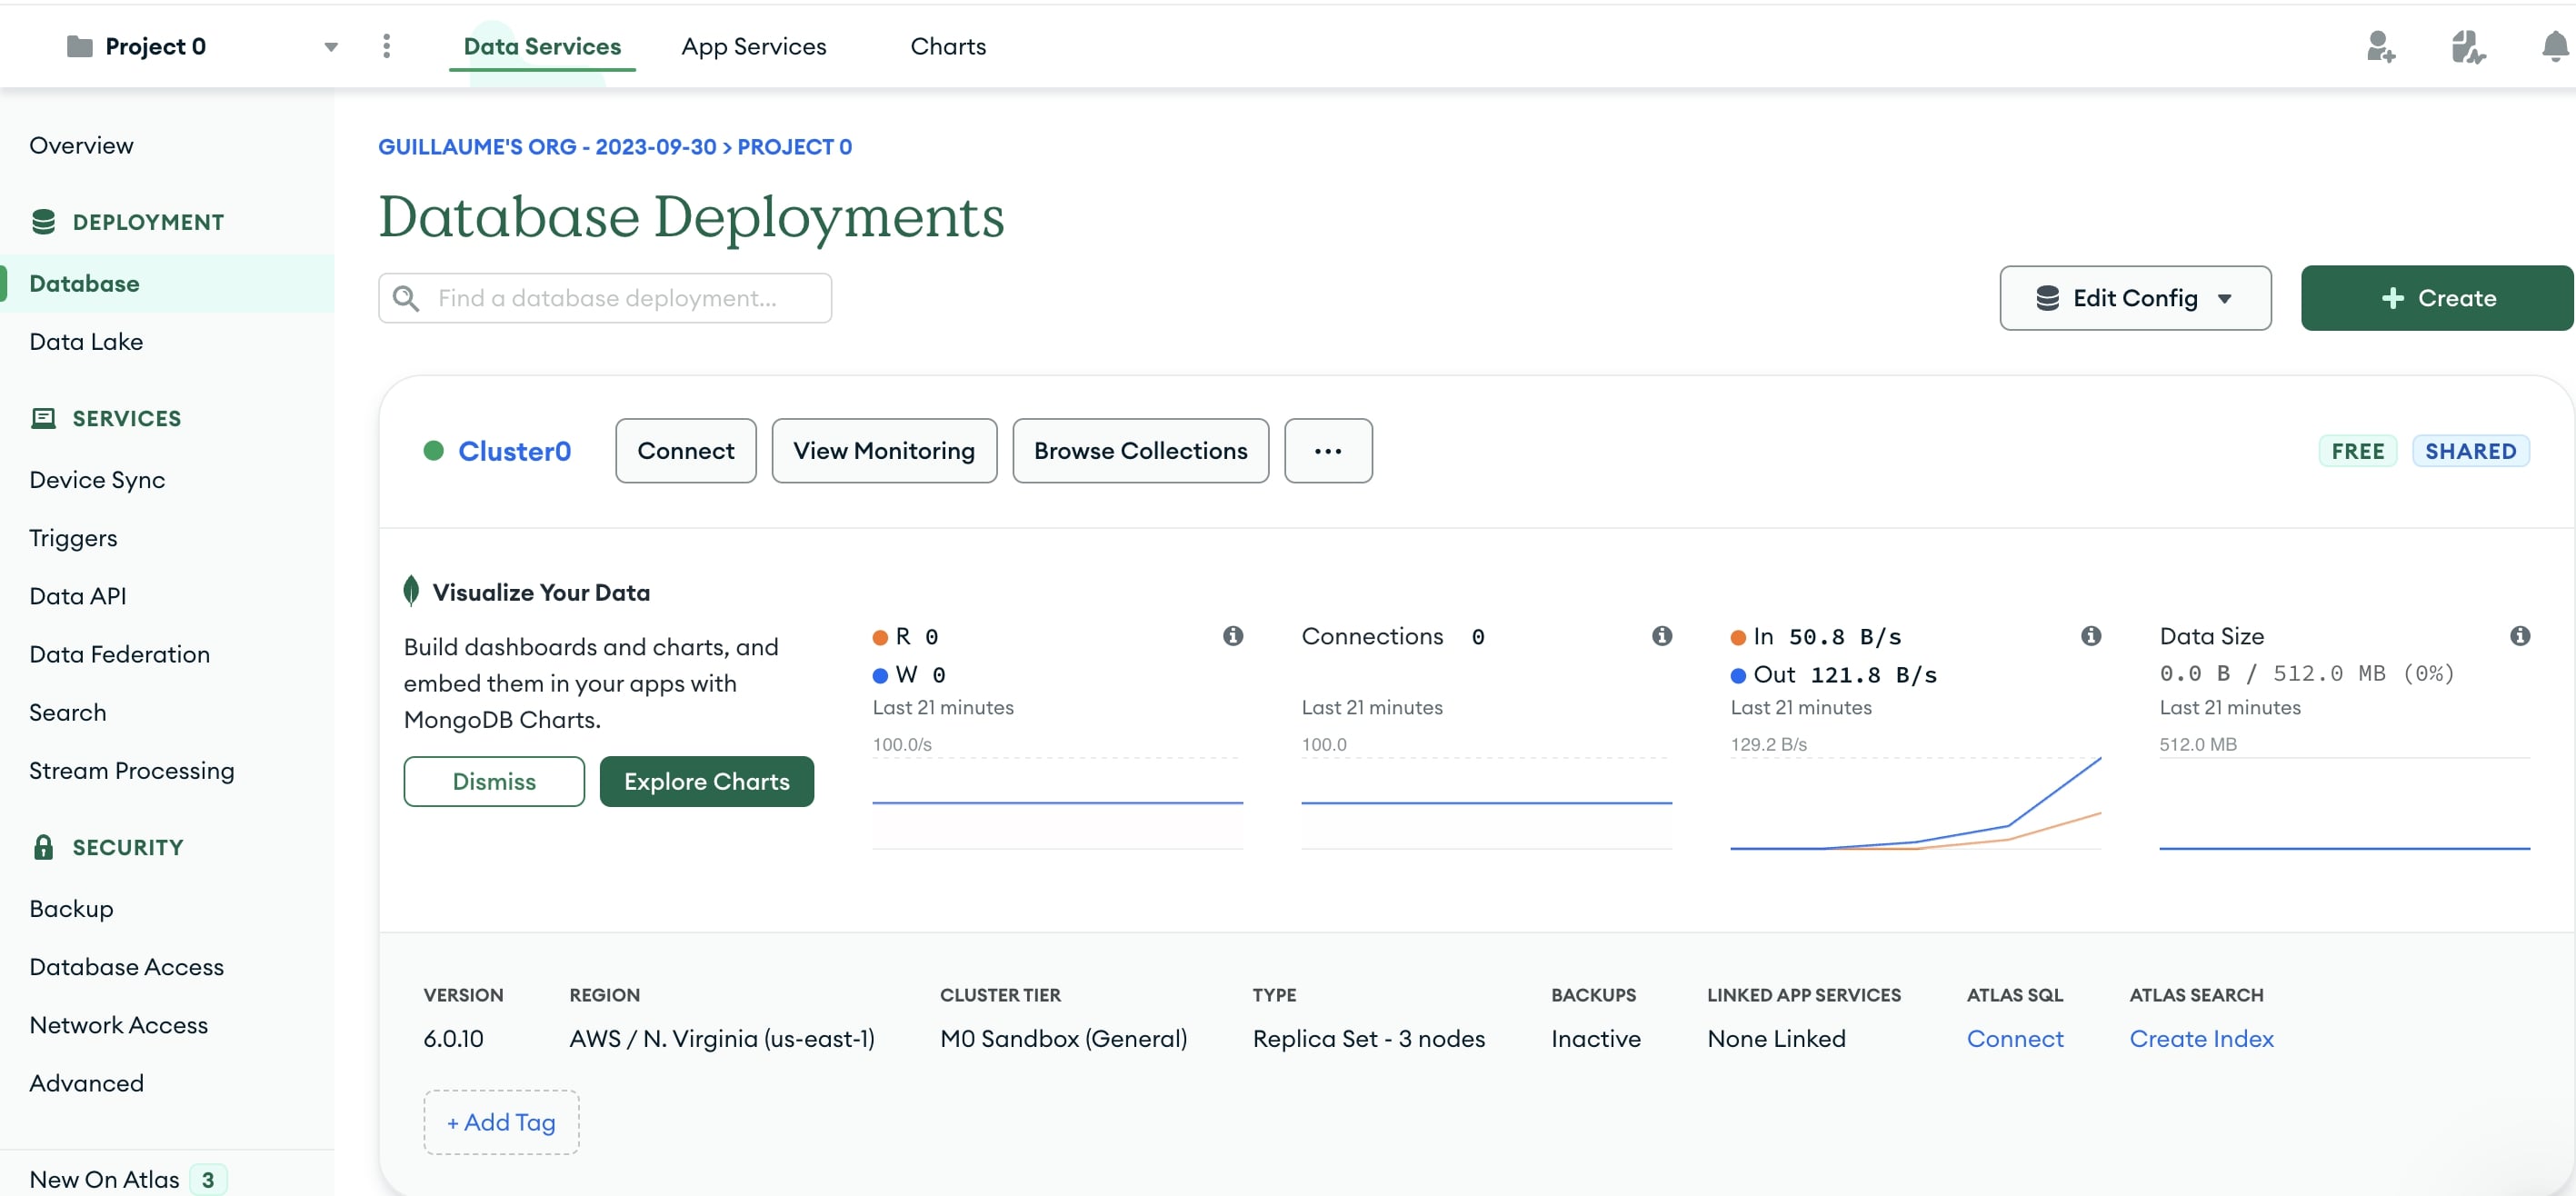
This will open the following screen. Click on the Go to Overview button.
-
You will return to the Overview screen. Click on the Database section under the Deployment menu on the left. Click the Browse Collections button.
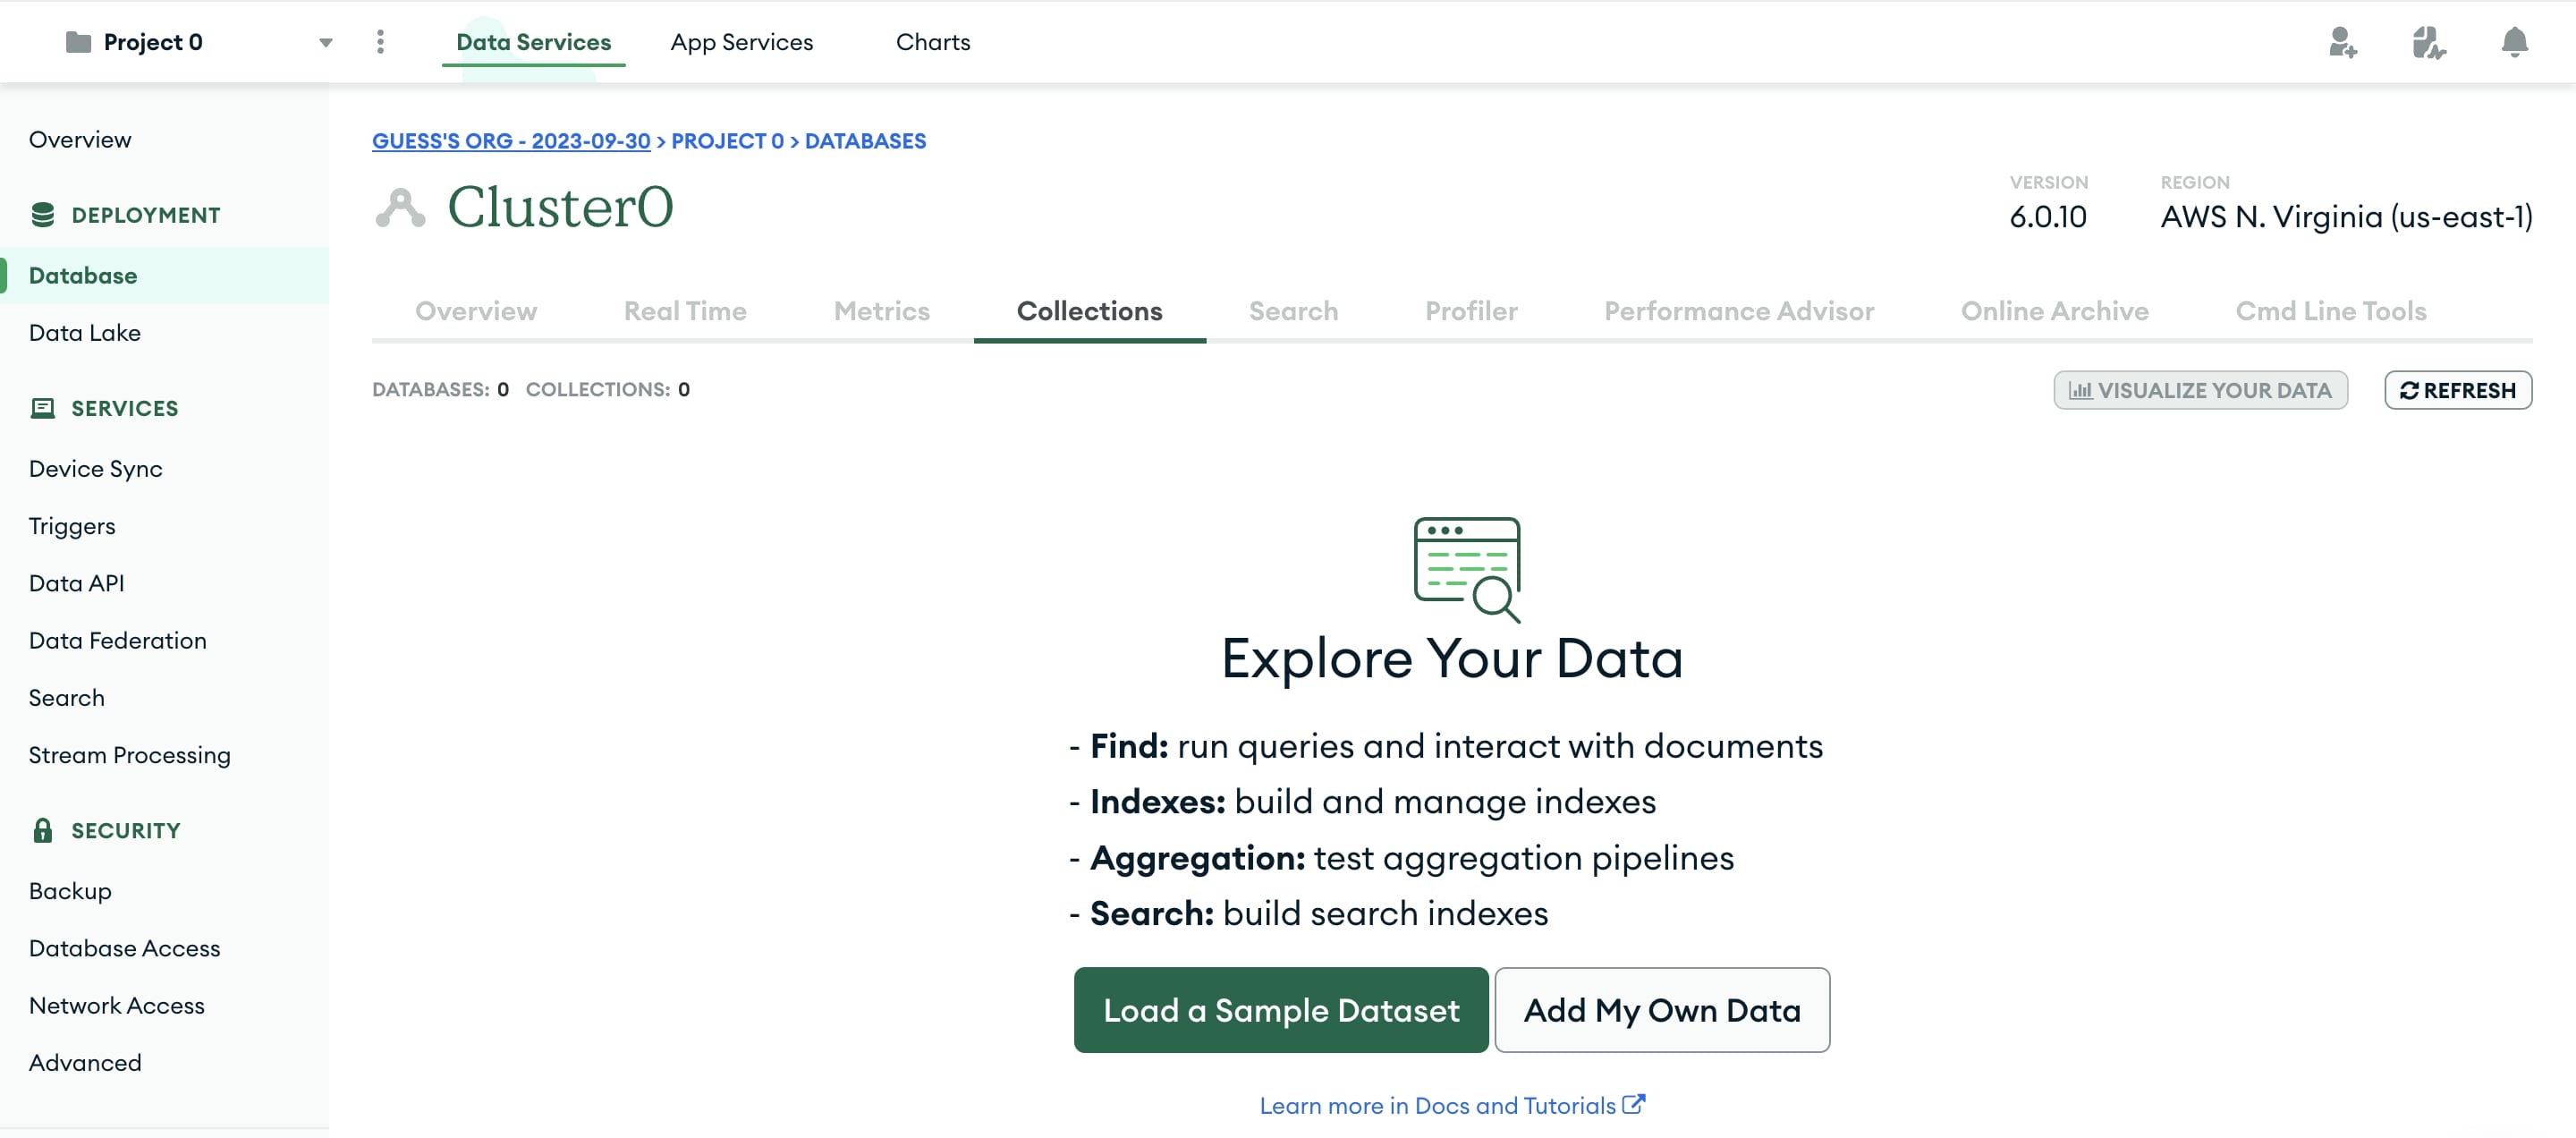
-
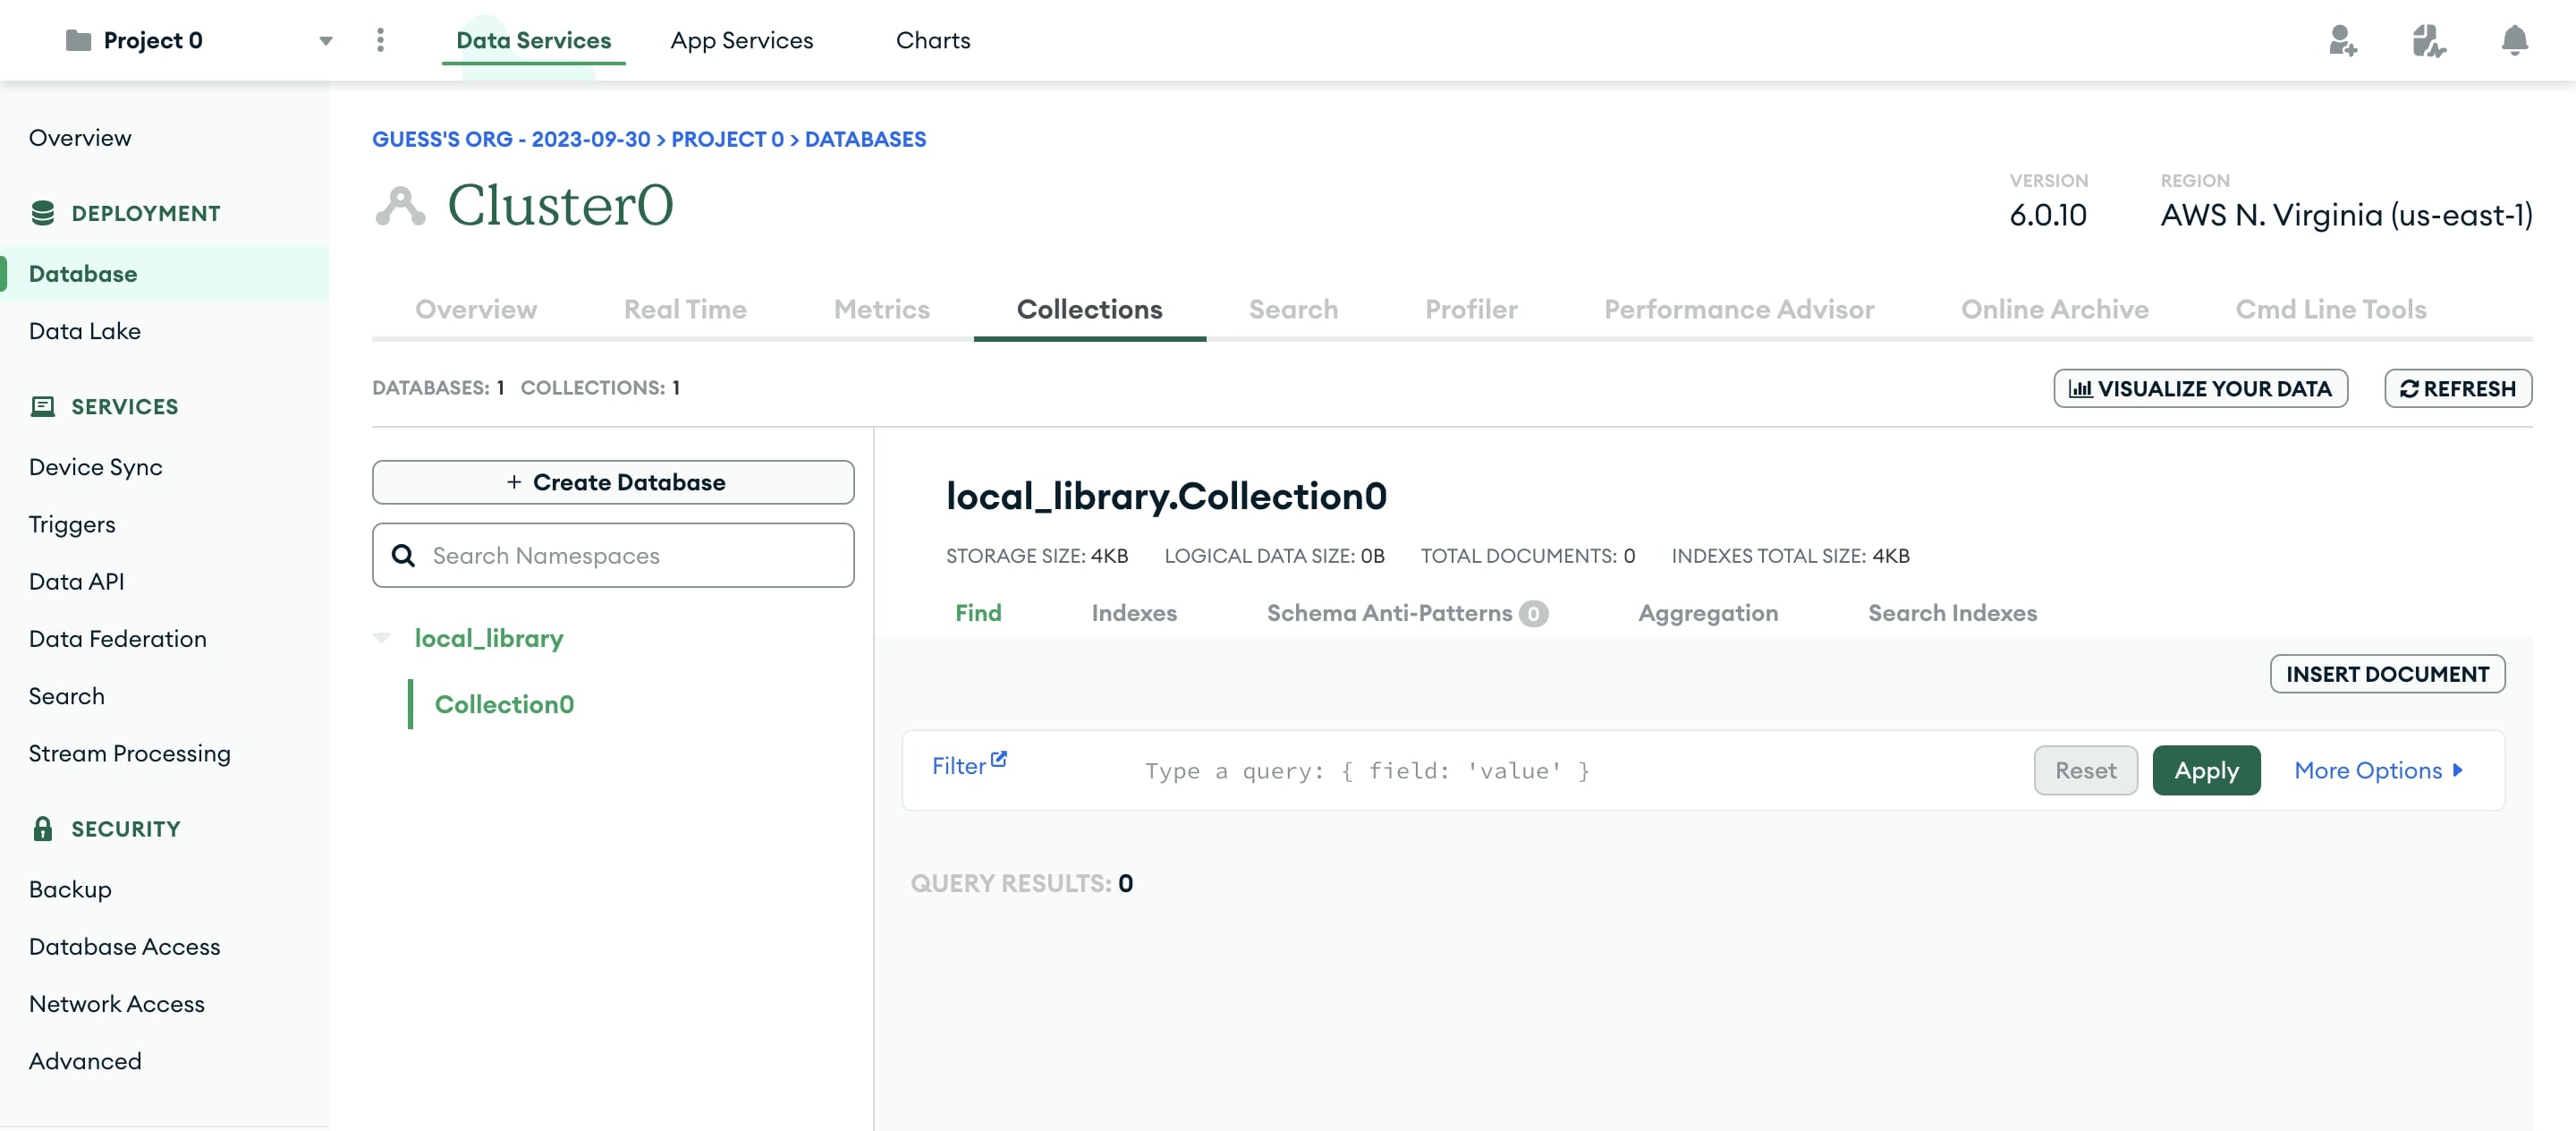
This will open the Collections section. Click the Add My Own Data button.
-
This will open the Create Database screen.
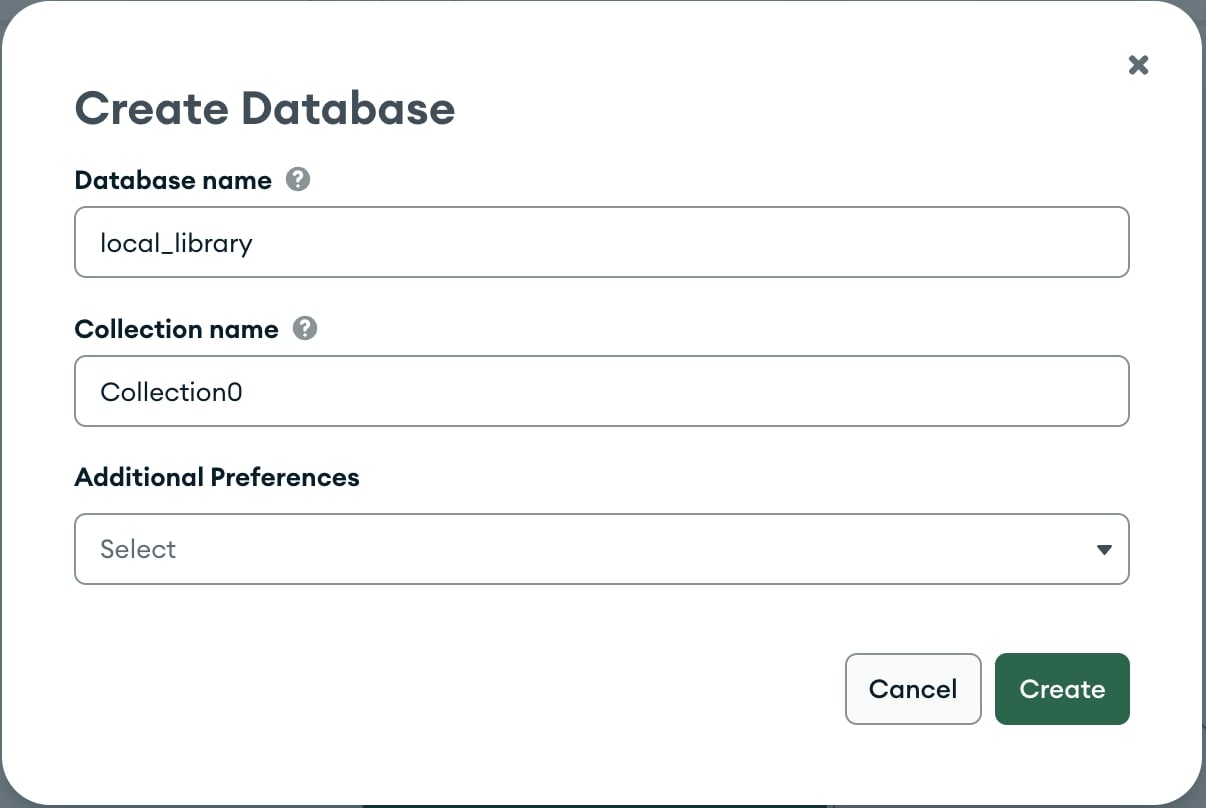
- Enter the name for the new database as
local_library. - Enter the name of the collection as
Collection0. - Click the Create button to create the database.
- Enter the name for the new database as
-
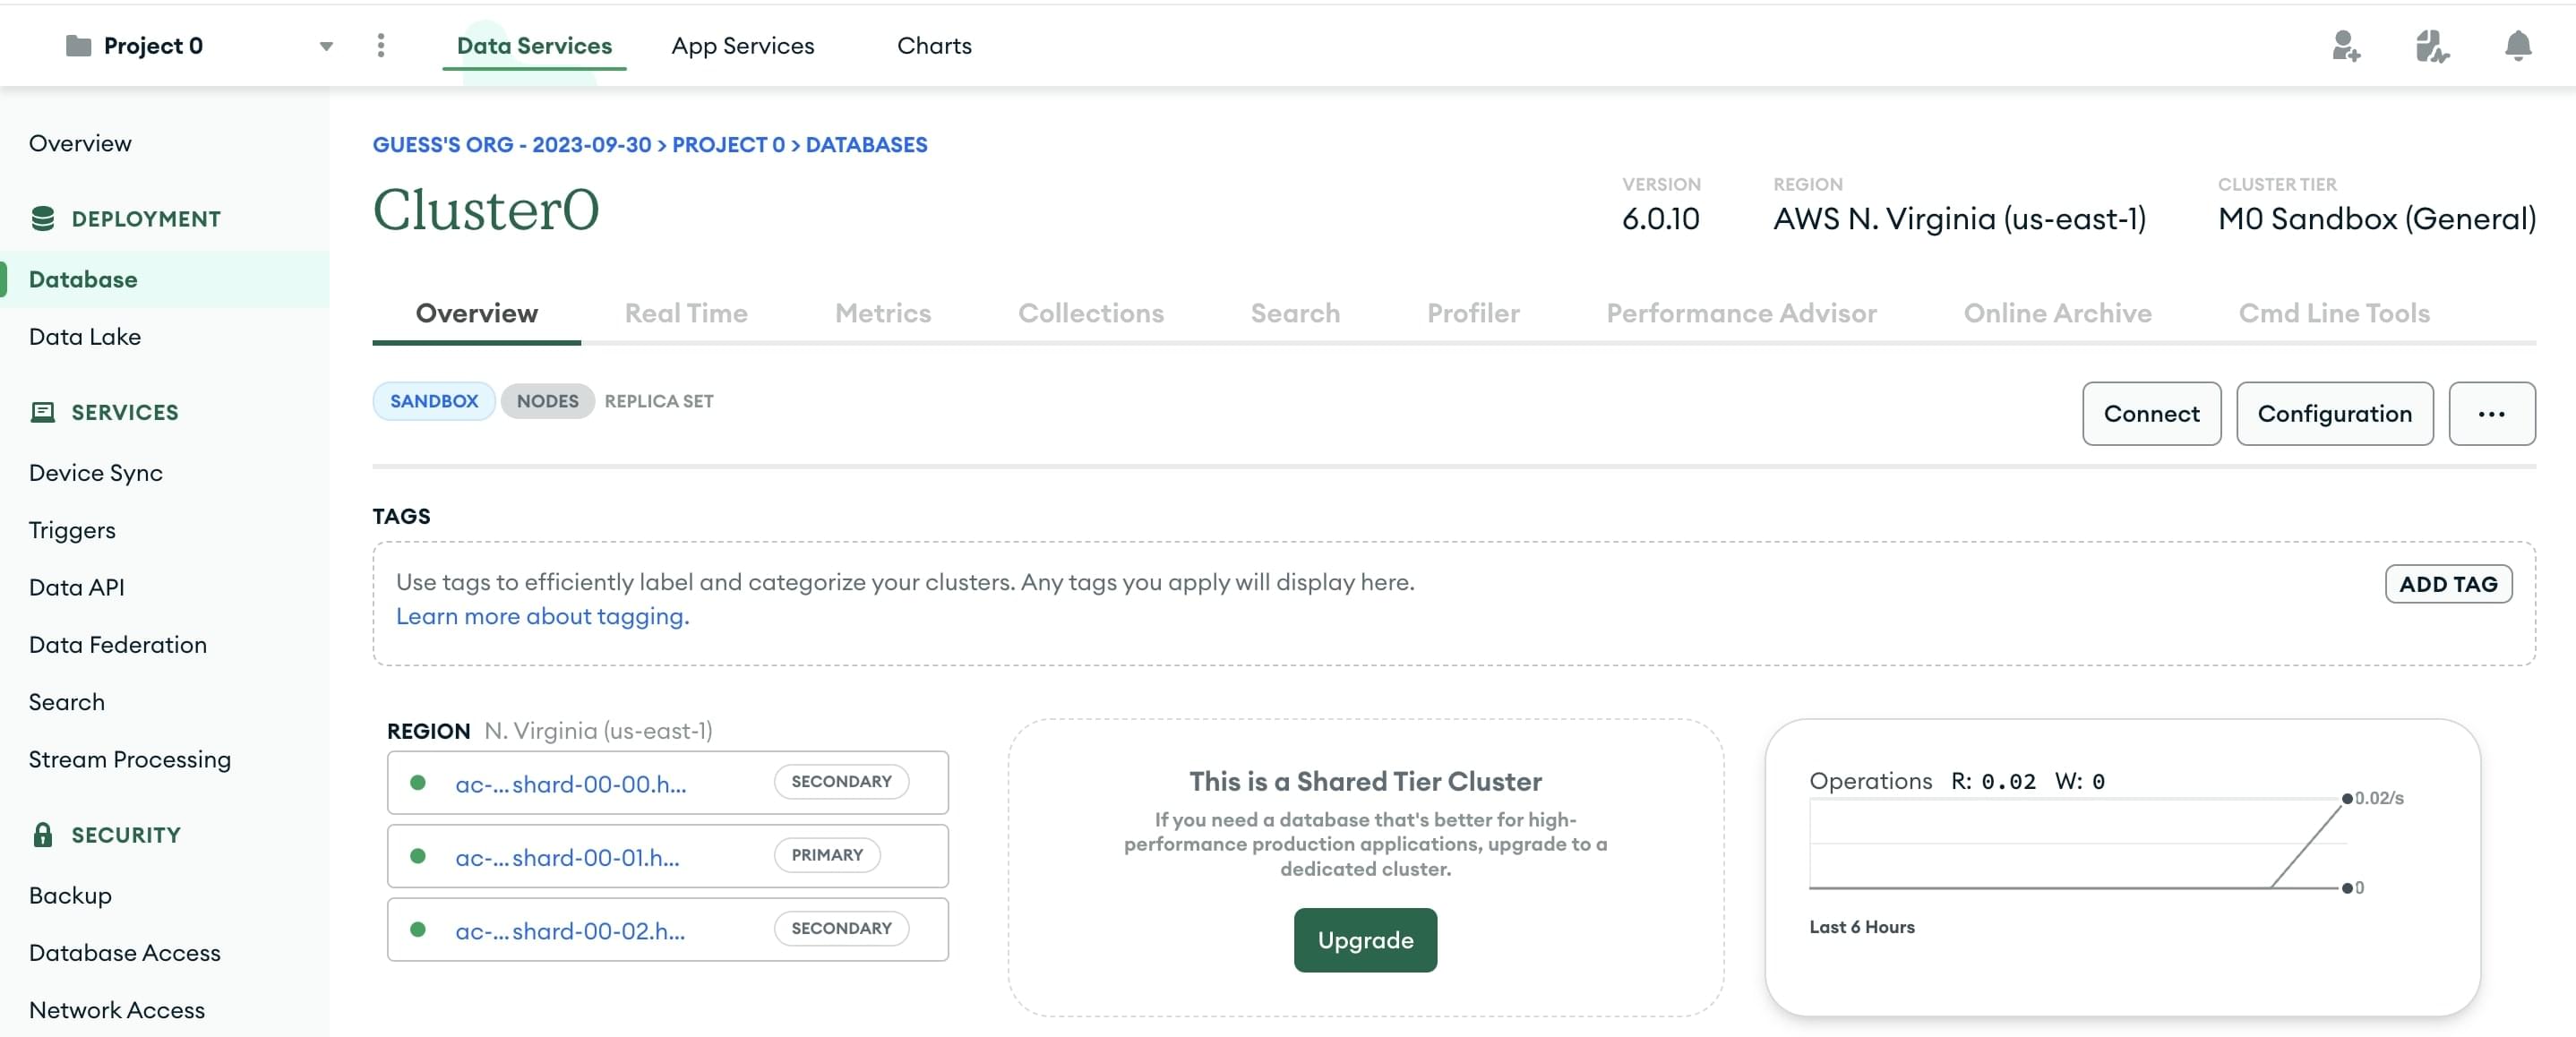
You will return to the Collections screen with your database created.
- Click the Overview tab to return to the cluster overview.
-
From the Cluster0 Overview screen click the Connect button.
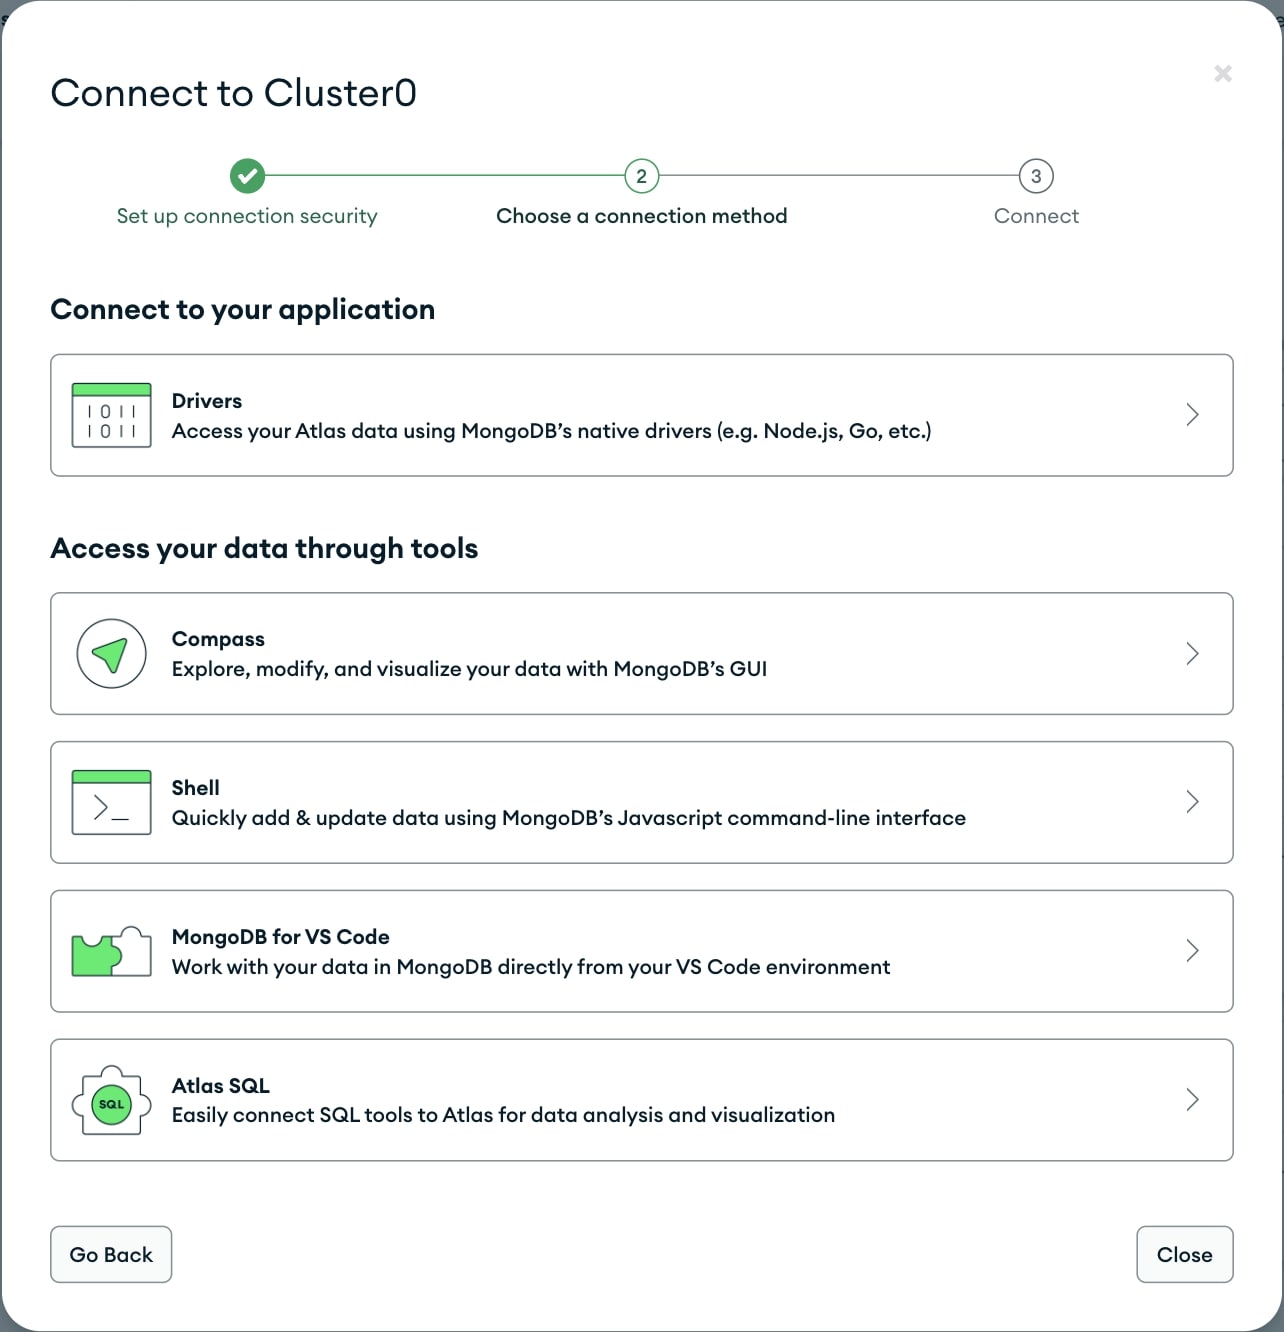
-
This will open the Connect to Cluster screen.
Click the Drivers option under the Connect to your application section.
-
You will now be shown the Connect screen.
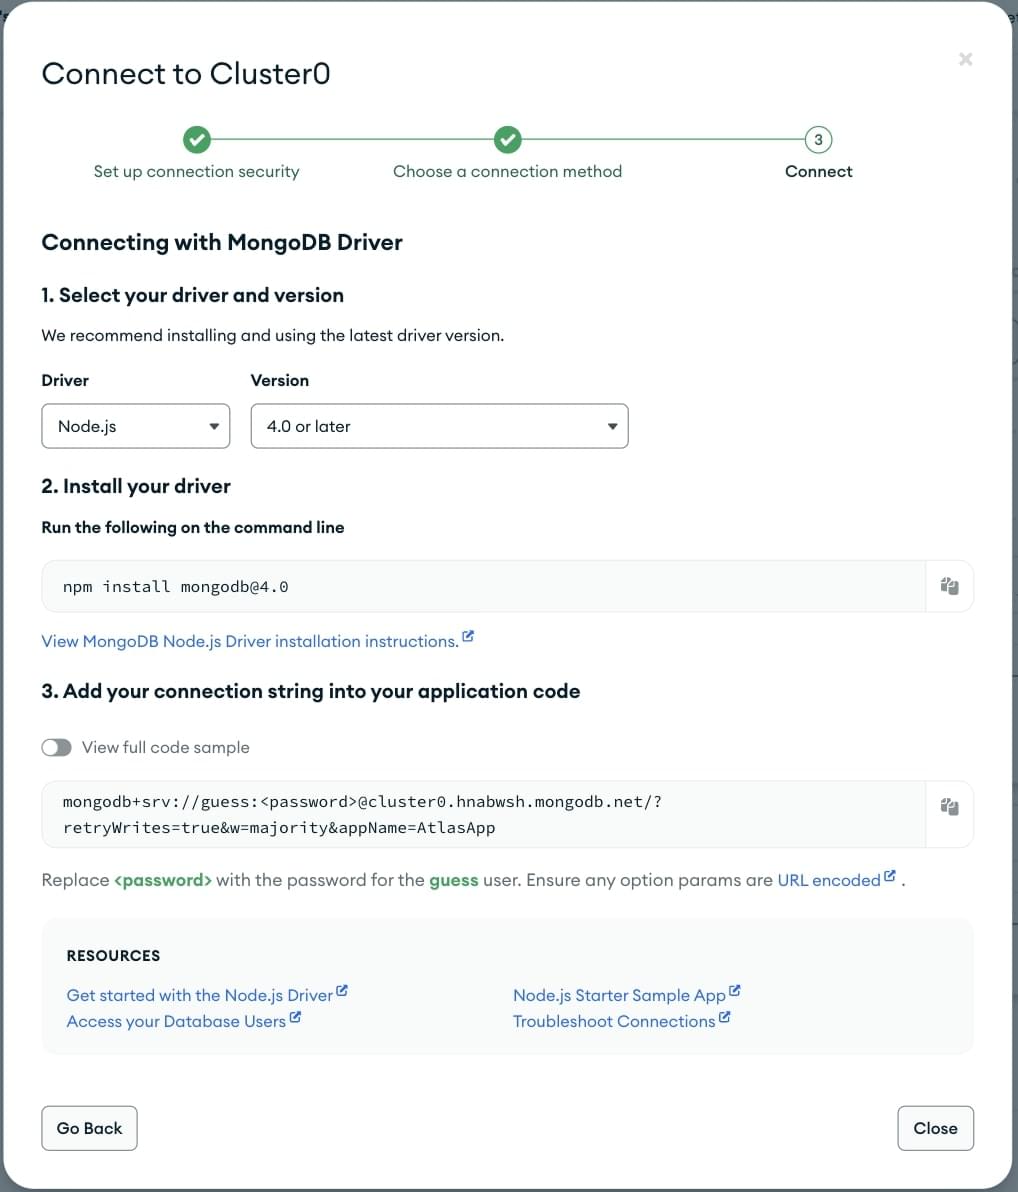
- Select the Node driver and version as shown.
- DO NOT follow the step 2.
- Click the Copy icon to copy the connection string.
- Paste this in your local text editor.
- Update the username and password with your user's password.
- Insert the database name "local_library" in the path before the options (
...mongodb.net/local_library?retryWrites...) - Save the file containing this string somewhere safe.
You have now created the database, and have a URL (with username and password) that can be used to access it.
This will look something like: mongodb+srv://your_user_name:your_password@cluster0.lz91hw2.mongodb.net/local_library?retryWrites=true&w=majority
Install Mongoose
Open a command prompt and navigate to the directory where you created your skeleton Local Library website. Enter the following command to install Mongoose (and its dependencies) and add it to your package.json file, unless you have already done so when reading the Mongoose Primer above.
npm install mongoose
Connect to MongoDB
Open /app.js (in the root of your project) and copy the following text below where you declare the Express application object (after the line const app = express();).
Replace the database URL string ('insert_your_database_url_here') with the location URL representing your own database (i.e. using the information from MongoDB Atlas).
// Set up mongoose connection
const mongoose = require("mongoose");
mongoose.set("strictQuery", false);
const mongoDB = "insert_your_database_url_here";

main().catch((err) => console.log(err));
async function main() {
  await mongoose.connect(mongoDB);
}
As discussed in the Mongoose primer above, this code creates the default connection to the database and reports any errors to the console.
Note that hard-coding database credentials in source code as shown above is not recommended. We do it here because it shows the core connection code, and because during development there is no significant risk that leaking these details will expose or corrupt sensitive information. We'll show you how to do this more safely when deploying to production!
Defining the LocalLibrary Schema
We will define a separate module for each model, as discussed above. Start by creating a folder for our models in the project root (/models) and then create separate files for each of the models:
/express-locallibrary-tutorial  // the project root
  /models
    author.js
    book.js
    bookinstance.js
    genre.js
Author model
Copy the Author schema code shown below and paste it into your ./models/author.js file.
The schema defines an author as having String SchemaTypes for the first and family names (required, with a maximum of 100 characters), and Date fields for the dates of birth and death.
const mongoose = require("mongoose");

const Schema = mongoose.Schema;

const AuthorSchema = new Schema({
  first_name: { type: String, required: true, maxLength: 100 },
  family_name: { type: String, required: true, maxLength: 100 },
  date_of_birth: { type: Date },
  date_of_death: { type: Date },
});

// Virtual for author's full name
AuthorSchema.virtual("name").get(function () {
  // To avoid errors in cases where an author does not have either a family name or first name
  // We want to make sure we handle the exception by returning an empty string for that case
  let fullname = "";
  if (this.first_name && this.family_name) {
    fullname = `${this.family_name}, ${this.first_name}`;
  }

  return fullname;
});

// Virtual for author's URL
AuthorSchema.virtual("url").get(function () {
  // We don't use an arrow function as we'll need the this object
  return `/catalog/author/${this._id}`;
});

// Export model
module.exports = mongoose.model("Author", AuthorSchema);
We've also declared a virtual for the AuthorSchema named "url" that returns the absolute URL required to get a particular instance of the model — we'll use the property in our templates whenever we need to get a link to a particular author.
Note: Declaring our URLs as a virtual in the schema is a good idea because then the URL for an item only ever needs to be changed in one place. At this point, a link using this URL wouldn't work, because we haven't got any routes handling code for individual model instances. We'll set those up in a later article!
At the end of the module, we export the model.
Book model
Copy the Book schema code shown below and paste it into your ./models/book.js file.
Most of this is similar to the author model — we've declared a schema with a number of string fields and a virtual for getting the URL of specific book records, and we've exported the model.
const mongoose = require("mongoose");

const Schema = mongoose.Schema;

const BookSchema = new Schema({
  title: { type: String, required: true },
  author: { type: Schema.Types.ObjectId, ref: "Author", required: true },
  summary: { type: String, required: true },
  isbn: { type: String, required: true },
  genre: [{ type: Schema.Types.ObjectId, ref: "Genre" }],
});

// Virtual for book's URL
BookSchema.virtual("url").get(function () {
  // We don't use an arrow function as we'll need the this object
  return `/catalog/book/${this._id}`;
});

// Export model
module.exports = mongoose.model("Book", BookSchema);
The main difference here is that we've created two references to other models:
- author is a reference to a single
Authormodel object, and is required. - genre is a reference to an array of
Genremodel objects. We haven't declared this object yet!
BookInstance model
Finally, copy the BookInstance schema code shown below and paste it into your ./models/bookinstance.js file.
The BookInstance represents a specific copy of a book that someone might borrow and includes information about whether the copy is available, on what date it is expected back, and "imprint" (or version) details.
const mongoose = require("mongoose");

const Schema = mongoose.Schema;

const BookInstanceSchema = new Schema({
  book: { type: Schema.Types.ObjectId, ref: "Book", required: true }, // reference to the associated book
  imprint: { type: String, required: true },
  status: {
    type: String,
    required: true,
    enum: ["Available", "Maintenance", "Loaned", "Reserved"],
    default: "Maintenance",
  },
  due_back: { type: Date, default: Date.now },
});

// Virtual for bookinstance's URL
BookInstanceSchema.virtual("url").get(function () {
  // We don't use an arrow function as we'll need the this object
  return `/catalog/bookinstance/${this._id}`;
});

// Export model
module.exports = mongoose.model("BookInstance", BookInstanceSchema);
The new things we show here are the field options:
enum: This allows us to set the allowed values of a string. In this case, we use it to specify the availability status of our books (using an enum means that we can prevent mis-spellings and arbitrary values for our status).default: We use default to set the default status for newly created book instances to "Maintenance" and the defaultdue_backdate tonow(note how you can call the Date function when setting the date!).
Everything else should be familiar from our previous schema.
Genre model - challenge!
Open your ./models/genre.js file and create a schema for storing genres (the category of book, e.g. whether it is fiction or non-fiction, romance or military history, etc.).
The definition will be very similar to the other models:
- The model should have a
StringSchemaType callednameto describe the genre. - This name should be required and have between 3 and 100 characters.
- Declare a virtual for the genre's URL, named
url. - Export the model.
Testing — create some items
That's it. We now have all models for the site set up!
In order to test the models (and to create some example books and other items that we can use in our next articles) we'll now run an independent script to create items of each type:
- Download (or otherwise create) the file populatedb.js inside your express-locallibrary-tutorial directory (in the same level as
package.json).Note: The code in
populatedb.jsmay be useful in learning JavaScript, but understanding it is not necessary for this tutorial. - Run the script using node in your command prompt, passing in the URL of your MongoDB database (the same one you replaced the insert_your_database_url_here placeholder with, inside
app.jsearlier):bashnode populatedb <your MongoDB url>Note: On Windows you need to wrap the database URL inside double ("). On other operating systems you may need single (') quotation marks.
- The script should run through to completion, displaying items as it creates them in the terminal.
Note: Go to your database on MongoDB Atlas (in the Collections tab). You should now be able to drill down into individual collections of Books, Authors, Genres and BookInstances, and check out individual documents.
Summary
In this article, we've learned a bit about databases and ORMs on Node/Express, and a lot about how Mongoose schema and models are defined. We then used this information to design and implement Book, BookInstance, Author and Genre models for the LocalLibrary website.
Last of all, we tested our models by creating a number of instances (using a standalone script). In the next article we'll look at creating some pages to display these objects.
See also
- Database integration (Express docs)
- Mongoose website (Mongoose docs)
- Mongoose Guide (Mongoose docs)
- Validation (Mongoose docs)
- Schema Types (Mongoose docs)
- Models (Mongoose docs)
- Queries (Mongoose docs)
- Population (Mongoose docs)