React アプリのコンポーネント化
この時点では、アプリは一枚岩です。アプリに何かをさせる前に、管理しやすく、記述しやすいコンポーネントに分解する必要があります。 React には、何がコンポーネントで何がコンポーネントでないかという難しいルールはありません。それはあなた次第なのです!この記事では、アプリをコンポーネントに分解するための賢明な方法を紹介します。
| 前提条件: |
HTML、CSS、JavaScript のコア言語に精通していること、ターミナル/コマンドラインの知識があること。 |
|---|---|
| 目的: | Todo リストアプリをコンポーネントに分割するための賢明な方法を示すこと。 |
最初のコンポーネントの定義
コンポーネントの定義は、ある程度練習をするまでは難しいと思われるかもしれませんが、要点は以下の通りです。
- アプリの明らかな「塊」を表している場合、それはおそらくコンポーネントです。
- よく再利用されるのであれば、それはおそらくコンポーネントです。
2 番目の項目には特に価値があります。一般的な UI 要素からコンポーネントを作成することで、コードを一箇所で変更することができ、そのコンポーネントが使用される場所のどこでも変更内容を確認することができます。また、すぐにすべてをコンポーネントに分割する必要もありません。 2 つ目の項目をヒントに、UI の中で最も再利用され、最も重要な部分である TODO リスト項目からコンポーネントを作成してみましょう。
<Todo /> の作成
コンポーネントを作る前に、そのための新しいファイルを作らなければなりません。実際は、コンポーネント用の新しいディレクトリーの作成が必要です。次のコマンドは、 components ディレクトリーを作成し、その中に Todo.js というファイルを作成します。これらを実行する前に、アプリのルートにいることを確認してください。
mkdir src/components
touch src/components/Todo.js
新しい Todo.js ファイルは今は空です。ファイルを開いて最初の行に次を入力してください。
import React from "react";
今回は Todo というコンポーネントを作る予定なので、以下のように Todo.js にもそのためのコードを追加していきます。このコードでは、関数の定義とエクスポートを一行で定義しています。
export default function Todo() {
  return (

  );
}
ここまでは問題ありませんが、このコンポーネントは何かを返さなければなりません!src/App.js に戻って、最初の <li> をコピーし、 Todo.js に貼り付けると、以下のようになります。
export default function Todo() {
  return (
    <li className="todo stack-small">
      <div className="c-cb">
        <input id="todo-0" type="checkbox" defaultChecked={true} />
        <label className="todo-label" htmlFor="todo-0">
          Eat
        </label>
      </div>
      <div className="btn-group">
        <button type="button" className="btn">
          Edit <span className="visually-hidden">Eat</span>
        </button>
        <button type="button" className="btn btn__danger">
          Delete <span className="visually-hidden">Eat</span>
        </button>
      </div>
    </li>
  );
}
メモ: コンポーネントは常に何かを返さなければなりません。もし今後あなたが何も返さないコンポーネントをレンダリングしようとしたら、React はブラウザーにエラーを表示するでしょう。
これで Todo コンポーネントは完成しました。App.js で、ファイルの先頭付近に次の行を追加して Todo をインポートします。
import Todo from "./components/Todo";このコンポーネントをインポートすると、App.js の <li> 要素をすべて <Todo /> コンポーネント呼び出しに置き換えることができます。 <ul> は以下のようになるはずです。
<ul
  role="list"
  className="todo-list stack-large stack-exception"
  aria-labelledby="list-heading">
  <Todo />
  <Todo />
  <Todo />
</ul>
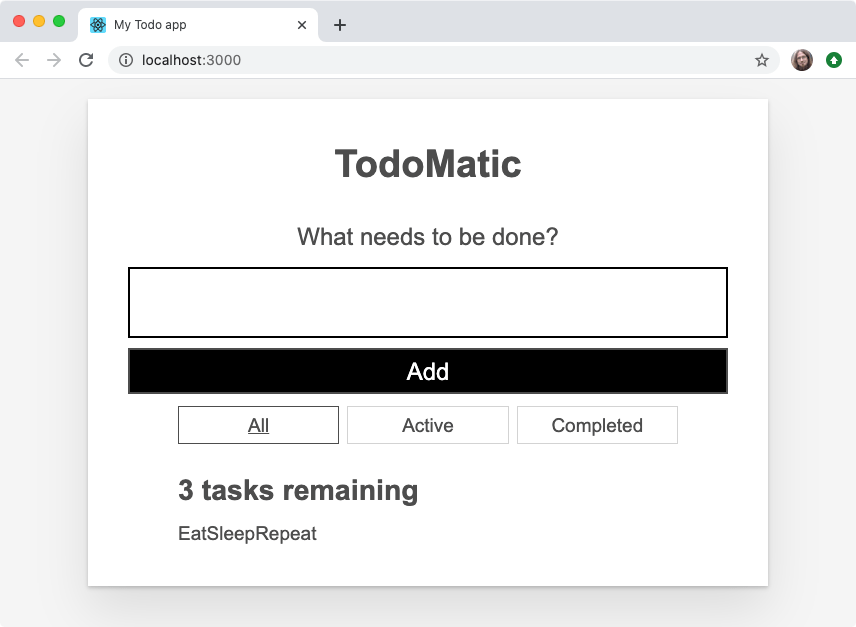
ブラウザーに戻ってみると、何か不幸なことに気づくでしょう。リストが、最初のタスクを 3 回繰り返すようになりました。

私たちがすべきことは、食べることだけではありません。そう、他にもすべきことがあります。— そう、TODO があります。次に、異なるコンポーネント呼び出しで別々のコンテンツをレンダリングする方法を見てみましょう。
一意の <Todo /> を作成
コンポーネントが強力なのは、UI の一部を再利用し、その UI のソースを 1 か所で参照できるからです。問題は、通常、各コンポーネントのすべてを再利用するのではなく、ほとんどの部分を再利用しつつ小さな部分を変更したいということです。そこで props の出番です。
name に何が入るでしょう?
完了させたいタスクの名前を追跡するために、それぞれの <Todo /> コンポーネントが一意の名前を表示するようにしなければなりません。
App.js では、それぞれの <Todo /> に name の prop を与えます。先ほどのタスクの名前を使ってみましょう。
<Todo name="Eat" />
<Todo name="Sleep" />
<Todo name="Repeat" />
ブラウザーを更新すると...以前と全く同じものが表示されます。<Todo /> に props を与えましたが、まだ使っていません。 Todo.js に戻って解決しましょう。
最初に Todo() 関数の定義を変更して、 props を引数として受け取るようにします。 props がコンポーネントによって正しく受信されているかどうかを確認したい場合は、先ほどと同様に console.log() で props を取得することができます。
コンポーネントが props を取得していることを確認したら、 Eat を name の prop で置き換えることができます。覚えておいてください。 JSX の式の途中では、中括弧を使って変数の値を注入します。
これらをまとめると、Todo() 関数は次のようになるはずです。
export default function Todo(props) {
  return (
    <li className="todo stack-small">
      <div className="c-cb">
        <input id="todo-0" type="checkbox" defaultChecked={true} />
        <label className="todo-label" htmlFor="todo-0">
          {props.name}
        </label>
      </div>
      <div className="btn-group">
        <button type="button" className="btn">
          Edit <span className="visually-hidden">{props.name}</span>
        </button>
        <button type="button" className="btn btn__danger">
          Delete <span className="visually-hidden">{props.name}</span>
        </button>
      </div>
    </li>
  );
}
*これで、*ブラウザーには 3 つの一意のタスクが表示されるようになりました。しかし、もう一つの問題が残っています。これらはすべて既定でチェックされています。

それは completed ですか?
元の静的リストでは、Eat だけがチェックされていました。もう一度言いますが、<Todo /> コンポーネントを構成する UI のほとんどを再利用しつつ、一つだけ変更したいのです。これは別の props が良い仕事をしてくれます! App.js での各 <Todo /> の呼び出しには、完了したことを示す新しい props を与えます。最初の (Eat) は true の値を持ち、残りは false にします。
<Todo name="Eat" completed={true} />
<Todo name="Sleep" completed={false} />
<Todo name="Repeat" completed={false} />
先ほどと同様に、これらの props を実際に使用するためには Todo.js に戻る必要があります。<input /> の defaultChecked 属性の値が completed した props と同じになるように変更します。これで、Todo コンポーネントの <input /> 要素は次のようになります。
<input id="todo-0" type="checkbox" defaultChecked={props.completed} />
そして、ブラウザーを更新すると、Eat だけがチェックされていることが表示されるようになるはずです。
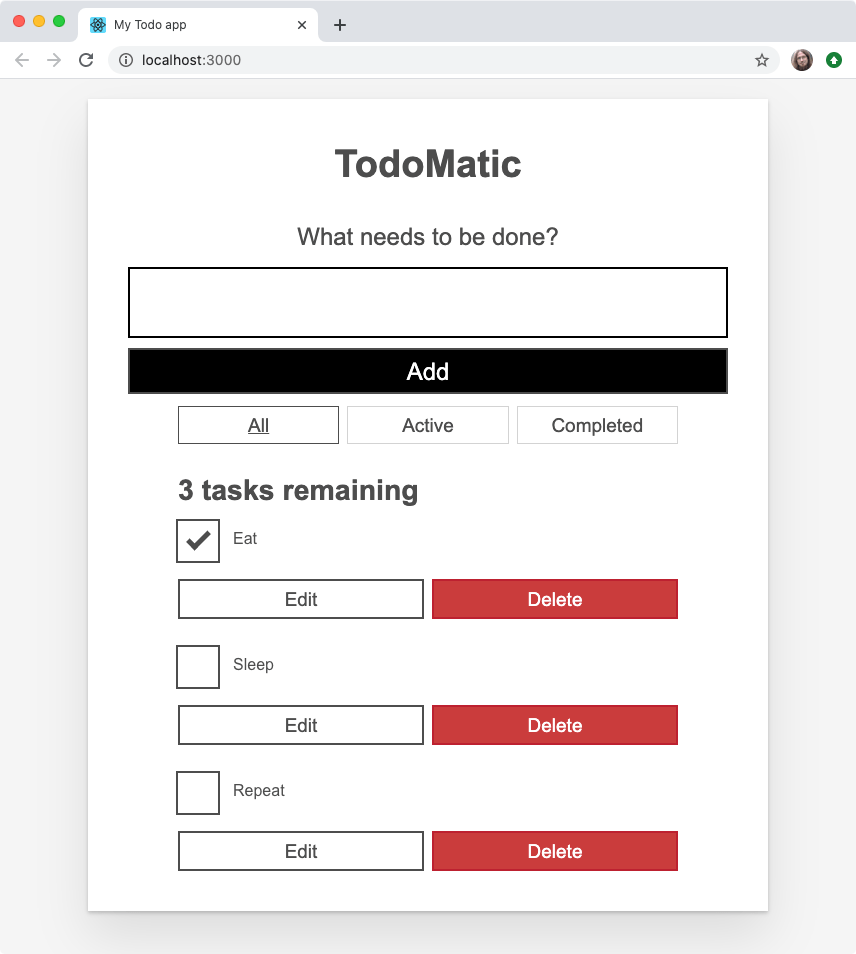
各 <Todo /> コンポーネントの completed prop を変更すると、ブラウザーはそれに応じてレンダリングされた同等のチェックボックスをチェックしたり、チェックを外したりします。
id をください
現在、<Todo /> コンポーネントはすべてのタスクに todo-0 という id 属性を与えています。これは悪い HTML です、なぜなら id 属性 は一意でなければならないからです(CSS や JavaScript などで文書フラグメントの一意な識別子として使用されます)。つまり、各 Todo に対して一意の値を取る id prop をコンポーネントに与えるべきです。
最初と同じパターンに従うために、<Todo /> コンポーネントの各インスタンスに todo-i の形式で ID を与えてみましょう。 i は毎回 1 つずつ大きくなっていきます。
<Todo name="Eat" completed={true} id="todo-0" />
<Todo name="Sleep" completed={false} id="todo-1" />
<Todo name="Repeat" completed={false} id="todo-2" />
ここで Todo.js に戻り、id prop を使うようにします。これは <input /> 要素の id 属性の値とラベルの htmlFor 属性の値を置き換える必要があります。
<div className="c-cb">
  <input id={props.id} type="checkbox" defaultChecked={props.completed} />
  <label className="todo-label" htmlFor={props.id}>
    {props.name}
  </label>
</div>
ここまでは順調ですか?
今のところ React をうまく使っていますが、もっとうまくできるかもしれません。今のコードは反復的です。<Todo /> コンポーネントをレンダリングする 3 つの行はほぼ同じですが、 1 つだけ違う点があります。それぞれの prop の値です。
JavaScript のコアな能力の一つであるイテレーション(反復処理)を使えば、コードをきれいにすることができます。イテレーションを使うためには、まず自分のタスクを再考する必要があります。
データとしてのタスク
それぞれのタスクには現在、 3 つの情報が含まれています: 名前、チェック済みかどうか、そして一意な ID です。このデータはうまくオブジェクトに変換されます。複数のタスクがあるので、このデータを表現するにはオブジェクトの配列が有効です。
src/index.js で、 import の後 ReactDOM.render() より前の行で以下の const を作成してください。
const DATA = [
  { id: "todo-0", name: "Eat", completed: true },
  { id: "todo-1", name: "Sleep", completed: false },
  { id: "todo-2", name: "Repeat", completed: false },
];
次に、 tasks という名前の props として <App /> に DATA を渡します。src/index.js の最終行は以下のようになるはずです。
ReactDOM.render(<App tasks={DATA} />, document.getElementById("root"));
この配列は、 App コンポーネントで props.tasks として利用できるようになりました。よかったら console.log() で確認してください。
メモ: すべて大文字の(ALL_CAPS のような)定数名に JavaScript で特別な意味があるわけではありません。他の開発者に「このデータはここで定義された後は変更されません」と伝えるための慣習です。
反復処理によるレンダリング
オブジェクトの配列をレンダリングするには、それぞれのオブジェクトを <Todo /> コンポーネントに変換しなければなりません。 JavaScript では、データを別のものに変換するための配列メソッド Array.prototype.map() を提供しています。
App() の return 文の上に、taskList という新しい const を作り、map() を使って変換します。まず、 tasks の配列を、各タスクの名前というシンプルなものに変えてみましょう。
const taskList = props.tasks?.map((task) => task.name);
<ul> のすべての子を taskListに置き換えてみましょう。
<ul
  role="list"
  className="todo-list stack-large stack-exception"
  aria-labelledby="list-heading">
  {taskList}
</ul>
これで、すべてのコンポーネントを再表示できるようになりましたが、まだやるべきことがあります。現在、ブラウザーは各タスクの名前を構造化されていないテキストとして表示しています。私たちが HTML の構造を見失っているからです。— <li> とチェックボックス、ボタンのことです。
この問題を解決するには、 map() 関数から <Todo /> コンポーネントを返す必要があります — JSX では、JavaScript とマークアップ構造を混在させることができることを覚えておいてください。今あるものの代わりに、次のものを試してみましょう。
const taskList = props.tasks.map((task) => <Todo />);
アプリをもう一度見てみましょう。タスクは以前のように見えますが、タスク自体の名前がありません。私たちがマッピングした各タスクには、id、name、checked のプロパティがあり、<Todo /> コンポーネントに渡したいことを覚えておいてください。これらの知識をまとめると、次のようなコードになります。
const taskList = props.tasks.map((task) => (
  <Todo id={task.id} name={task.name} completed={task.completed} />
));
今では、アプリは以前のように見え、私たちのコードの繰り返しも少なくなりました。
固有なキー
React は配列からタスクをレンダリングしているので、それらを適切にレンダリングするために、どれがどれなのかを追跡しなければなりません。どれがどれなのかを把握して、適切にレンダリングする必要があります。 React は自分自身で推測で物事を把握しようとしますが、それを助けるために key prop を<Todo /> コンポーネントに渡すことで助けてあげることができます。key は React で管理されている特別な prop です。key という単語を他の目的で使用することはできません。
キーは固有であるべきなので、各タスクオブジェクトの id をキーとして再利用します。taskList は次のように更新します。
const taskList = props.tasks.map((task) => (
  <Todo
    id={task.id}
    name={task.name}
    completed={task.completed}
    key={task.id}
  />
));
反復処理でレンダリングするものには、常に固有なキーを渡す必要があります。 ブラウザー上では何も明らかな変化はありませんが、もし固有なキーを使用していない場合、 React はコンソールに警告し、アプリは奇妙な動作をするかもしれません。
アプリの残り部分をコンポーネント化
最も重要なコンポーネントを整理したので、アプリの残りの部分をコンポーネント化することができます。アプリの残りの部分をコンポーネント化します。ここでコンポーネントは次のいずれかであることを覚えておいてください。コンポーネントが UI の一部か、再利用された UI の一部、またはその両方であることを覚えておいて、さらに 2 つのコンポーネントを作ります。
<Form/><FilterButton/>
両方とも必要ですので、ファイルをターミナルコマンドで一括して行いましょう。ターミナルで次のコマンドを実行してください。アプリのルートディレクトリーにいることに注意してください。
touch src/components/Form.js src/components/FilterButton.js
<Form />
components/Form.js を開いて、以下のようにしてください。
- Todo.js で行ったように、ファイルの先頭で React をインポートします。
- 新しい
Form()コンポーネントをTodo()と同じ基本構造で作成し、そのコンポーネントをエクスポートします。 <form>タグとその間のものをApp.jsの中からコピーして、Form()のreturn文の中に貼り付けます。Formをファイルの最後でエクスポートします。
Form.js ファイルは次のようになります。
import React from "react";

function Form(props) {
  return (
    <form>
      <h2 className="label-wrapper">
        <label htmlFor="new-todo-input" className="label__lg">
          What needs to be done?
        </label>
      </h2>
      <input
        type="text"
        id="new-todo-input"
        className="input input__lg"
        name="text"
        autoComplete="off"
      />
      <button type="submit" className="btn btn__primary btn__lg">
        Add
      </button>
    </form>
  );
}

export default Form;
<FilterButton />
FilterButton.js を Form.js のようにします。でもコンポーネントの FilterButton() を呼び出し、 <div> 要素内の最初のボタンの HTML をコピーして App.js の filters の class を return 文に入れます。
ファイルの内容は以下のようになります。
import React from "react";

function FilterButton(props) {
  return (
    <button type="button" className="btn toggle-btn" aria-pressed="true">
      <span className="visually-hidden">Show </span>
      <span>all </span>
      <span className="visually-hidden"> tasks</span>
    </button>
  );
}

export default FilterButton;
メモ: ここでは、最初に <Todo /> コンポーネントで行ったのと同じ間違いをしていることに気づくかもしれません。つまり、それぞれのボタンは同じものになるということです。これでいいのです。このコンポーネントの修正は、後ほどで行います。(フィルターボタンへ戻る (en-US))
すべてのコンポーネントのインポート
新しいコンポーネントを使ってみましょう。
さらにいくつかの import 文を App.js の上に追加して、インポートします。
次に、App() の return 文を更新して、私たちのコンポーネントをレンダリングするようにします。コンポーネントのレンダリングを行うと、App.js は次のようになります。
import React from "react";
import Form from "./components/Form";
import FilterButton from "./components/FilterButton";
import Todo from "./components/Todo";

function App(props) {
  const taskList = props.tasks.map((task) => (
    <Todo
      id={task.id}
      name={task.name}
      completed={task.completed}
      key={task.id}
    />
  ));
  return (
    <div className="todoapp stack-large">
      <h1>TodoMatic</h1>
      <Form />
      <div className="filters btn-group stack-exception">
        <FilterButton />
        <FilterButton />
        <FilterButton />
      </div>
      <h2 id="list-heading">3 tasks remaining</h2>
      <ul
        role="list"
        className="todo-list stack-large stack-exception"
        aria-labelledby="list-heading">
        {taskList}
      </ul>
    </div>
  );
}

export default App;
これで、React アプリでインタラクティブな処理を行う準備がほぼ整いました。
まとめ
この記事では、アプリをコンポーネントにうまく分割し、それらを効率的にレンダリングする方法について、詳しく説明しました。さて、次は React でイベントを処理する方法を見て、いくつかのインタラクティブ機能を追加していきます。